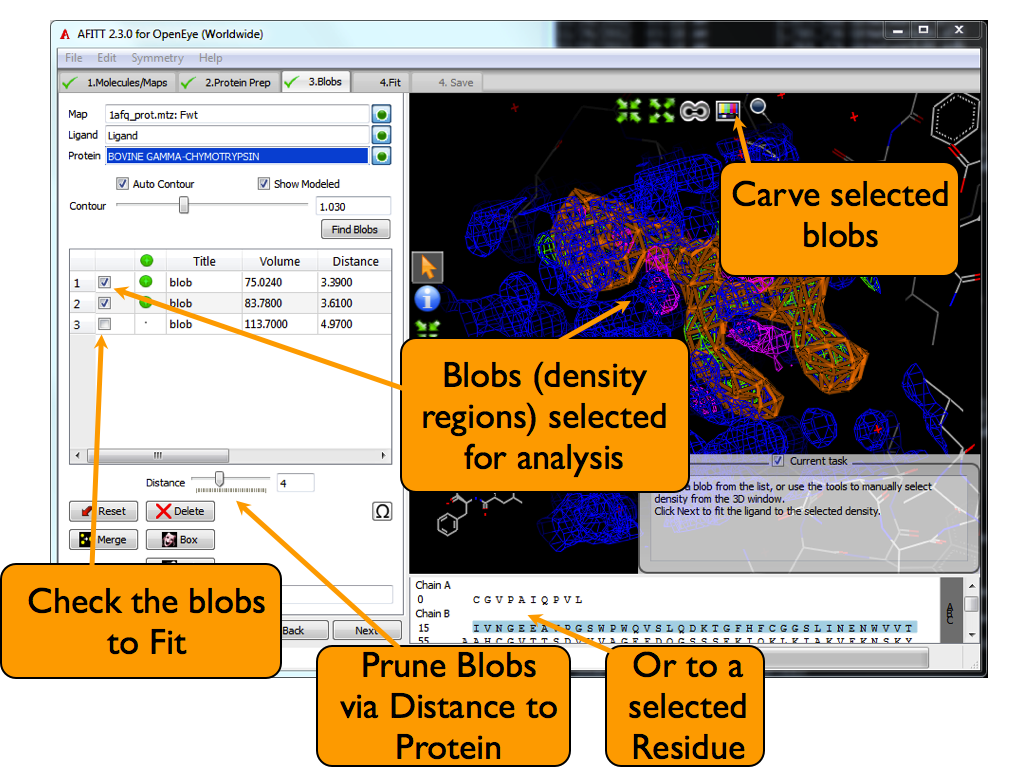
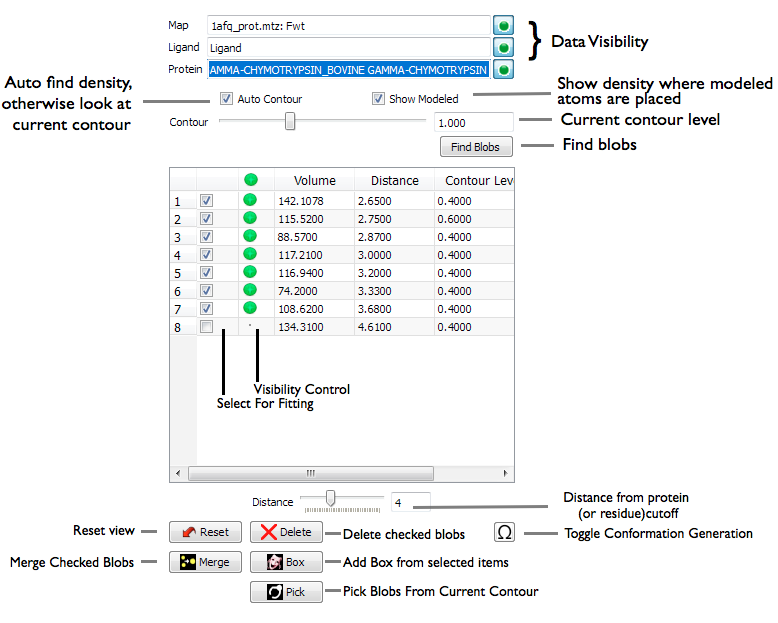
Find Density: Blobs Page
After loading the desired molecules and maps, the next step is locate where the ligand should be placed in density. When this page is first shown, an automatic ligand detection is initially run.
AFITT searches existing density from high to low sigma levels or contours, searching for connected regions of density that are approximately the same volume as the target ligand. After these regions are found, they are pruned to remove density farther than 4 Angstroms from the protein. This default pruning can be changed using the distance slider seen in figure Ligand Density Locating.
Normally several blobs are found by the automatic algorithm. At this point, pressing Next will fit the ligand to all of the selected density regions.
Ligand Density Locating
Selecting Analyzed Density
Density is grouped into regions of space called blobs. Blobs contain the regions of density that the ligand is fit against.
To select or unselect density, click on the blob’s checkbox in the list window. Each blob is annotated with (1) its volume, (2) its closest distance to a protein atom and (3) the contour at which it was detected in the map.
Pruning Blobs Using Distance to Protein
To prune blobs that are far away from the protein, adjust the density slider as seen in figure figure Blob Page. Adjusting this slider will uncheck all blobs whose closest grid point is farther from any protein atom than the specified distance.
Density can also be selected from the 3D window by double clicking on the blob (highlighted in yellow).
Note
Clicking or double clicking on the 3D window will clear the current selection of blobs. To add another blob to the current selection, hold down the shift key. Please see figure Mouse Mode.
Additionally, selecting a residue in the sequence view will allow filtering of blobs using the distance to the residue. If a blob intersects the distance radius (visualized by a transparent bubble) the blob is accepted, otherwise it is rejected.
Note
Clicking on a residue in the sequence view will temporarily turn off symmetry to aid selection. To unselect a residue click in empty space in the 3D window.
Advanced Modes of Operation
AFITT supplies some advanced modes of operation in the cases where no density or poor density is found.
These operations are shown in figure Advanced Operations.
Advanced Blob Finding
Locating Density at a Given Contour
To select blobs at a given contour level, adjust the contour level with the contour slider, deselect the Auto Find option and click Find. This runs the detection algorithm at the given contour.
Merging Density
Sometimes two disconnected pieces of density need to be combined into a single volume. To accomplish this, select the blobs to merge and click on the Merge Checked Blobs button as shown in figure Advanced Operations.
Picking Density
AFITT looks for regions of connected density, and it can sometimes miss small density regions that should actually be connected. Ordinarily, the selection algorithm won’t detect these regions because they are too small with respect to the volume of the ligand.
To pick density from the 3D Screen, click on the Pick Blobs From Current Contour button as seen in figure Advanced Operations. This puts AFITT into blob picking mode. AFITT masks the map used for fitting with the current protein and then makes the map pickable. Hovering the mouse over a piece of density will highlight the density and display the volume. At anytime, the contour may be adjusted to increase or decrease the volume of the density that will be picked. Clicking on the density will extract it to use for fitting. This process is seen in figure Picking blobs from density.
To turn off blob picking mode, click on the Pick Blobs button again or navigate to the previous or next page.
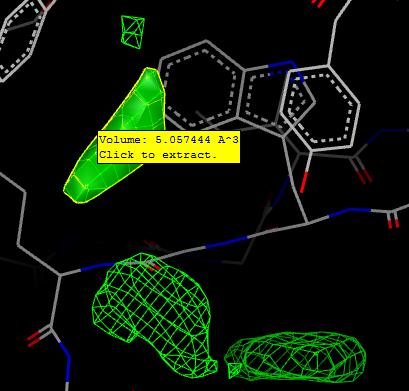
Picking blobs from density
Carving Density
Density blobs that are too large or have poorly connected regions may enclose density regions that may not be part of the ligand’s density. AFITT supplies a mechanism to remove these regions by carving away the bounding regions for unwanted density.
To accomplish this, open up the Carve Selection window using the magnifying glass icon as seen in figure Blob Page then click on the middle of the portion surface to be carved away.
Adjusting the slider in the Carve Selection window adjusts the removal volume around the selected region of the blob. To remove this portion (or remove the unselected portion) select the Carve Selected Blobs icon from the 3D view. This process is shown in figure Carve Blob.

Carving Density
Making a box that holds density
For extremely bad density, AFITT supplies a tool that allows a bounding surface to be made out of a box. To create a box, first select a whole molecule, individual atoms or previously located density blobs that bound the desired density. ( To select multiple objects, see ‘add to selection’ in figure AFITT Mouse Mode ). Second, click on the Add box from selected Items button seen in figure Advanced Operations.
When the add box button is toggled, a box surface and the box tool will appear. To adjust the surface, simply click on the appropriate move or resize buttons. The box tool is aligned with the 3D scene so clicking on the up arrow will move the side of the box that is currently pointing up and so on. This tool can be seen in figure figure Box Tool.
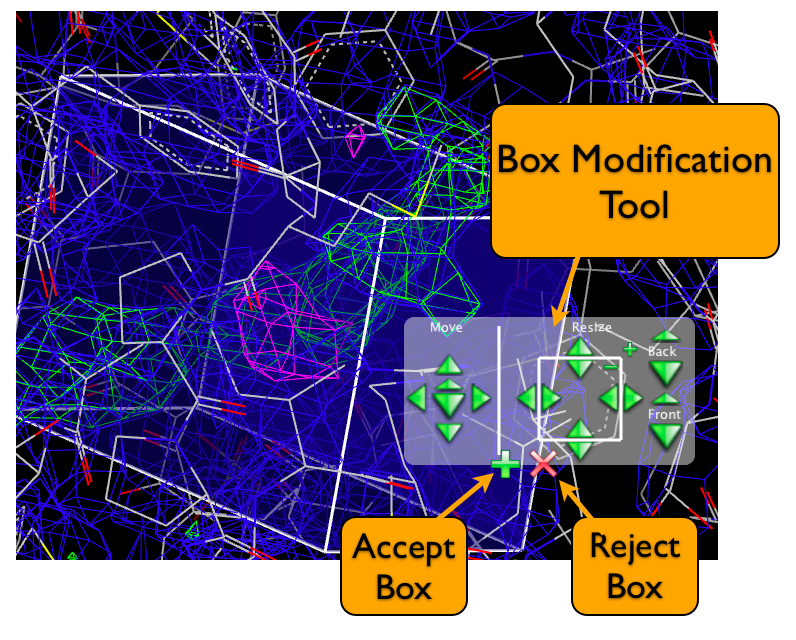
Using the box tool to box density
To add the surface to the list of density boundaries, click on the Accept Box or + button in the box tool. To reject the surface, either toggle the Add Box button or click on the Reject Box or X button in the box tool. The surface will also be rejected and disappear when the Next button is clicked.