Molecule Manipulation
Input ligands can be edited when they are loaded into AFITT. For instance, this allows alteration of stereo-chemistry, functional groups and atom types.
Fitted molecules can be manipulated and edited to better fit density or to change undesirable conformational properties and angles.
Editing 2D Molecules
A ligand can be edited in AFITT by clicking on the edit button in the 3D window when in the Molecules/Maps page as shown in Figure: Molecules Page. Clicking this button will launch AFITT’s molecule input dialog.
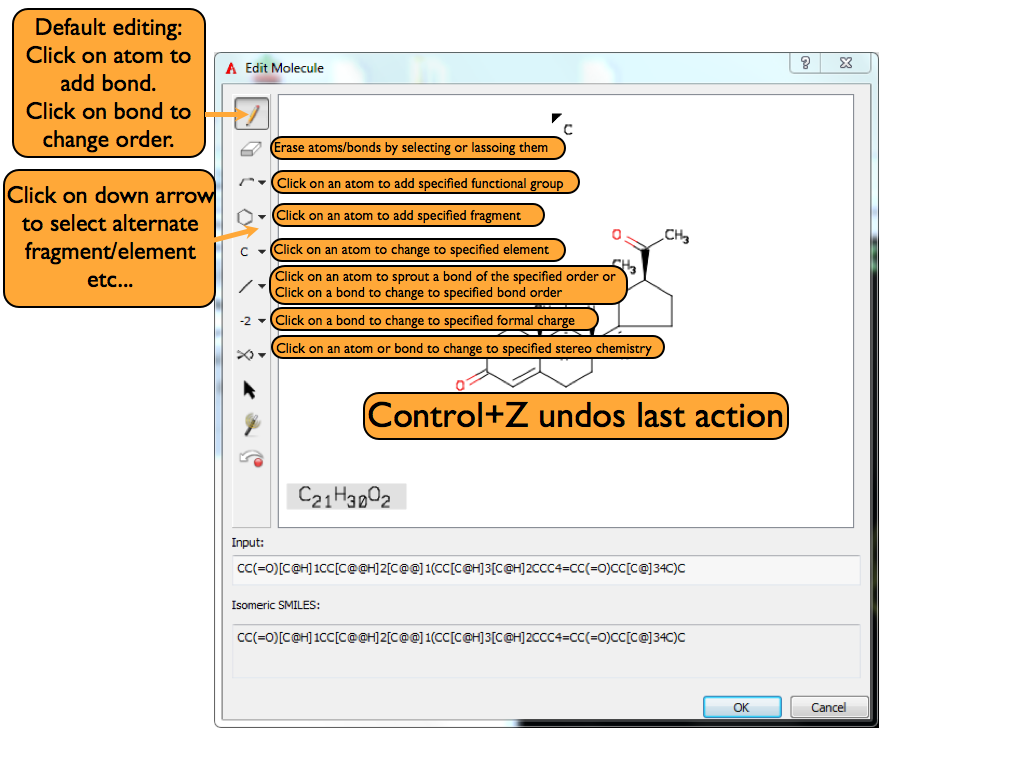
Molecule Input
The molecule input dialog contains a basic 2D sketching environment at the top and a 1D text entry mechanism below that. The 1D input mechanism provides a very fast way to specify a new molecule or get started with new molecule creation. The 1D input mechanism supports SMILES, IUPAC and common names, as well as FASTA sequences for small peptides (sequence must be prefixed by a leading angle bracket (‘>’) character). Disconnected fragments can be specified on the 1D input line by entering a vertical bar (‘|’) character between the entries; however, only one molecule (the first one) will ultimately be loaded into AFITT. Once a valid molecule has been specified in the 1D area, that molecule will be depicted in the 2D sketching area.
The 2D sketching environment contains a toolbar on the left which controls the mouse functions in the actual 2D depiction area on the right. The first button with the arrow icon puts the mouse into Selection mode. Selection mode allows the user to click on and select single or multiple atoms and/or bonds. Once a collection of atoms and/or bonds has been selected, right-clicking in the 2D depiction area will generate a context sensitive popup menu with a variety of potential operations that can be performed on the selected set.
The second button with eraser icon puts the mouse into Deletion mode which will delete any atom or bond that is clicked on while in this mode.
The third button with the initial “C” icon puts the mouse into Element mode. When in Element mode, clicking on any atom will change that atom into the element that is currently displayed in the button’s icon. The button contains a drop down menu which allows for specification of additional elements besides the default carbon.
The fourth button with the initial “-” icon puts the mouse into Bond mode. When in Bond mode, clicking on any bond will change that bond’s order to the order that is currently displayed in the button’s icon. Clicking on an atom will cause a new bond to be sprouted off of the clicked atom to a newly created carbon atom. The new bond will have the same order as is reflected in the button’s icon.
The fifth button with the initial “-2” icon puts the mouse into Charge mode. When in Charge mode, clicking on any atom will change the formal charge of that atom to be the one that is currently displayed in the button’s icon.
The sixth button with the initial “R” icon puts the mouse into Stereo mode. When in Stereo mode, clicking on any atom or bond will change that atom or bond’s stereochemistry to reflect the specified stereochemistry in the button’s icon. If the “Invert” option is selected on the button, clicking on any atom or bond will invert the stereochemistry of that atom or bond.
The next seven buttons with icons containing a variety of ring systems put the mouse into Attach/Fuse mode. When in this mode, clicking on any atom will automatically attach the specified ring system to the clicked atom. Clicking on any bond will automatically fuse the specified ring system to the clicked bond.
The second to last button will also put the mouse into Attach/Fuse mode but it enables the user to select a variety of predefined fragments or specify a new fragment.
The last button will cause the current 2D depiction to be cleaned up and redrawn.
Once as a molecule has been specified, clicking on the “OK” button will cause that molecule to be created and added to the Ligand list.
Editing 3D Molecules
Molecules can only be changed in AFITT when (1) fitting has been complete and (2) when in Editing mode. Only a single molecule can be in Editing mode at a time. To put a molecule into Editing mode, click on the button in the main toolbar with the icon of a molecule overlaid with a pencil as shown in figure Figure Fitting Page
On entering Editing mode, an additional button will appear in the toolbar with the icon of a molecule overlaid with an X. Clicking on this button will cancel out all of the changes made to the molecule and will restore the molecule back to its original state. In addition, a large collection of buttons will appear in the mouse control toolbar on the left hand side of the 3D window as well as a few on the toolbar on the right hand side of the 3D window. The function of the mouse control buttons parallel those in the 2D sketching component of the molecule input dialog discussed in Figure Molecule Editing.

Molecule Editing
When a molecule enters Editing mode, AFITT adds explicit hydrogens to the molecule to properly fill out the valences. In addition, labels are added to both atoms and bonds to indicate stereochemistry and formal charge.
When in editing mode, atoms and bonds are highlighted when the mouse is placed over them. Clicking on an atom or bond will show a set of basic operations that can be used to alter the atom or bonds properties. These operations are seen in Figure Basic Atom and BondOperations.

Basic Atom and Bond Operations
For more advanced operations, please see Advanced Operations.
Advanced Molecule Operations
A molecule can be edited by either setting the mouse mode using the buttons on the left of the 3D window. The general method for edit a molecule using these button is to select the button with the operation to perform and then click on the atom or bond to change. To exit the advanced operations, click on the select button (the one that looks like a lightning bolt).
The list of operations is shown in Figure Builder mouse modes.
Advanced Building operations
When using an advanced operation, the basic atom and bond overlays will not be shown.
| Icon | Description |
|---|---|
| Select: This is the default selection mode. With the icon highlighted click on the atoms or bonds to be selected or Shift-click or Ctrl-click to incrementally select multiple atoms and/or bonds. The selected atoms and bonds will be highlighted in orange. Double click to select whole functional groups or molecules. Select a group of atoms and bonds within a rectangle using right-click and drag. | |
| Information: Clicking on an atom or bond provides information such as atom type, 3D Cartesian coordinates, bond type and bond length. | |
| Center: Select the center tool and then click on an atom to center the view on that atom | |
| Monitors: Place monitors for distance (2 atoms), angle (3 atoms) or torsion (4 atoms). Click sequentially on the atoms to be included in the monitor. Before the last atom is clicked hovering over an atom will display a temporary monitor. Clicking on the atom makes the monitor persist. | |
| Add Labels: With the tool selected click on an atom or bond to add label text. | |
| Delete: Delete atoms and/or bonds by selecting the eraser tool and clicking on the atom or bond to be deleted. To delete groups of atoms or bonds first select them with the Selection tool and then either use the Delete option in the right-click menu or use the Delete keyboard key. | |
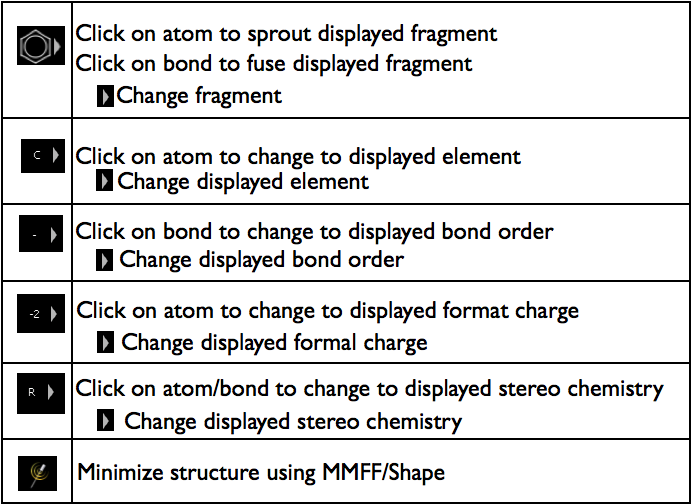
Rings: Click on the small arrow to open a dropdown menu and select from some commonly used rings, such as benzene, cyclopropane and cyclohexane. The selected ring can be added to the growing molecule multiple times. There is also an option to define a Custom functional group. This opens the 2D sketcher into which the functional group can be sketched or a SMILES string can be input. This icon shows an image of the currently active ring template. The default is benzene. |
|
Element: Click on the small arrow to open a dropdown menu and select from some commonly used elements. Clicking on an atom in the main 3D window will cause that atom to be changed to the selected atom type. In addition to the commonly used atoms there is an “X” dummy atom type. Clicking the ”...” option in the list opens a full periodic table of the elements from which a wider range of elements can be selected. This icon shows an image of the currently active atom type. The default is “C”. |
|
Bond order: Click on the small arrow to open a dropdown menu and select from single, double and triple bonds. Clicking on a bond in the main 3D Builder window will convert that bond to the active bond type. This icon displays an image of the currently active bond type. The default is the single bond (-) |
|
Charge: Click on the small arrow to open a dropdown and select the formal charge for an atom. Options available are -2, -1, 0, +1, +2. Other formal charges not in this range can be set with the ”...” option. With the charge icon active (highlighted white) clicking on any atom in the main sketcher window will modify the atom to have the currently selected charge. This icon displays an image of the currently active charge. The default is “-2”. |
|
Stereochemistry: Click on the small arrow to open a dropdown and select atom and bond CIP stereochemistry options. Available options are R and S for chiral atoms and E or Z for chiral bonds. There is also an option to invert the current stereochemistry. This icon displays an image of the currently active option. The default is “Invert”. |
When a molecule enters Editing mode, AFITT adds explicit hydrogens to the molecule to properly fill out the valences. In addition, labels are added to both atoms and bonds to indicate stereochemistry and formal charge.
A molecule can be edited by either setting the mouse mode using the buttons on the right or by clicking on one or more atoms/bonds and then selecting the desired operation from the context sensitive right-click menu. The menu provides the following choices. Some options are available only when atoms are selected and others only when bonds are selected.
| Center | Centers the highlighted atom(s) in the display. |
| Set Element | Atoms only. Select the desired atom type from a Periodic Table. This atom type will be applied to all the selected atoms. |
| Set Formal Charge | Atoms only. Select the formal charge for all the selected atoms. |
| Set Torsion | Specify a torsion angle for a 4-atom set. |
| Set Bond Order | Bonds only. Specify the desired bond order. Applies to all the highlighted bonds. |
| Set Bond Length | Bonds only. Specify the desired bond length. The new length is applied to all the highlighted bonds. |
| Modify Torsion | Bonds or 4-atom sets only. Use the keyboard up and down arrow keys or the mouse scroll wheel to increase and decrease the bond torsion. |
| Modify Angle | 3-atom sets only. Use the keyboard up and down arrow keys to increase and decrease the bond angle. |
| Sprout Methyl | Atoms only. If the selected atom has an open valence (i.e. bond to H) this option will replace the H-atom with a methyl group. |
| Create Bond | Atoms only. Make a new bond between two selected atoms with open valences. |
| Attach | Atoms only. Opens the 2D sketcher to input the fragment to be attached to the highlighted atom. |
| Fuse | Opens the 2D sketcher to input the fragment to be fused to the highlighted atom or bond. |
| Measure Length | Bonds only. Displays a monitor with the bond length. |
| Measure Torsion | Bonds only. Displays a monitor for the torsion around the bond(s). |
| Measure Angle | Atoms only. Displays a monitor with the bond length. |
| Minimize | Atoms only. Minimize the highlighted portion of the molecule using the MMFF94 or MMFF94s force field. |
| Delete | Delete the highlighted atoms or bonds. Open valences will be filled with H-atoms. |
| Cancel Editing | Exit the 3D builder without keeping any of the changes. |
| Finish Editing | Exit the 3D builder and accept the edits. |
| Create | A sub-menu provides options for creating molecular or accessible surfaces or electrostatic grids. |
| Bookmarks | A sub-menu provides options to add or organize bookmarks and define animation preferences. |
| Delete Visible Monitors | Deletes all visible monitors (angle, length, torsion) from the 3D display. |
Independent Rotation/Translation of Molecules
It is possible to rotate and translate a molecule in Editing mode independently from all other molecules in AFITT, by holding down the Ctrl key (Command key on the Macintosh) during rotation or translation actions. Any selected atoms will define the center of rotation. If no atoms are selected, the centroid of the molecule is used for the center of rotation.
Minimization
An entire molecule or just a subset of a molecule can be minimized using the MMFF94/Shape forcefield.
To minimize a molecule, the molecule of interest must be in Editing mode. Once Editing mode has been enabled for a molecule, a button with a magic wand icon will appear on the right hand side of the 3D display. Clicking on this button will cause the entire molecule or just the selected subset of the molecule to be minimized. Like all other procedures in AFITT, the minimization process can be undone.
Monitors
Angle, distance, and torsion monitors can be added to individual molecules to display as well as modify the associated properties. Monitors can be created using the monitor mouse mode (available from the toolbar on the left side of the 3D display). Torsion monitors can also be created by first selecting a single bond, three adjacent bonds, or four adjacent atoms and then choosing the Modify Torsion option in the right-click menu.
The value associated with a given monitor can be changed by selecting the monitor of interest and then scrolling the mouse wheel. By default, the smaller side of the molecule will be the one modified by these changes; however, if the Ctrl key is held down while using the mouse wheel, the larger side will be modified instead.
When adjusting torsions, the default step size is 10 degrees; however, a finer resolution of 1 degree can be achieved by simultaneously holding down the Shift key while using the mouse wheel.
Monitors
Angle, distance, and torsion monitors can be added to individual molecules to display as well as modify the associated properties. Monitors can be created using the monitor mouse mode (available from the toolbar on the left side of the 3D display). Torsion monitors can also be created by first selecting a single bond, three adjacent bonds, or four adjacent atoms and then choosing the Modify Torsion option in the right-click menu.
The value associated with a distance or angle monitor can be changed by selecting the monitor of interest and then scrolling the mouse wheel. By default, the smaller side of the molecule will be the one modified by these changes; however, if the Ctrl key is held down while using the mouse wheel, the larger side will be modified instead.
In the builder, torsion monitors are added in pairs, with one monitor at each end of the selected bond. The monitor you select will determine which end of the bond will rotate. (By default the monitor on the smaller side of the molecule is selected.)
To rotate torsions within a ring, create a torsion monitor on a ring bond, then select one other bond in the ring as a “closure bond”. The closure bond will stretch and deform as you adjust the torsion. When finished with the adjustment, you will probably want to minimize the ring structure using the Minimize Tool (see Figure: Minimize). Either MMFF94 or PM3 forcefields may be used to minimize the ligand into the surrounding density. Note that PM3 minimization takes significantly longer than MMFF94.
Ligand Minimization. Minimize ligand to density using MMFF94 or PM3 forcefields
The figure below illustrates adjusting a ring torsion to convert a cyclohexyl group from chair to boat conformation. The active torsion monitor and closure bond are shown selected.
Ring Pucker Conversion. Interconversion of a ring from chair to boat conformation can be performed by rotating a single ring torsion.
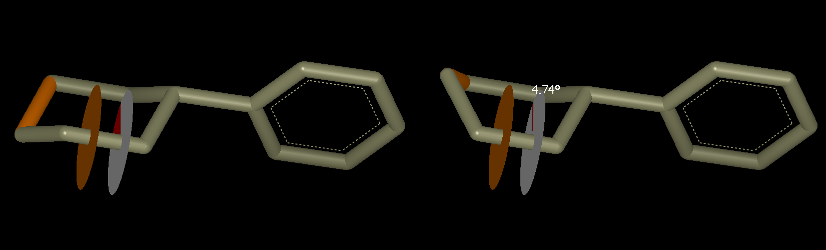
Torsion monitors can also be used to convert between equatorial and axial substitutions of a ring, as shown in the following figure. In this example, a single torsion is rotated in two steps, using two different closure bonds.

Equatorial to Axial Conversion. An equatorial substitution on a cyclohexyl ring is converted to an axial substitution by adjusting a ring torsion. In step 3 a new closure bond is selected, and the torsion rotated farther, until a chair conformation is obtained.
When adjusting torsions, the default step size is 10 degrees; however, a finer resolution of 1 degree can be achieved by simultaneously holding down the Shift key while using the mouse wheel.