Multi Page Images
Multi-page images can be generated by the usage of the
OEMultiPageImageFile class.
After generating a multi-page object by specifying the orientation and
the size of its pages, the individual pages can be accessed by calling
the OEMultiPageImageFile::NewPage method.
The returned OEImage then can be used to depict
molecule(s) as demonstrated in the previous chapters.
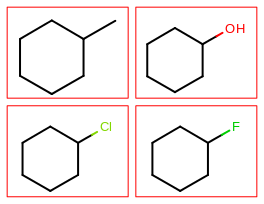
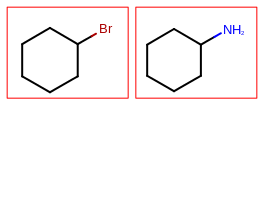
The image created by Listing 1 is shown in
Figure: Example multi-page depiction.
Listing 1: Example of multi-page depiction
  const vector<string> smiles = { "C1CC(C)CCC1", "C1CC(O)CCC1", "C1CC(Cl)CCC1",
                                  "C1CC(F)CCC1", "C1CC(Br)CCC1", "C1CC(N)CCC1" };

  OEMultiPageImageFile multi(OEPageOrientation::Landscape, OEPageSize::US_Letter);

  OE2DMolDisplayOptions opts;

  const auto rows = 2u;
  const auto cols = 2u;

  std::unique_ptr<OEImageGrid> grid(nullptr);
  OEIter<OEImageBase> cell;

  for (const auto& smi : smiles)
  {
    if (!cell)
    { // go to next page
      OEImage& image = multi.NewPage();
      grid.reset(new OEImageGrid(image, rows, cols));
      grid->SetCellGap(20);
      grid->SetMargins(20);
      cell = grid->GetCells();
    }

    OEGraphMol mol;
    OESmilesToMol(mol, smi);
    OEPrepareDepiction(mol);

    opts.SetDimensions(cell->GetWidth(), cell->GetHeight(), OEScale::AutoScale);
    OE2DMolDisplay disp(mol, opts);
    OERenderMolecule(cell, disp);
    OEDrawBorder(cell, OERedPen);

    ++cell;
  }

  OEWriteMultiPageImage("MultiPage.pdf", multi);
page 1 |
page 2 |
|---|---|

|

|
The Listing 1 example creates a PDF multi-page image
file, the multi-page image types supported by OEDepict TK can be accessed by
calling the OEGetSupportedMultiPageImageFileExtensions
function.
It returns an iterator over the file extensions that can be used when
writing a multi-page image file by the
OEWriteMultiPageImage function.
Multi Page Reports
The Listing 1 example illustrates how depict a set of
molecules in a multi-page PDF using the OEImageGrid
and OEMultiPageImageFile classes.
OEDepict TK also provides the OEReport class to do
this task in a more convenient way.
The OEReport class is a multi-page layout manager that
handles the page generation and the positioning of information
(such as text and molecule depiction).
In the Listing 2 example, first a
OEReportOptions object is created that stores
all properties that determine the layout of a documentation.
After generating the OEReport object a
molecule can be positioned on a cell that is returned by
the OEReport::NewCell method.
The OEReport::NewCell method creates cells
from left to right and top to bottom order on each page.
If no more cells are left on the page, then a new page is created
before returning the first cell of this new page.
After the document is generated, i.e all molecule are depicted,
the OEWriteReport function writes the multi-page
documentation into into a file with the given name.
The image created by the Listing 2 example is the
same as depicted in Figure: Example multi-page depiction.
Listing 2: Example of multi-page depiction using OEReportOptions
  const vector<string> smiles = { "C1CC(C)CCC1", "C1CC(O)CCC1", "C1CC(Cl)CCC1",
                                  "C1CC(F)CCC1", "C1CC(Br)CCC1", "C1CC(N)CCC1" };

  const auto rows = 2u;
  const auto cols = 2u;
  OEReportOptions reportopts(rows, cols);
  reportopts.SetPageOrientation(OEPageOrientation::Landscape);
  reportopts.SetCellGap(20);
  reportopts.SetPageMargins(20);
  OEReport report(reportopts);

  OE2DMolDisplayOptions opts(report.GetCellWidth(), report.GetCellHeight(), OEScale::AutoScale);

  for (const auto& smi : smiles)
  {
    OEGraphMol mol;
    OESmilesToMol(mol, smi);
    OEPrepareDepiction(mol);

    OEImageBase* cell = report.NewCell();
    OE2DMolDisplay disp(mol, opts);
    OERenderMolecule(*cell, disp);
    OEDrawBorder(*cell, OERedPen);
  }

  OEWriteReport("MultiPageReport.pdf", report);
See also
OEReportOptions class
OEReport class