Highlighting
Atoms and bonds of a molecule can be highlighted by using the
OEAddHighlighting functions.
OEDepict TK provides four built-in highlighting styles:
- color
This style is associated with the
OEHighlightStyle::Colorconstant. See Figure: Example of highlighting using the ‘color’ style.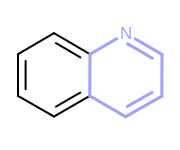
Example of highlighting using the ‘color’ style
- stick
This style is associated with the
OEHighlightStyle::Stickconstant. See Figure: Example of highlighting using the ‘stick’ style.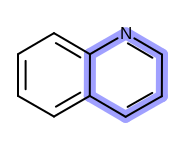
Example of highlighting using the ‘stick’ style
- ball and stick
This style is associated with the
OEHighlightStyle::BallAndStickconstant. See Figure: Example of highlighting using the ‘ball and stick’ style.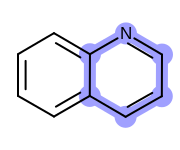
Example of highlighting using the ‘ball and stick’ style
- cogwheel
This style is associated with the
OEHighlightStyle::Cogwheelconstant. See Figure: Example of highlighting using the ‘cogwheel’ style.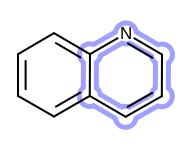
Example of highlighting using the ‘cogwheel’ style
- lasso
This style is associated with the
OEHighlightStyle::Lassoconstant. See Figure: Example of highlighting using the ‘lasso’ style.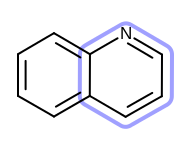
Example of highlighting using the ‘lasso’ style
Using Highlighting Styles
The following example (Listing 1) shows how
to use the built-in highlighting styles.
The OEAddHighlighting function takes an
OEMatchBase object and highlights each of its target
atoms and bonds using the given style.
In this case, the two pyridine rings in the target structure are
highlighted by red color using the stick style.
The image created by Listing 1 is shown in
Figure: Example of using ‘stick’ highlighting style.
Listing 1: Example of using highlighting style
int main()
{
  OEGraphMol mol;
  OESmilesToMol(mol, "c1cncc2c1cc3c(cncc3)c2");
  OEPrepareDepiction(mol);

  OESubSearch ss("c1ncccc1");

  OE2DMolDisplay disp(mol);

  const bool unique = true;
  for (OEIter<const OEMatchBase> mi = ss.Match(mol, unique); mi; ++mi)
    OEAddHighlighting(disp, OERed, OEHighlightStyle::Stick, *mi);

  OERenderMolecule("HighlightSimple.png", disp);
  return 0;
}

Example of using ‘stick’ highlighting style
See also
OEHighlightStylenamespaceOEAddHighlightingfunction
Using Highlighting Classes
OEDepict TK also provides the highlighting classes that correspond to the highlighting styles. Each highlighting style can be customized by using the corresponding class:
The next example (Listing 2) shows how
the stick style can be customized by using the corresponding
OEHighlightByStick class.
The image created by Listing 2 is shown in
Figure: Example of customizing the ‘stick’ highlighting style.
Listing 2: Example of using highlighting class
int main()
{
  OEGraphMol mol;
  OESmilesToMol(mol, "c1cncc2c1cc3c(cncc3)c2");
  OEPrepareDepiction(mol);

  OESubSearch ss("c1ncccc1");

  OE2DMolDisplayOptions opts(240.0, 100.0, OEScale::AutoScale);
  opts.SetMargins(10.0);
  OE2DMolDisplay disp(mol, opts);

  const double stickWidthScale = 6.0;
  const bool monochrome = true;
  OEHighlightByStick highlight(OERed, stickWidthScale, !monochrome);

  bool unique = true;
  for (OEIter<const OEMatchBase> mi = ss.Match(mol, unique); mi; ++mi)
    OEAddHighlighting(disp, highlight, *mi);

  OERenderMolecule("HighlightStyle.png", disp);
  return 0;
}
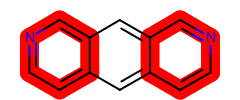
Example of customizing the ‘stick’ highlighting style
See also
OEAddHighlightingfunction
Highlighting Overlapped Patterns
If more than one part of a molecule is highlighted, these highlights can overlap resulting in loss of information. For example, highlighting the matches of the c1cc[c,n]cc1 SMARTS pattern will produce the following image.
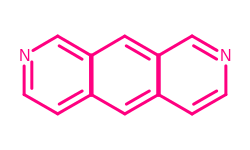
Example of highlighting multiple matches in the same image
There are two ways how this can be avoided and correctly
highlight overlapping parts of a molecule.
The first example demonstrates how to depict multiple matches in
different image cells one by one.
The image created by Listing 3 is shown in
Figure: Example of highlighting multiple matches one by one.
Listing 3: Example of highlighting multiple matches one by one
int main()
{
  OEGraphMol mol;
  OESmilesToMol(mol, "c1cncc2c1cc3c(cncc3)c2");
  OEPrepareDepiction(mol);

  OESubSearch subs("c1cc[c,n]cc1");

  const auto width  = 350u;
  const auto height = 250u;
  OEImage image(width, height);

  const auto rows = 2u;
  const auto cols = 2u;
  OEImageGrid grid(image, rows, cols);
  OE2DMolDisplayOptions opts(grid.GetCellWidth(), grid.GetCellHeight(), OEScale::AutoScale);

  const bool unique = true;
  OEIter<const OEMatchBase> mi = subs.Match(mol, unique);
  OEIter<OEImageBase> ci = grid.GetCells();
  for ( ; (bool)ci && (bool)mi; ++ci, ++mi)
  {
    OE2DMolDisplay disp(mol, opts);
    OEAddHighlighting(disp, OEPink, OEHighlightStyle::Color, *mi);
    OERenderMolecule(*ci, disp);
  }
  OEWriteImage("HighlightMulti.png", image);
  return 0;
}
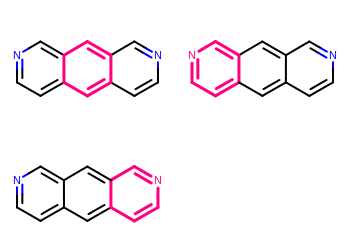
Example of highlighting multiple matches one by one
See also
OEImageGrid class
Depicting Molecules in a Grid section
The second example (Listing 4) illustrates how
to highlight overlapping matches at once using the
OEHighlightOverlayByBallAndStick class.
In this example, the OEAddHighlightOverlay function takes
all matches being highlighted and colors the overlapped atoms and bonds
using the colors by turn.
The colors used for highlighting are determined when the
OEHighlightOverlayByBallAndStick object is constructed.
The image created by Listing 4 is shown in
Figure: Example of highlighting overlapping matches at once.
Listing 4: Example of highlighting multiple matches simultaneously
int main()
{
  OEGraphMol mol;
  OESmilesToMol(mol, "c1cncc2c1cc3c(cncc3)c2");
  OEPrepareDepiction(mol);

  OESubSearch subs("c1cc[c,n]cc1");

  OE2DMolDisplayOptions opts(240.0, 100.0, OEScale::AutoScale);
  opts.SetMargins(10.0);
  OE2DMolDisplay disp(mol, opts);

  OEHighlightOverlayByBallAndStick highlight(OEGetContrastColors());

  const bool unique = true;
  OEAddHighlightOverlay(disp, highlight, subs.Match(mol, unique));

  OERenderMolecule("HighlightOverlay.png", disp);
  return 0;
}
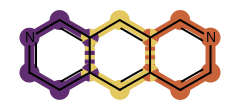
Example of highlighting overlapping matches at once
See also
OEHighlightOverlayBase base class
OEHighlightOverlayStylenamespaceOEGetColors,OEGetContrastColors,OEGetDeepColors,OEGetLightColorsandOEGetVividColorsfunctions