ML Build: Cheaper and Faster Machine Learning Regression Models with Tuner using Fingerprints for Small Molecules
In this tutorial, we will again train several regression models to predict IC50 concentrations at which molecules become reactant to pyrrolamides. This tutorial uses the pyrrolamides dataset (P1) as training data. Both the Analyze page and the Floe Report will be used to examine the results and choose a good model. Finally, we will choose a built model to use to predict the properties of small molecules.
This tutorial uses the following floe:
ML Build: Regression Model with Tuner using Fingerprints for Small Molecules
However, the same procedure can be followed for other ML Build floes.
Warning
This tutorial runs a bare-bones version of the floe, reducing parameters to a minimum. It builds four ML models, costs about one dollar, and takes approximately 10 minutes to run. We should not expect to build any good models in this version, but will use it to understand the workings and/or perform a trial run. For the full version, refer to the Building Machine Learning Regression Models tutorial.
Note
If you need to create a tutorial project, please see the Setup Directions for the Machine Learning Model Building Tutorials.
Floe Input
This floe uses the pyrrolamides dataset for P1. It expects two things from each record:
An OEMol, which is the molecule to train the models on.
A Float value that contains the regression property to be learned. For this example, it is the IC50 concentration.
Here is a sample record from the dataset:
OERecord (
    *Molecule(Chem.Mol)* : c1ccc(c(c1)NC(=O)N)OC[C@H](CN2CCC3(CC2)Cc4cc(ccc4O3)Cl)O
    *NegIC50(Float)* : 3.04
    )
Use the following dataset for this tutorial:
Input Data
Run OEModel-Building Floe
Choose the ML Build: Regression Model with Tuner using Fingerprints for Small Molecules Floe. Click “Launch Floe” to bring up the Job Form. The parameters can be specified as below.
Input Small Molecules to train machine learning models on: Select the pyrrolamides dataset or your own dataset.
Response Value Field: This in the property to be trained. The drop-down field generates a list of options based on the input dataset. For our data, choose NegIC50.
Number of models to show in Floe Report: This field prevents memory blowup in case you generate >1K models. In such cases, viewing the top 20–50 models should suffice.
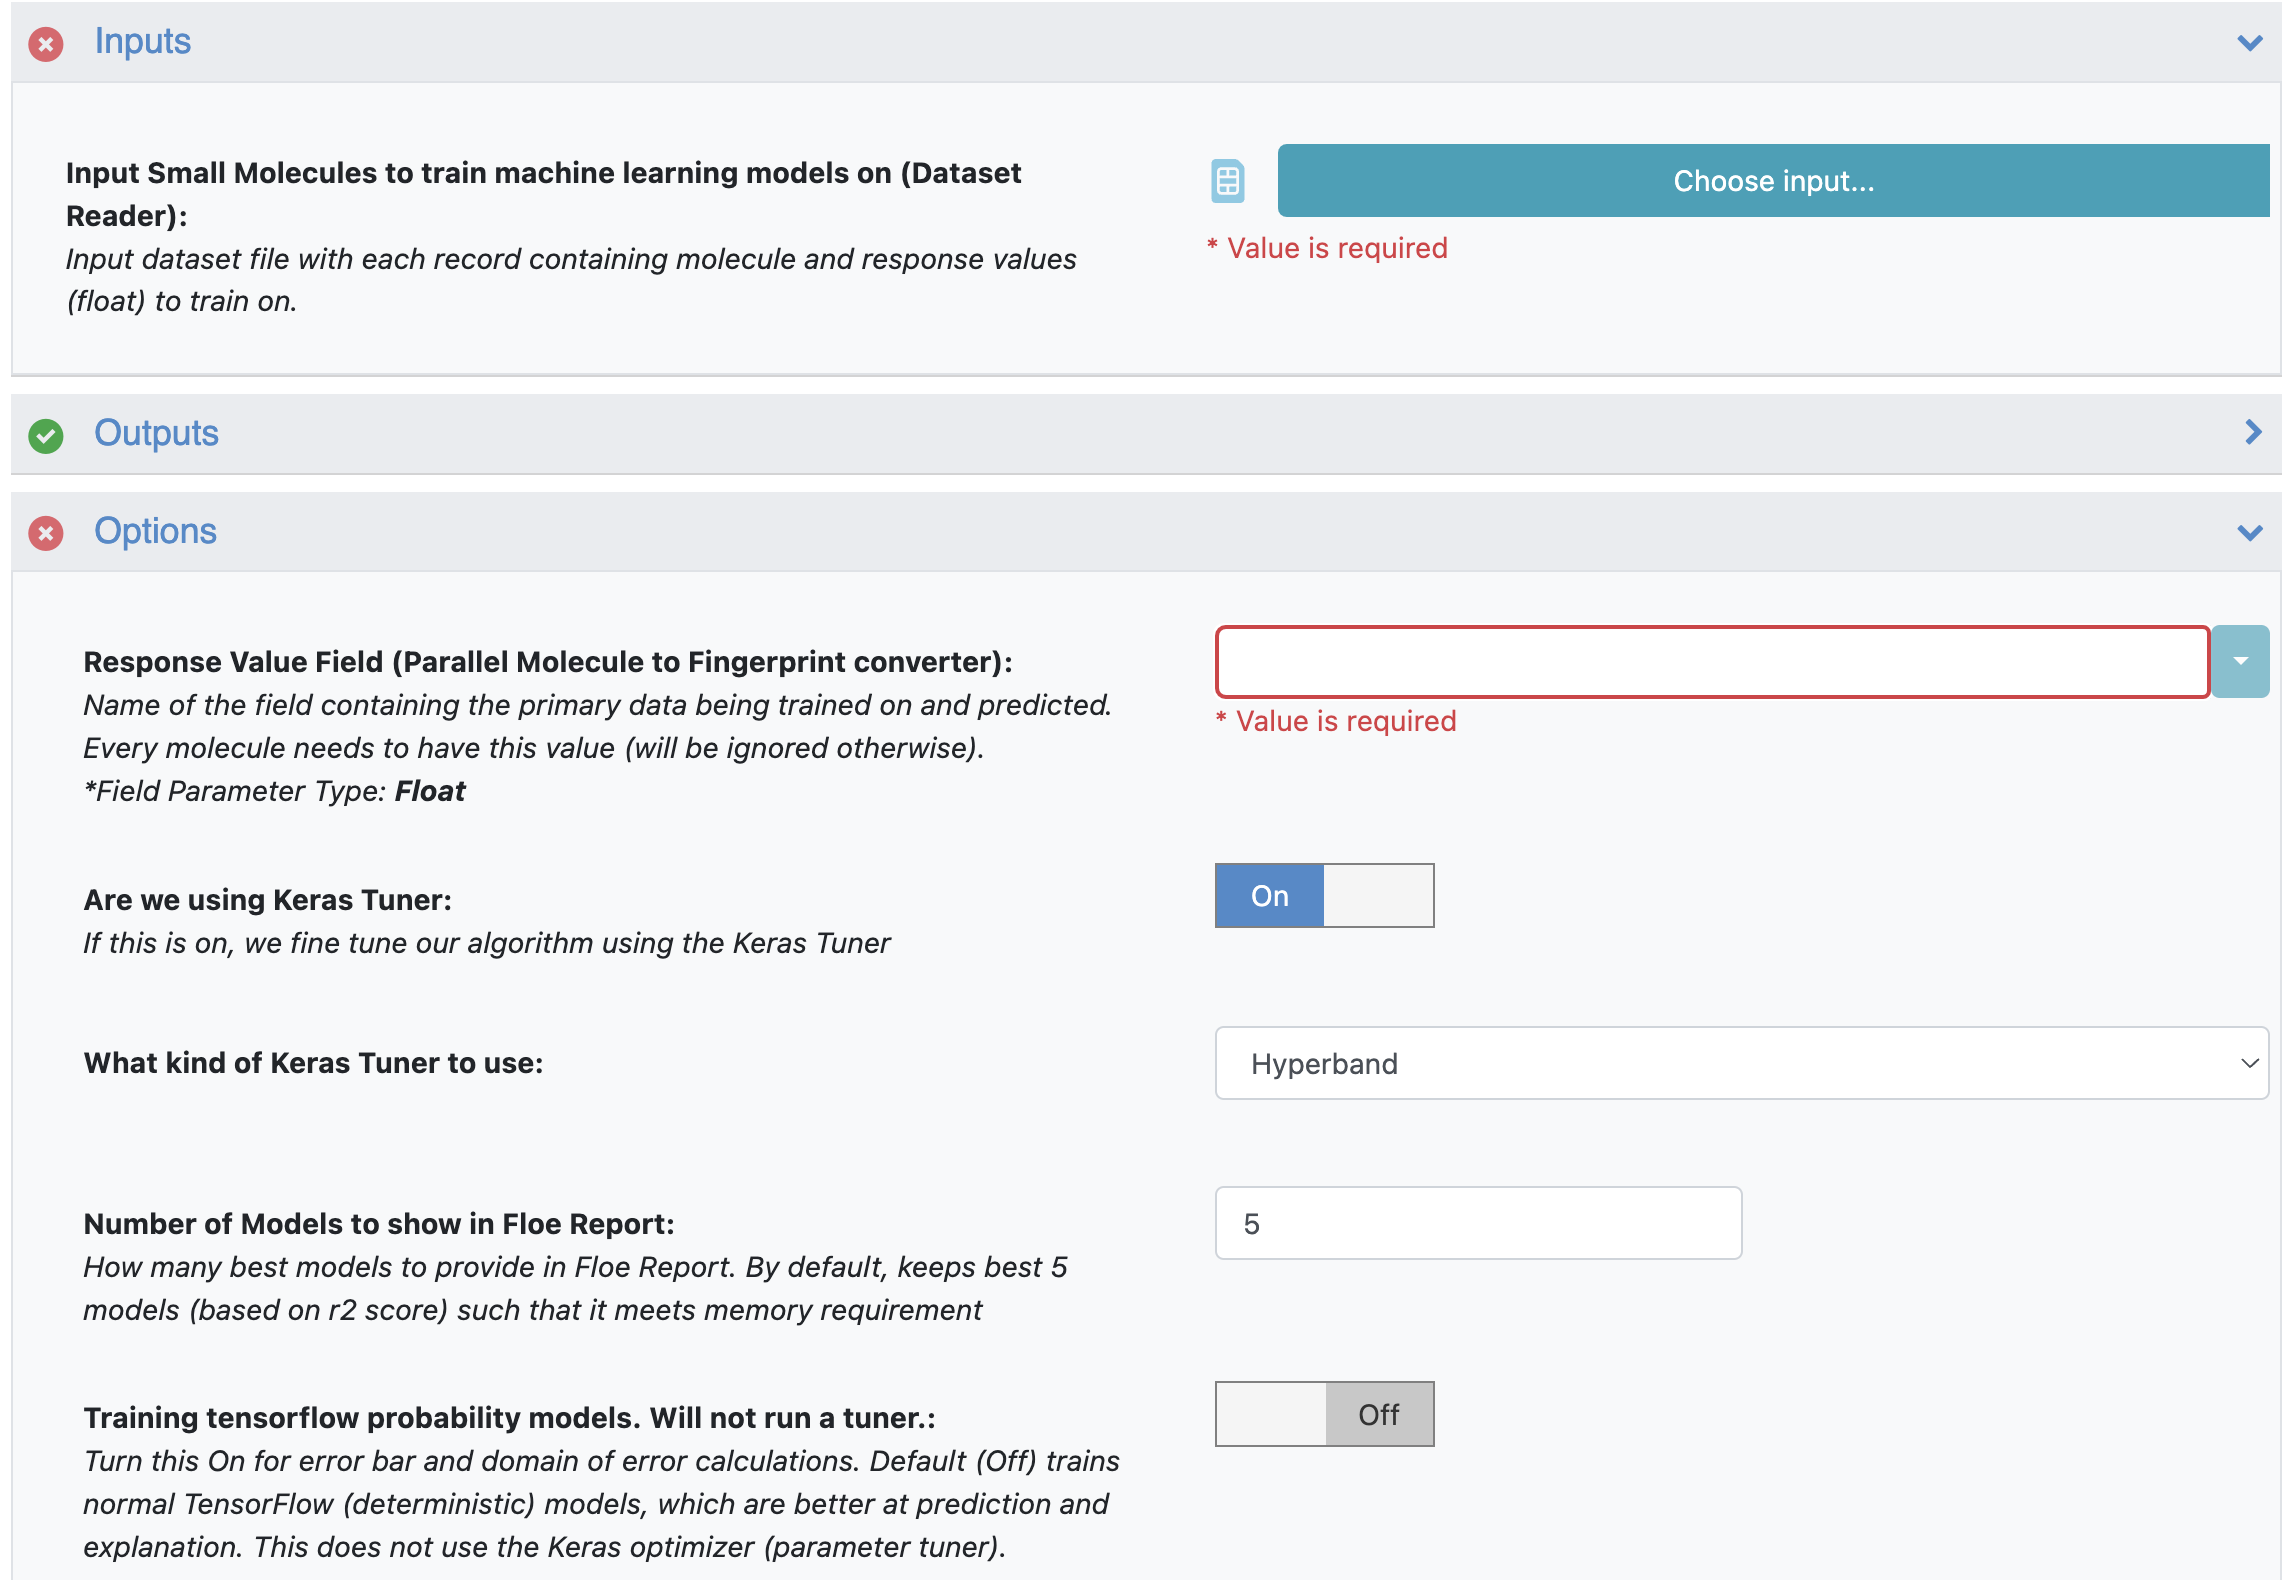
Figure 1. Options parameters on the Job Form.
Preprocess Molecule performs the following steps:
Keeps the largest molecule if more than one is present in a record.
Sets the pH value to neutral.
Negative Log: When On, this allows you to transform the training values to a negative log. Turn it On for this example.
Molecule Explainer Type: Select the model visualization method.
‘Atom’ annotates every atom by their degree of contribution towards the final result.
‘Fragment’ does this for every molecule fragment generated by OEMedChem TK and is the preferred method of medicinal chemists.
‘Combined’ produces visualizations of both these techniques combined.

Figure 2. Additional Options parameters.
The default parameters will run and create a working model. But we can tweak some parameters to learn more about the functionality.
Advanced: Cheminformatics Fingerprint Options: These options contain the cheminformatics parameters the model will be built on. For this cheap and quick run of the floe, change the following:
Min Radius: 0
Max Radius: 5
Bit Length of Fingerprint (FP): 1024
Type of Fingerprint (FP): Remove Tree and Path and keep Circular (or any of them may be kept).
Note
The plots corresponding to these features in the Floe Report will now contain only a single point with no information on their variance.
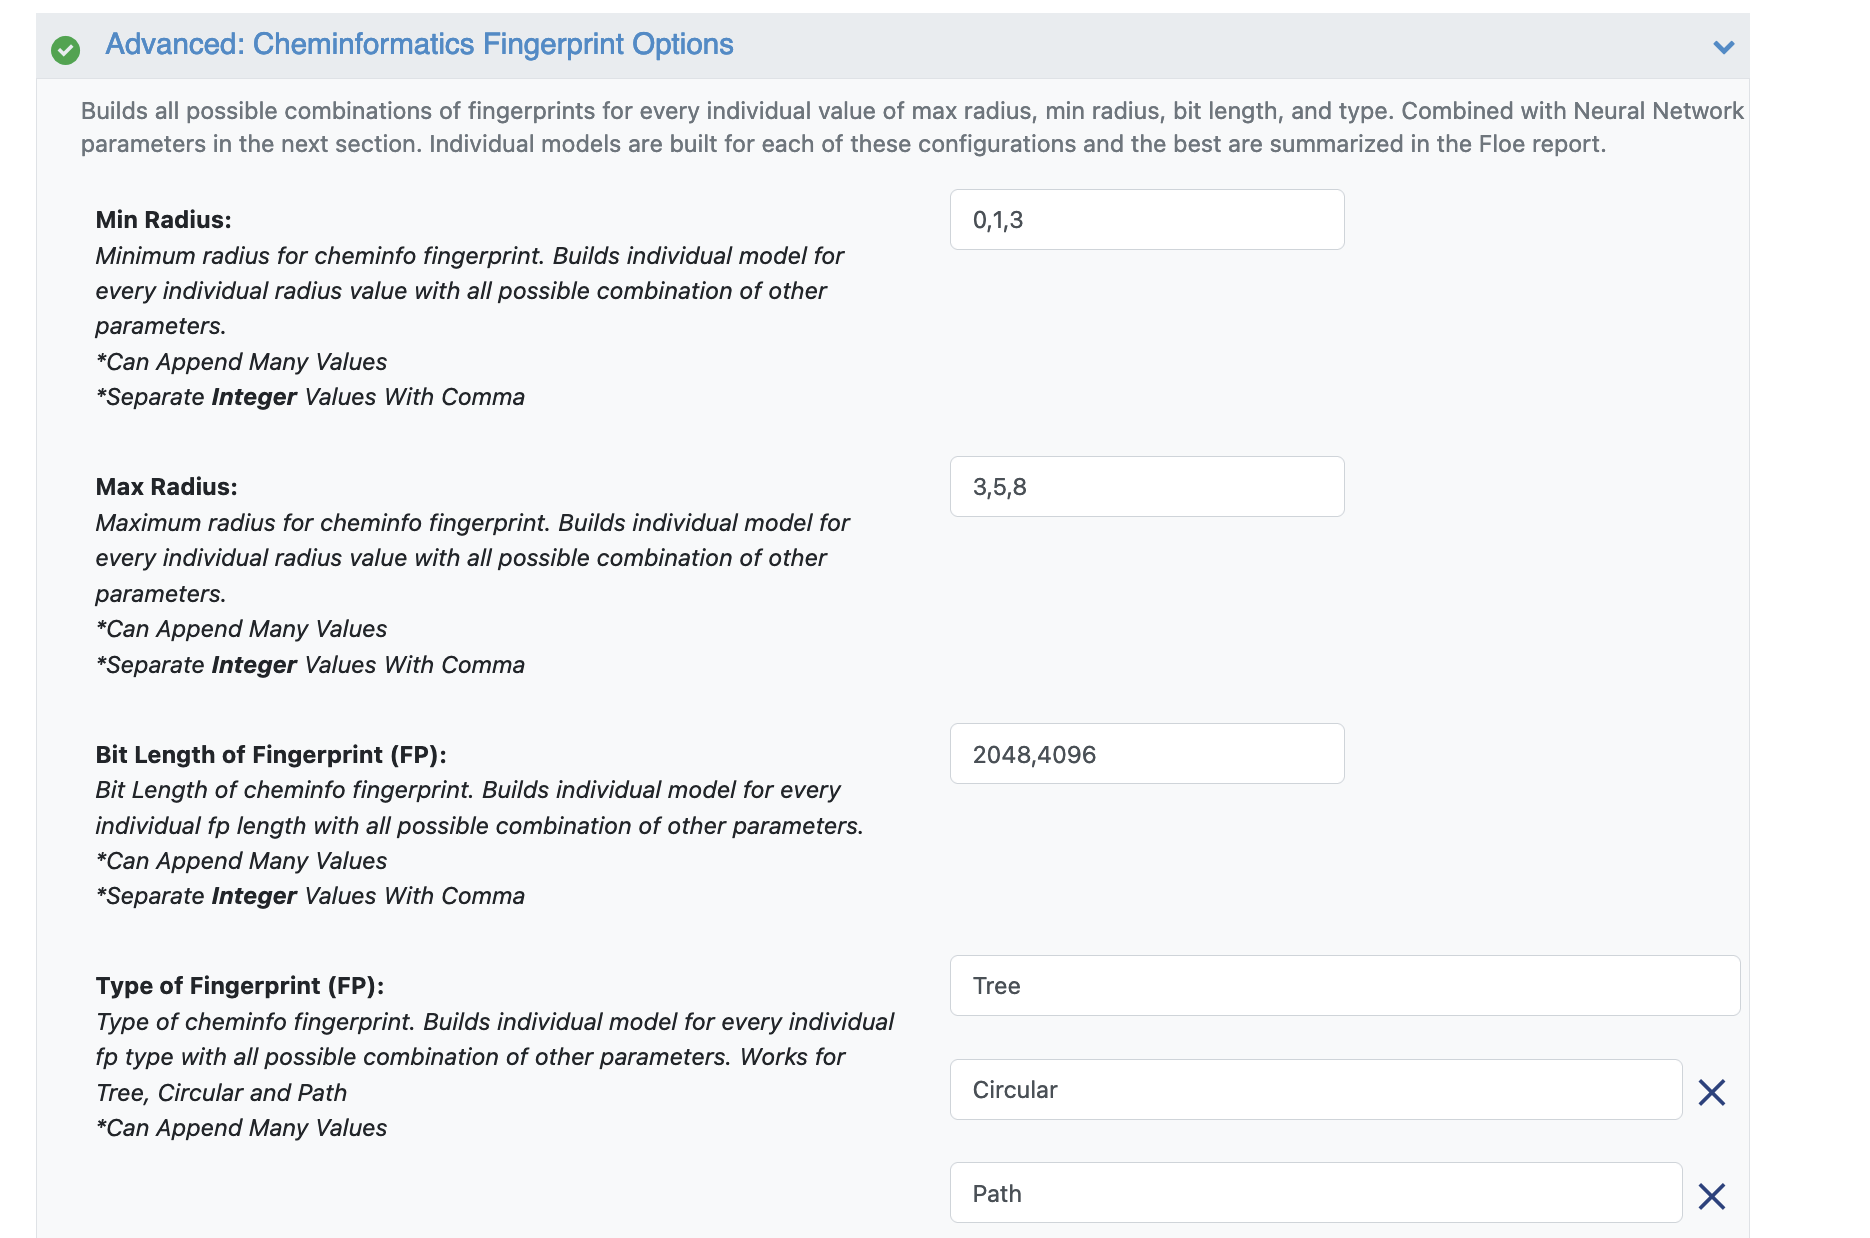
Figure 3. Parameter options for cheminformatics fingerprints.
Neural Network Hyperparameter Options: These are the more specific machine learning parameters. Again, for this cheap and quick run of the floe, make the following modifications:
Dropouts: 0.2
Sets of Hidden Layers: 100,50,0,-1,20,0,0
Sets of Regularization Layers: 0,0,0,-1,0.06,.04,0.02
Batch size: 64
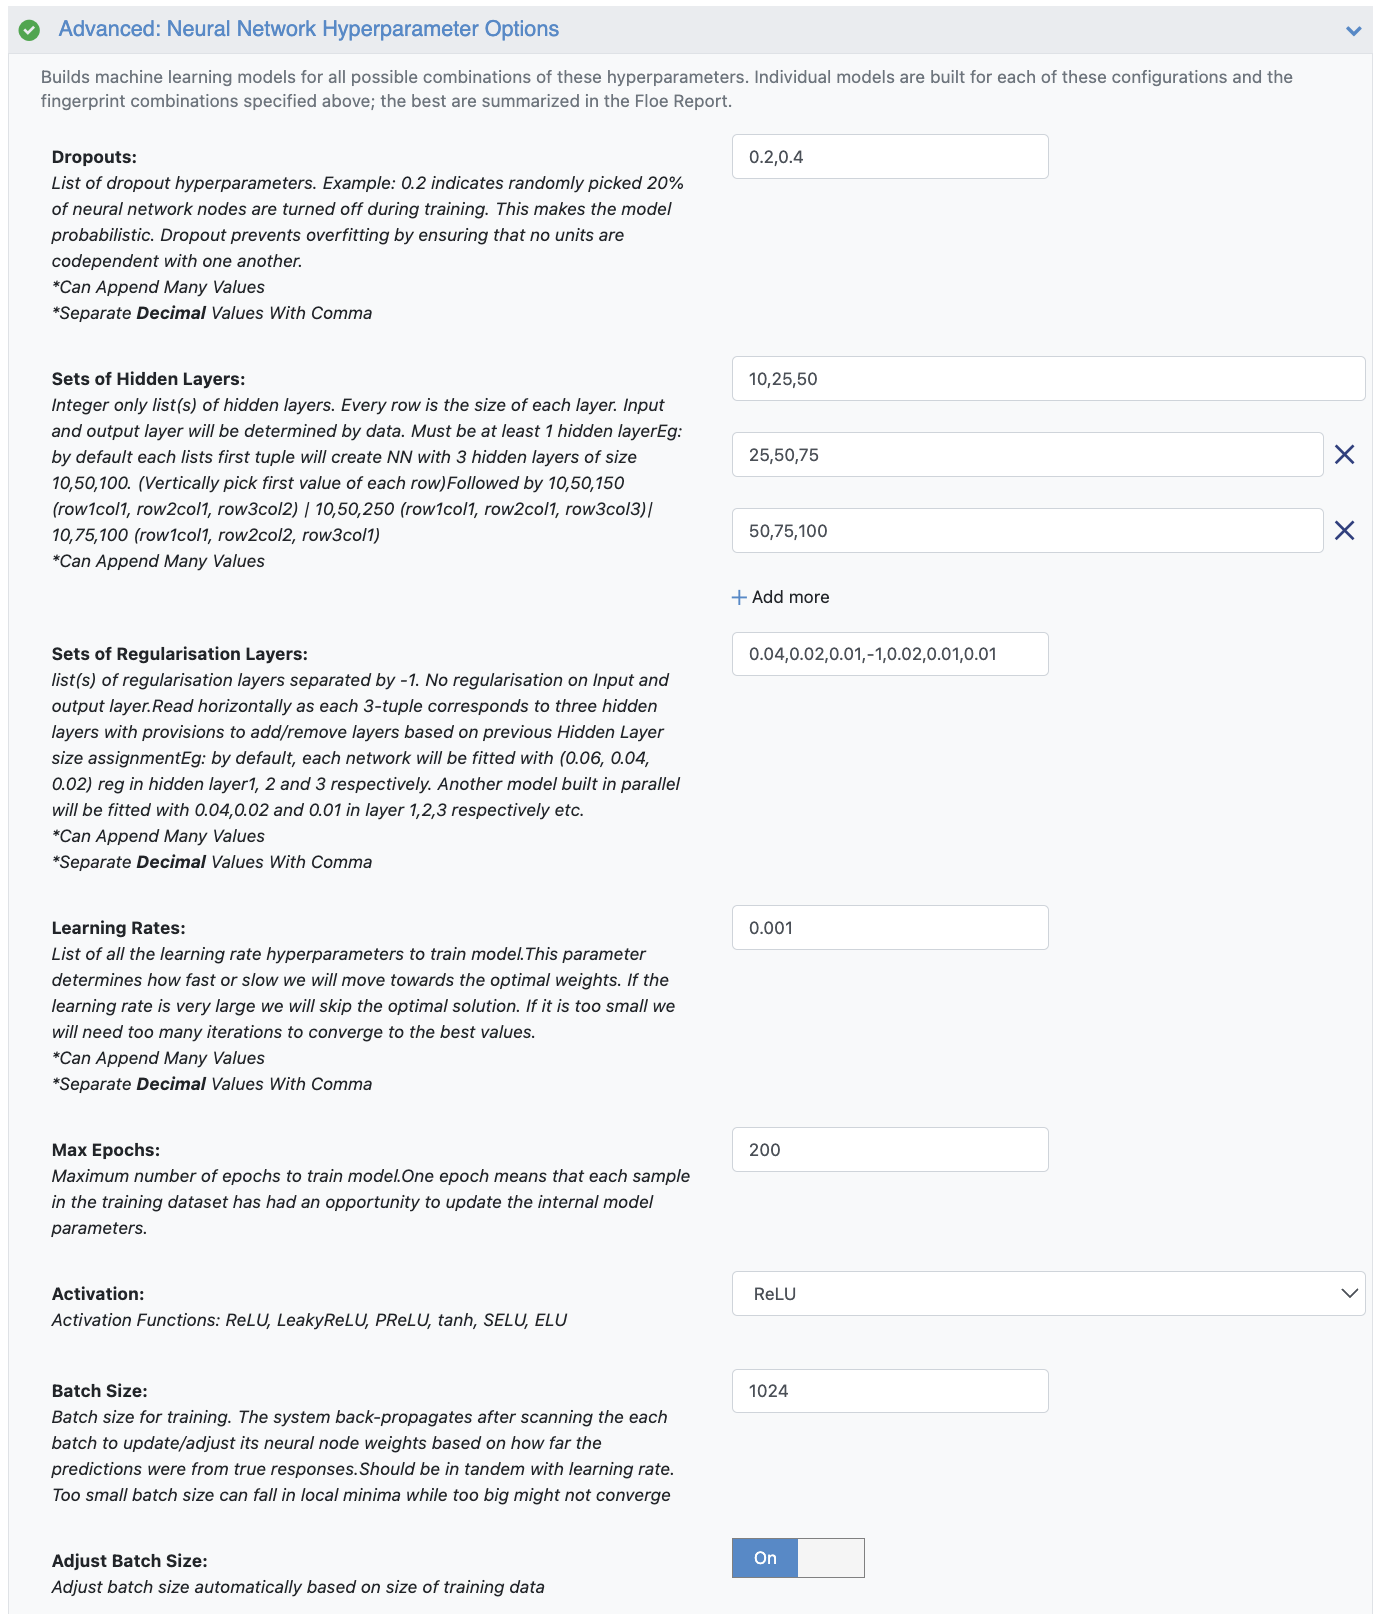
Figure 4. Neural network hyperparameter options.
That’s it! Let’s run the Floe. Click the “Start Job” button.
Analysis of Output and Floe Report
After the floe has finished running, click the link on the Floe Report tab in your window to preview the report. Since the report is big, it may take a while to load. Try refreshing or popping the report to a new window if this is the case. All results in the Floe Report are based on the validation data.
Figure 5 shows histograms that summarize statistics on the whole input data. For this run, it should mostly be a single point as we have just one value for most parameters.
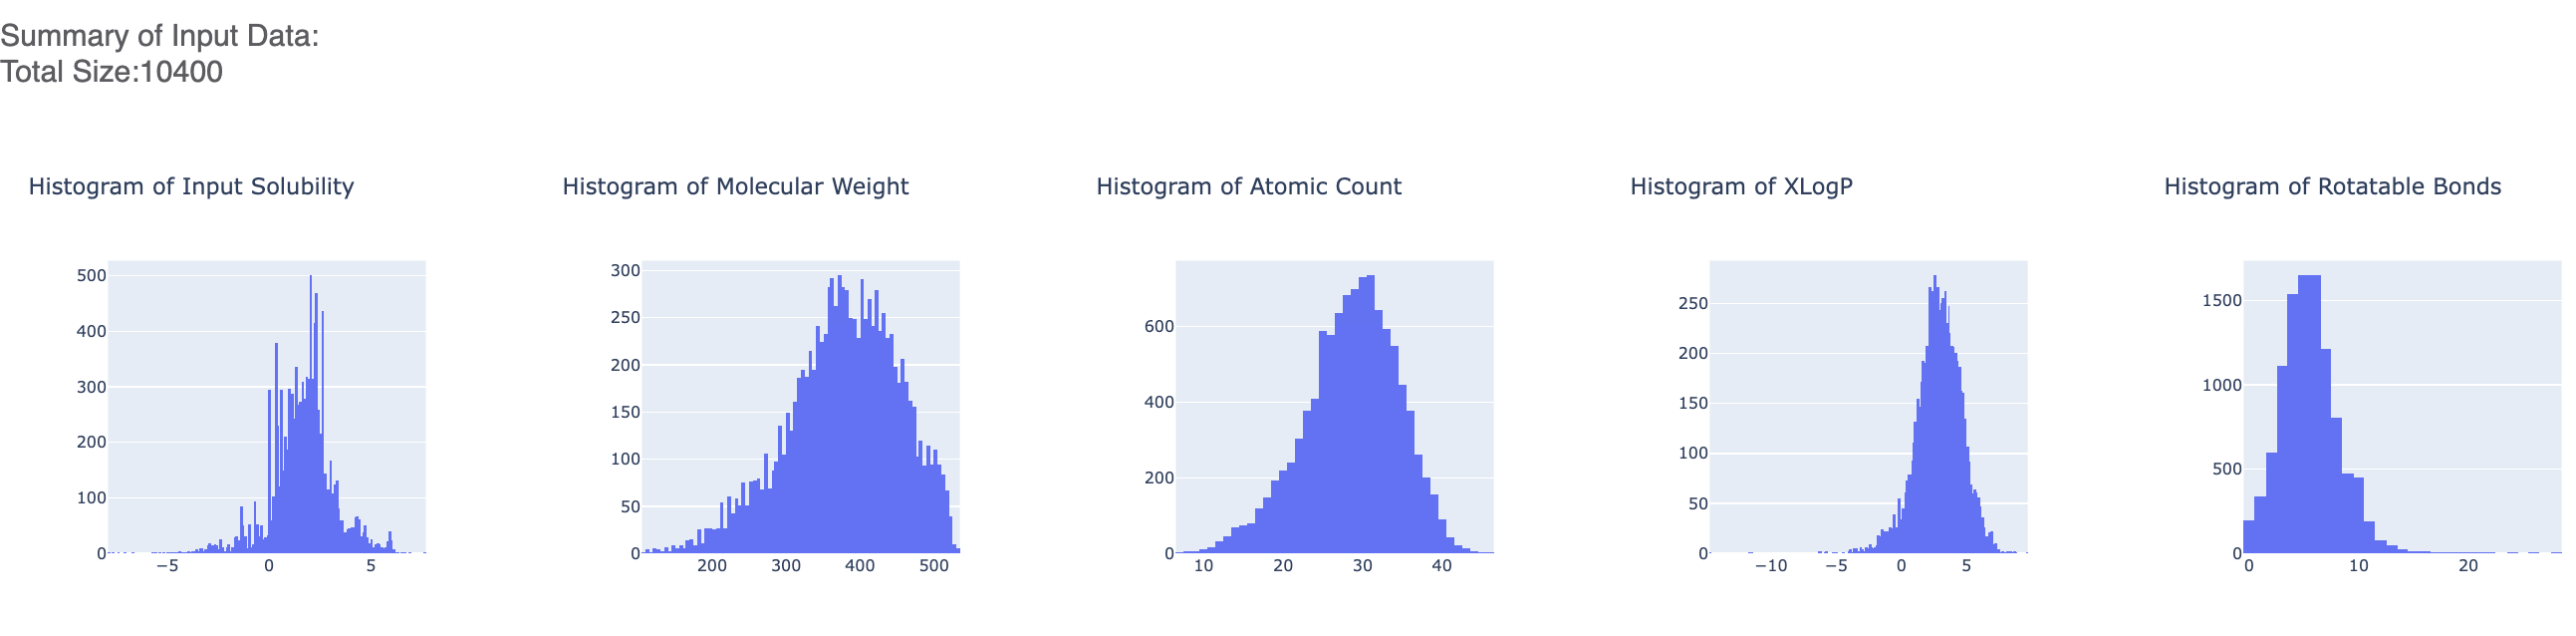
Figure 5. Histograms for the statistics of the input data.
As discussed in the full tutorial, the graphs below show the Mean Absolute Error (MAE) for the neural network hyperparameters, which helps us analyze how sensitive the hyperparameter values are. The lower the number, the better the model for that parameter.
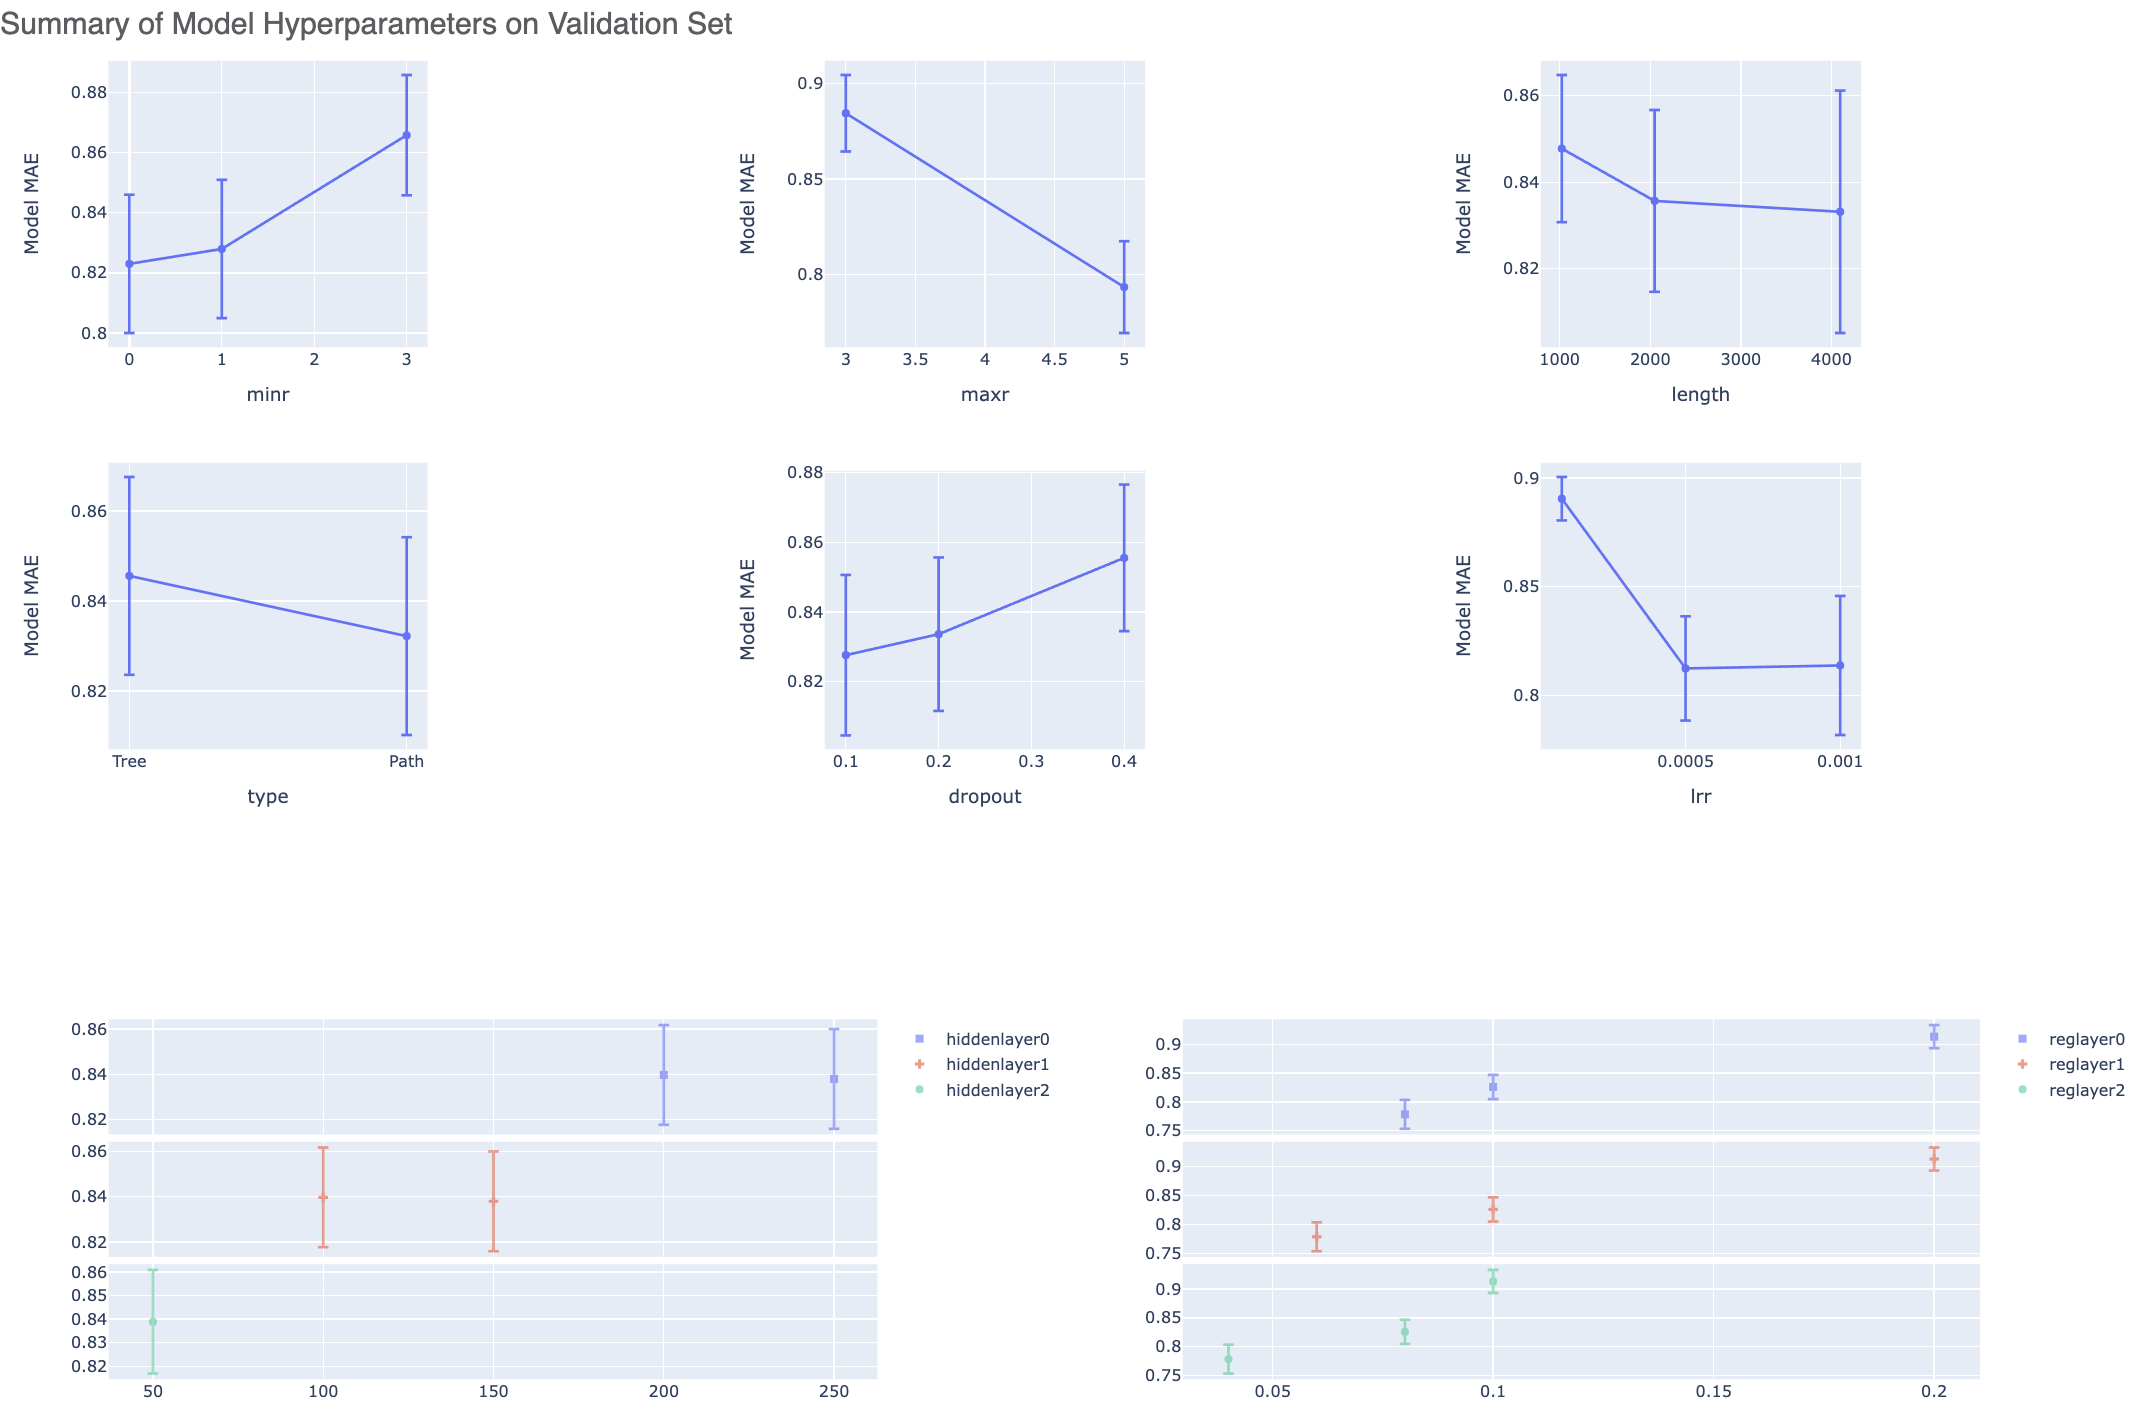
Figure 6. Summary of the model hyperparameters on the validation set.
Here is a plot between the top two most sensitive hyperparameters. In this cheaper and faster version, this graph may be empty due to lack of data.
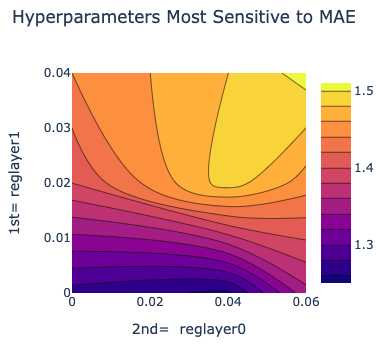
Figure 7. The two most sensitive hyperparameters.
The remainder of the summary statistics for this cheaper and faster version of the tutorial are the same as those in the main tutorial for the ML Build: Regression Model with Tuner using Fingerprints for Small Molecules Floe.
While this tutorial shows how to build a few regression models, building a usable one is a nontrivial task. Refer to the original tutorial for this.
Go to the Use Pretrained Regression Models to Predict Properties of Molecules tutorial to learn how.