How-To Guide for the Short Trajectory MD with Analysis Floe
What This Floe Does
Given the inputs of the protein and posed ligands, the complex is formed with each ligand/conformer separately, and the complex is solvated and parameterized according to the selected force fields. We refer to this ready-to-run molecular assembly as a “flask” by analogy to experiment: all the components are combined into the flask, upon which we run our experiment.
For the bound state, the minimization stage is performed on the flask followed by a warm-up (NVT ensemble) and several equilibration stages (NPT ensemble). In the minimization, warm-up, and equilibration stages, positional harmonic restraints are applied on the ligand and protein. At the end of the equilibration stages, a short (default 6 ns) production run is performed on the unrestrained flask. The production run is then analyzed in terms of interactions between the ligand and the active site and in terms of ligand RMSD, after fitting the trajectory based on active site Cα atoms.
Ligand Input
In order to run, this floe requires ligands to have reasonable 3D coordinates, all atoms, and correct chemistry (in particular, bond orders and formal charges). If the ligands already have good atomic partial charges (RESP or AM1-BCC_ELF10 charges), we recommend using these for STMD as opposed to recharging them in the STMD Floe.
Given that this floe only runs a very short timescale by default (6 ns), it is preferable that the input pose be well-refined.
Although bad clashes (or poor positioning for important interactions) can be (and often are) cleaned up by even this short trajectory, it starts off the “evaluation” purpose of the floe on the wrong foot by giving a poor comparison.
Poor initial poses might even be considered outside the scope of this floe, given how short the default timescale is. It is strongly recommended that docked poses be subsequently minimized in the active site before input to STMD. This will resolve high gradients (usually clashes) with the protein and optimize protein-ligand interactions in the context of a good force field. It is possible that even with this pre-MD refinement, the docked pose starting points could be reevaluated and triaged prior to the extra effort and expense of STMD.
Protein Input
All the MD Floes require correctly prepared proteins up to “MD ready” standards. This begins with the normal prerequisites for physics-based modeling:
Protein chains must be capped.
All atoms in protein residues (including hydrogens) must be present.
Missing protein loops must be resolved or capped.
Of course, protein side chain formal charges and protonation at this point determine their tautomeric state.
Additionally, cofactors and structured internal waters are also important to include, not only those in the immediate vicinity of the ligand and active site, but also distally because they can have an important effect on the protein structure and dynamics over the course of the MD.
The SPRUCE - Protein Preparation floe is strongly recommended for protein preparation.
Caution
Unfortunately, proteins with covalently bound ligands or covalently bound cofactors are not tractable.
How to Run This Floe
After selecting the Short Trajectory MD with Analysis Floe in the Orion UI, you will be presented with a Job Form with parameters to select. Figure 1 shows the key fields of that form.
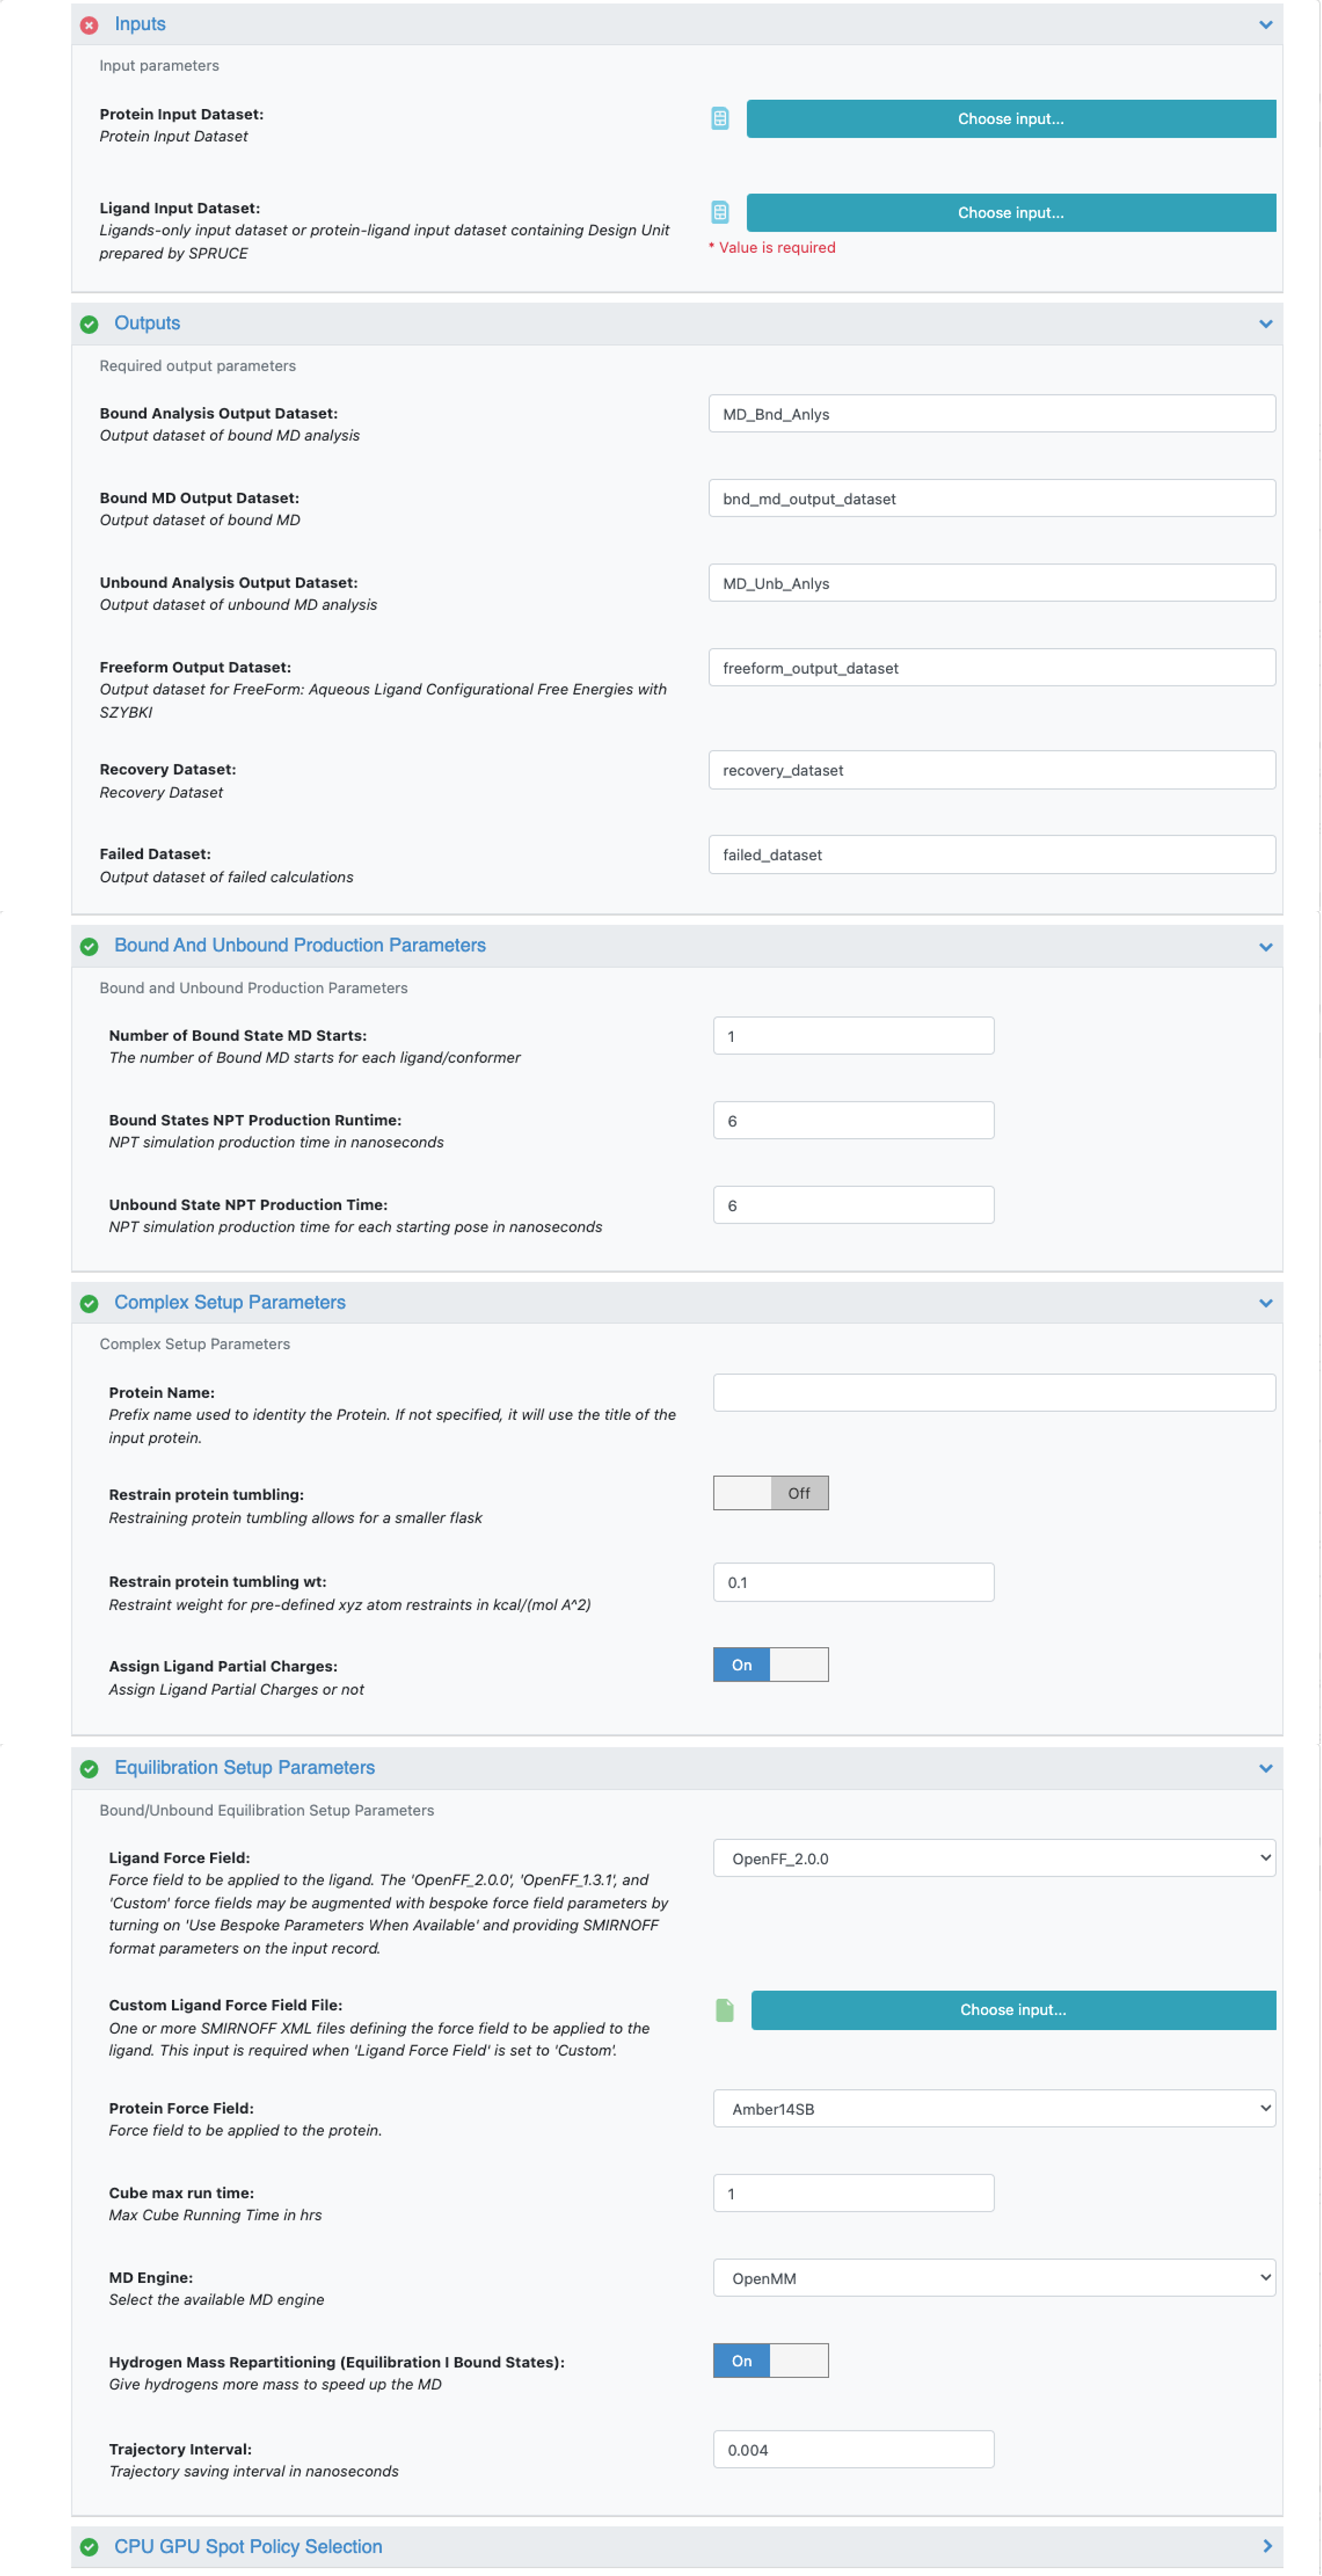
Figure 1. Key fields of the STMD Job Form.
Aside from the essential user-defined parameters relating to job name, input (protein and ligand datasets as described above), and output (output and failure dataset name), all other parameters except Protein Name use reasonable defaults.
The top-level parameters are:
Protein Name (no default): Put a handy short name for the protein here to use in molecule titles (e.g., “Bace” instead of “beta-secretase”).
Number Of Bound State MD Starts (default 1): This allows you to ask for N independent starts to each ligand/pose, giving rise to N independent MD runs. This allows more sampling while keeping the simulation closer to the starting pose.
NPT Production Runtime (default 6): The default 6 is set to be synchronized with the De Groot protocol, so that the output ligand bound/unbound datasets can be directly used in the FE-NES for Binding Affinity Prediction Floe. For fast, high-throughput pose validation, you can change this to 2, but the output datasets won’t be suitable for FE-NES.
Unbound State Production Runtime (default 6): The default 6 is set to be synchronized with the De Groot protocol, so that the output ligand bound/unbound datasets can be directly used in the FE-NES for Binding Affinity Prediction Floe. For fast, high-throughput pose validation, you can change this to 2, but the output datasets won’t be suitable for FE-NES.
Restrain protein tumbling (default Off): Enabling this parameter allows for the automatic selection of the stable protein region, applying gentle restraints to prevent protein tumbling, and using a smaller water box. The default setting is Off.
Assign Ligand Partial Charges (default On): If your input ligands already have good atomic partial charges (e.g., RESP or AM1-BCC_ELF10), set this to Off to have the floe use the existing ligand charges.
Custom Ligand Force Field File: One or more SMIRNOFF XML files defining the force field to be applied to the ligand. This input is required when Ligand Force Field is set to Custom.
Ligand Force Field (default OpenFF2.0.0): This force field choice has a strong impact on the results. The most recent version of the OpenFF force field from the Open Force Field Initiative is recommended.
MD Engine (default OpenMM): Gromacs is the other alternative.
Hydrogen Mass Repartitioning (default On): Hydrogen Mass Repartitioning (HMR) reduces cost by moving mass from heavy atoms to their covalently bonded hydrogen atoms and doubling the MD integration time step from 2 to 4 fs. The speedup is slightly less than a factor of two (because the nonbonded neighbor list is then regenerated more often). We recommend leaving it On.
The other top-level parameters are available for expert users by turning on Show Cube Parameters at the bottom of the input form and then drilling down into the parameters of the desired cube in the list below.
Note
By default, the input bioactive (bound) conformation is used as a starting point for the unbound state of the ligand. To support nonbioactive starting conformations for the unbound state, OpenEye’s FreeForm application is used to generate an ensemble of unique unbound conformations. By setting the cube parameters Sampling Scheme to State Probability and Number Of Starting Confs to n from the FreeForm Output Ligand Setting Cube, you can use the n most probable conformations from the generated FreeForm ensemble as starting points for the independent m ns unbound simulations. Please be aware that this feature is still in its experimental stage.
Protein Tumbling Restraints
Protein tumbling restraints offer a functionality designed to maintain accuracy while reducing computational cost. They achieve this by using a smaller solvent box and applying gentle restraints on the stable part of the system, thereby preventing the protein from tumbling and interacting with its image across periodic boundaries.
The key advantage of protein tumbling restraints is the potential for cost-saving, particularly for nonspherical systems. Enabling this function allows users to save computational costs. This feature has been validated with various datasets to ensure that the accuracy of the results remains unaffected. It can be turned on by the Restrain Protein Tumbling parameter on the Job Form. By default, it is Off.
Note
If any restraint using restraints or restraintWt is set above 0 at the production stage, it will override the protein tumbling restraints setting.
How to Check Results
The results from the STMD Floe can be accessed through the job output in the Jobs tab on the Floe page. In the Jobs tab, select your STMD job to reach the job details. The Details panel includes information about the run. The Reports section includes any reports generated by the floe. The Results section includes output datasets and collections. These datasets can be activated for further analysis in the 3D & Analyze page.