Run a Normal Mode-Guided Weighted Ensemble MD Simulation
Quick floe search term: CPD A3a
For a protein with less than 200 residues, you should run the simulation for approximately 50 iterations in order to get sufficient sampling. For proteins with less than 600 residues, we recommend running the simulation for approximately 100 iterations. For this tutorial, we recommend running the simulation with a total of 50 iterations (broken up over the Run a Normal Mode-Guided Weighted Ensemble MD Simulation and Continue a Normal Mode-Guided Weighted Ensemble MD Simulation Floes).
For production runs, we recommend running a short simulation initially with the Run a Normal Mode-Guided Weighted Ensemble MD Simulation Floe and then using the Continue a Normal Mode-Guided Weighted Ensemble MD Simulation Floe to extend the simulations. This facilitates checking on the simulation using the Perform Weighted Ensemble MD Analysis Floe before committing more time and money to extend sampling.
Tip
Running 45 iterations of WEMD for the tutorial will typically take 15–20 hours to complete and cost approximately $300. After submitting this floe, take a break and check in the next day to make sure the job is complete before proceeding to the next step.
If you are the second person on your stack to run this tutorial, you can ask the first person to share their output data with you (usually via Team Data) and proceed with the other tutorials using the shared data. Then, follow the rest of this tutorial by running a short simulation with a total of 10 iterations (5 iterations each for the Run a Normal Mode-Guided Weighted Ensemble MD Simulation and Continue a Normal Mode-Guided Weighted Ensemble MD Simulation Floes) to save cost.
Tip
If your simulation is interrupted or cancelled, the collection will be left open and may appear to have a size of 0 MB. In order to close it, run the Continue a Normal Mode-Guided Weighted Ensemble MD Simulation Floe on the open collection for an additional n iterations, where n = Maximum Iteration Number - Iteration Number from the last output record generated before the interruption. This will facilitate finishing the rest of the simulation and closing the collection correctly.
Caution
We recommend waiting for jobs from the Run a Normal Mode-Guided Weighted Ensemble MD Simulation or Continue a Normal Mode-Guided Weighted Ensemble MD Simulation Floes to complete before running any analysis on the output collection.
Prerequisite: Selection of Protein Normal Modes (Progress Coordinates)
Before we start running the Run a Normal Mode-Guided Weighted Ensemble MD Simulation Floe, we need to select the modes that the weighted ensemble simulation will use as progress coordinates.
The cryptic pocket opening that you are likely to observe depends on the conformational landscape you are exploring. Global modes often correspond to low-energy collective motions of the protein. These motions involve coordinated movements of multiple residues or domains, allowing the protein to explore its conformational space efficiently. In choosing your normal mode progress coordinates, you are determining which large-scale protein motions will be enhanced and thereby what part of the conformational landscape is sampled. If you run your simulations and do not see a desirable pocket, a different selection of normal modes would explore a different conformational ensemble and has the potential reveal a different subset of pockets. The selection of normal modes is a stage in the floes that can be revisited.
The normal modes calculated from the Calculate Normal Modes Floe only describe the motion of the protein backbone. The side chain motions are governed by the MD force field. This is by design, and enables comprehensive sampling of large-scale motions like domain shifts, hinge movements, and overall structural alterations, while ensuring the realistic sampling of smaller-scale motions.
While some global modes may not appear to directly correlate with the opening and closing of the pocket, it is important to note that global modes correspond to low-energy slopes. Enhancing sampling along these slopes could facilitate transitions between various conformational states, such as open and closed states of the pocket, by circumventing large energy barriers in between.
There are two ways to select the input modes that you will use as progress coordinates in the weighted ensemble MD simulation. If you have already inspected the modes visually in the 3D & Analyze page and know which modes you will be picking, you can create a dataset with just two modes on it using Option 1. Otherwise, use Option 2.
Tip
The Run a Normal Mode-Guided Weighted Ensemble MD Simulation and Continue a Normal Mode-Guided Weighted Ensemble MD Simulation Floes support up to two input modes, and we recommend selecting two modes to ensure more extensive sampling.
Selecting Input Normal Modes (Option 1)
Navigate to the output dataset from the Calculate Normal Modes job. Open “Tile View” for the dataset. In the “Tile View” box you will unfortunately be unable to view the protein with the depiction of the orange arrows representative of the mode vectors. However, you will be able to see Mode Number and Mode Collectivity by clicking on the ‘Columns’ drop-down and toggling those record fields to be visible.
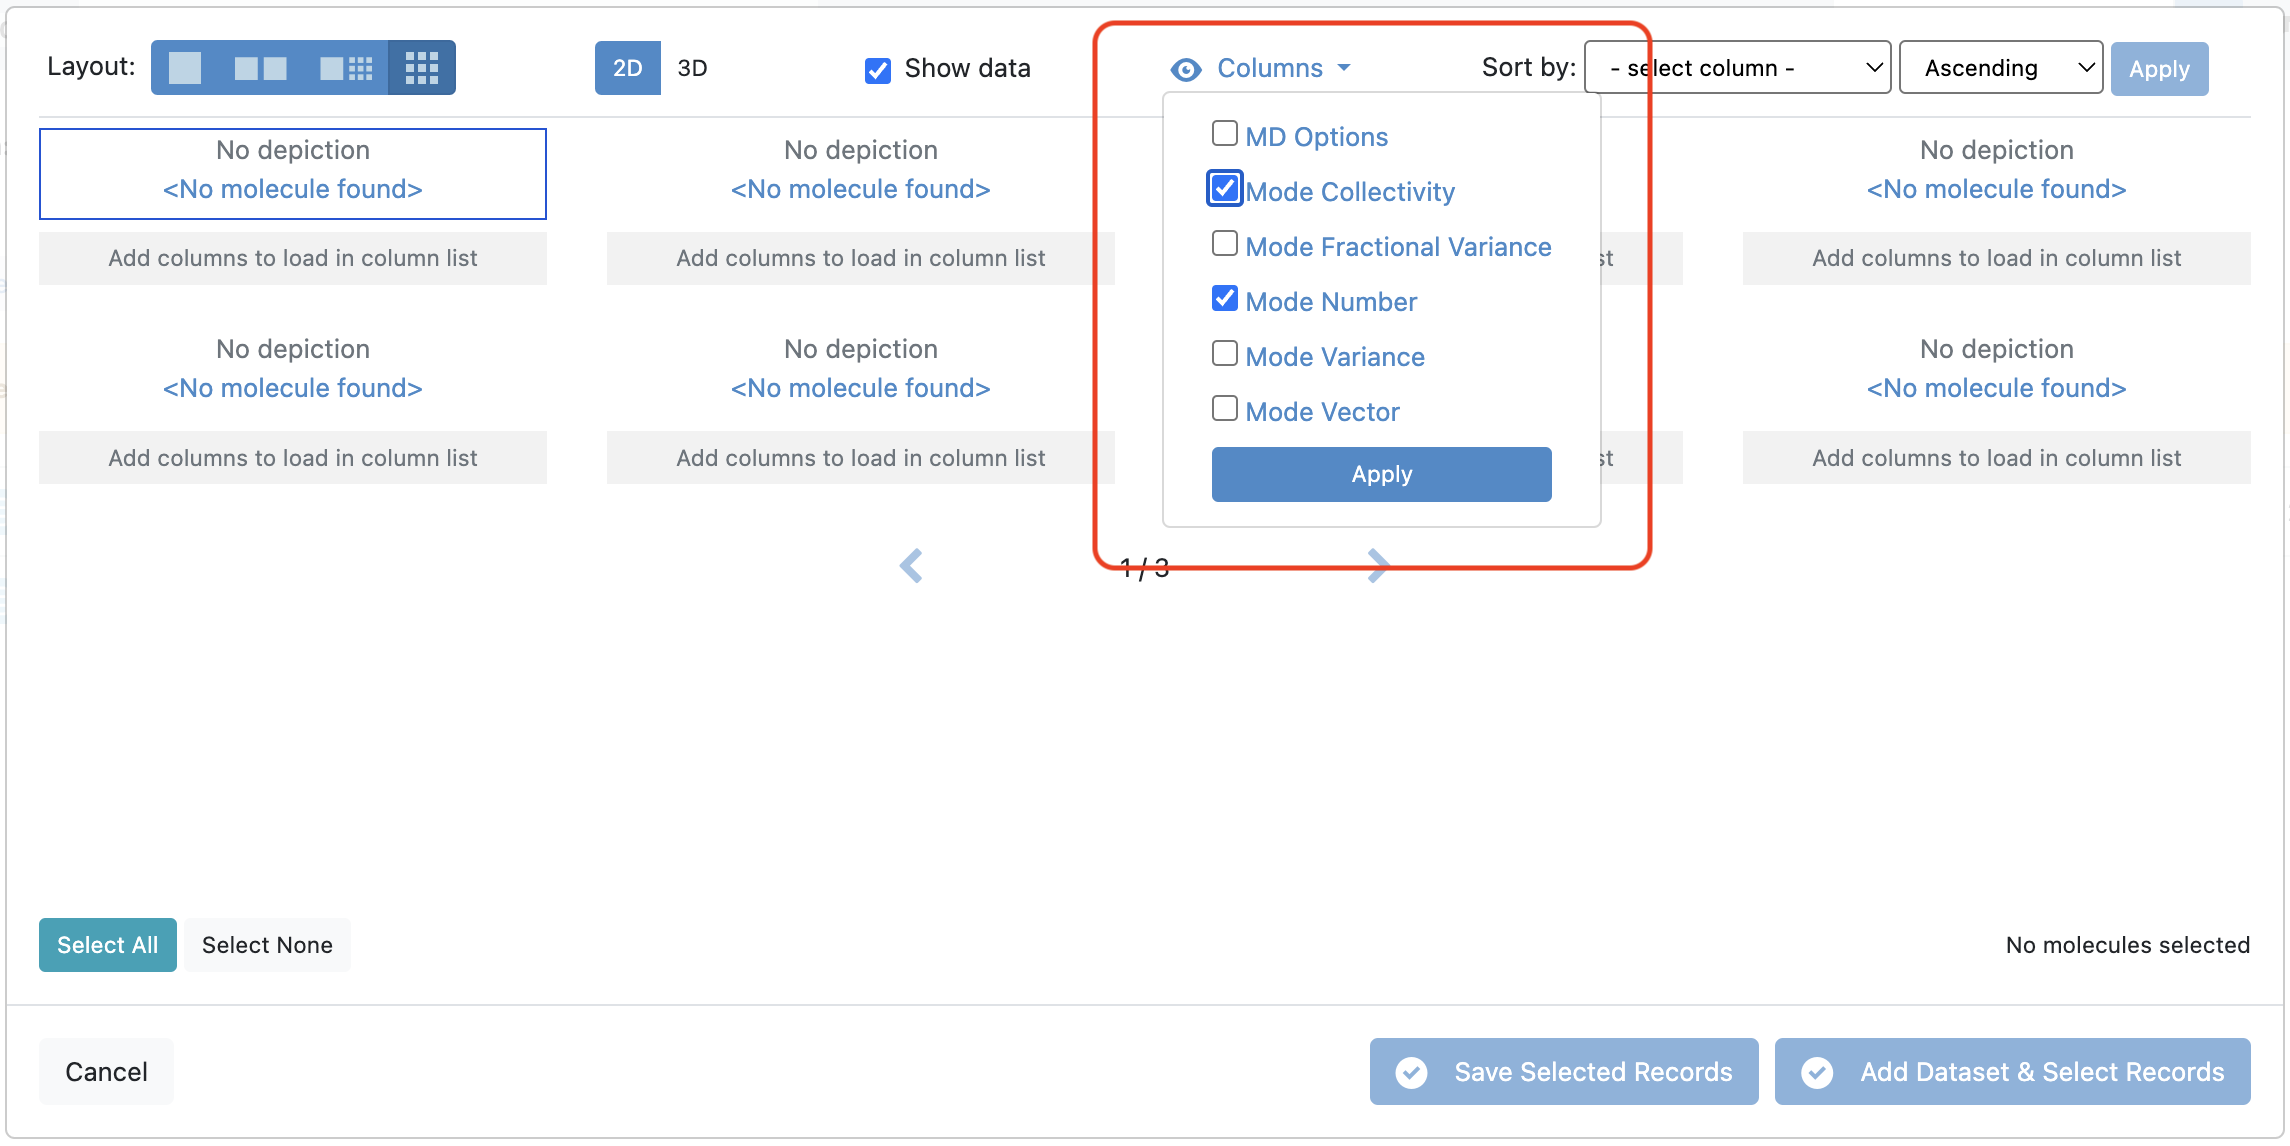
Figure 1. Selecting data from the record to be visible.
Now sort the records by setting the criterion to Mode Collectivity and the order to Descending. In this tutorial, we shall select the first two records with the highest mode collectivity.
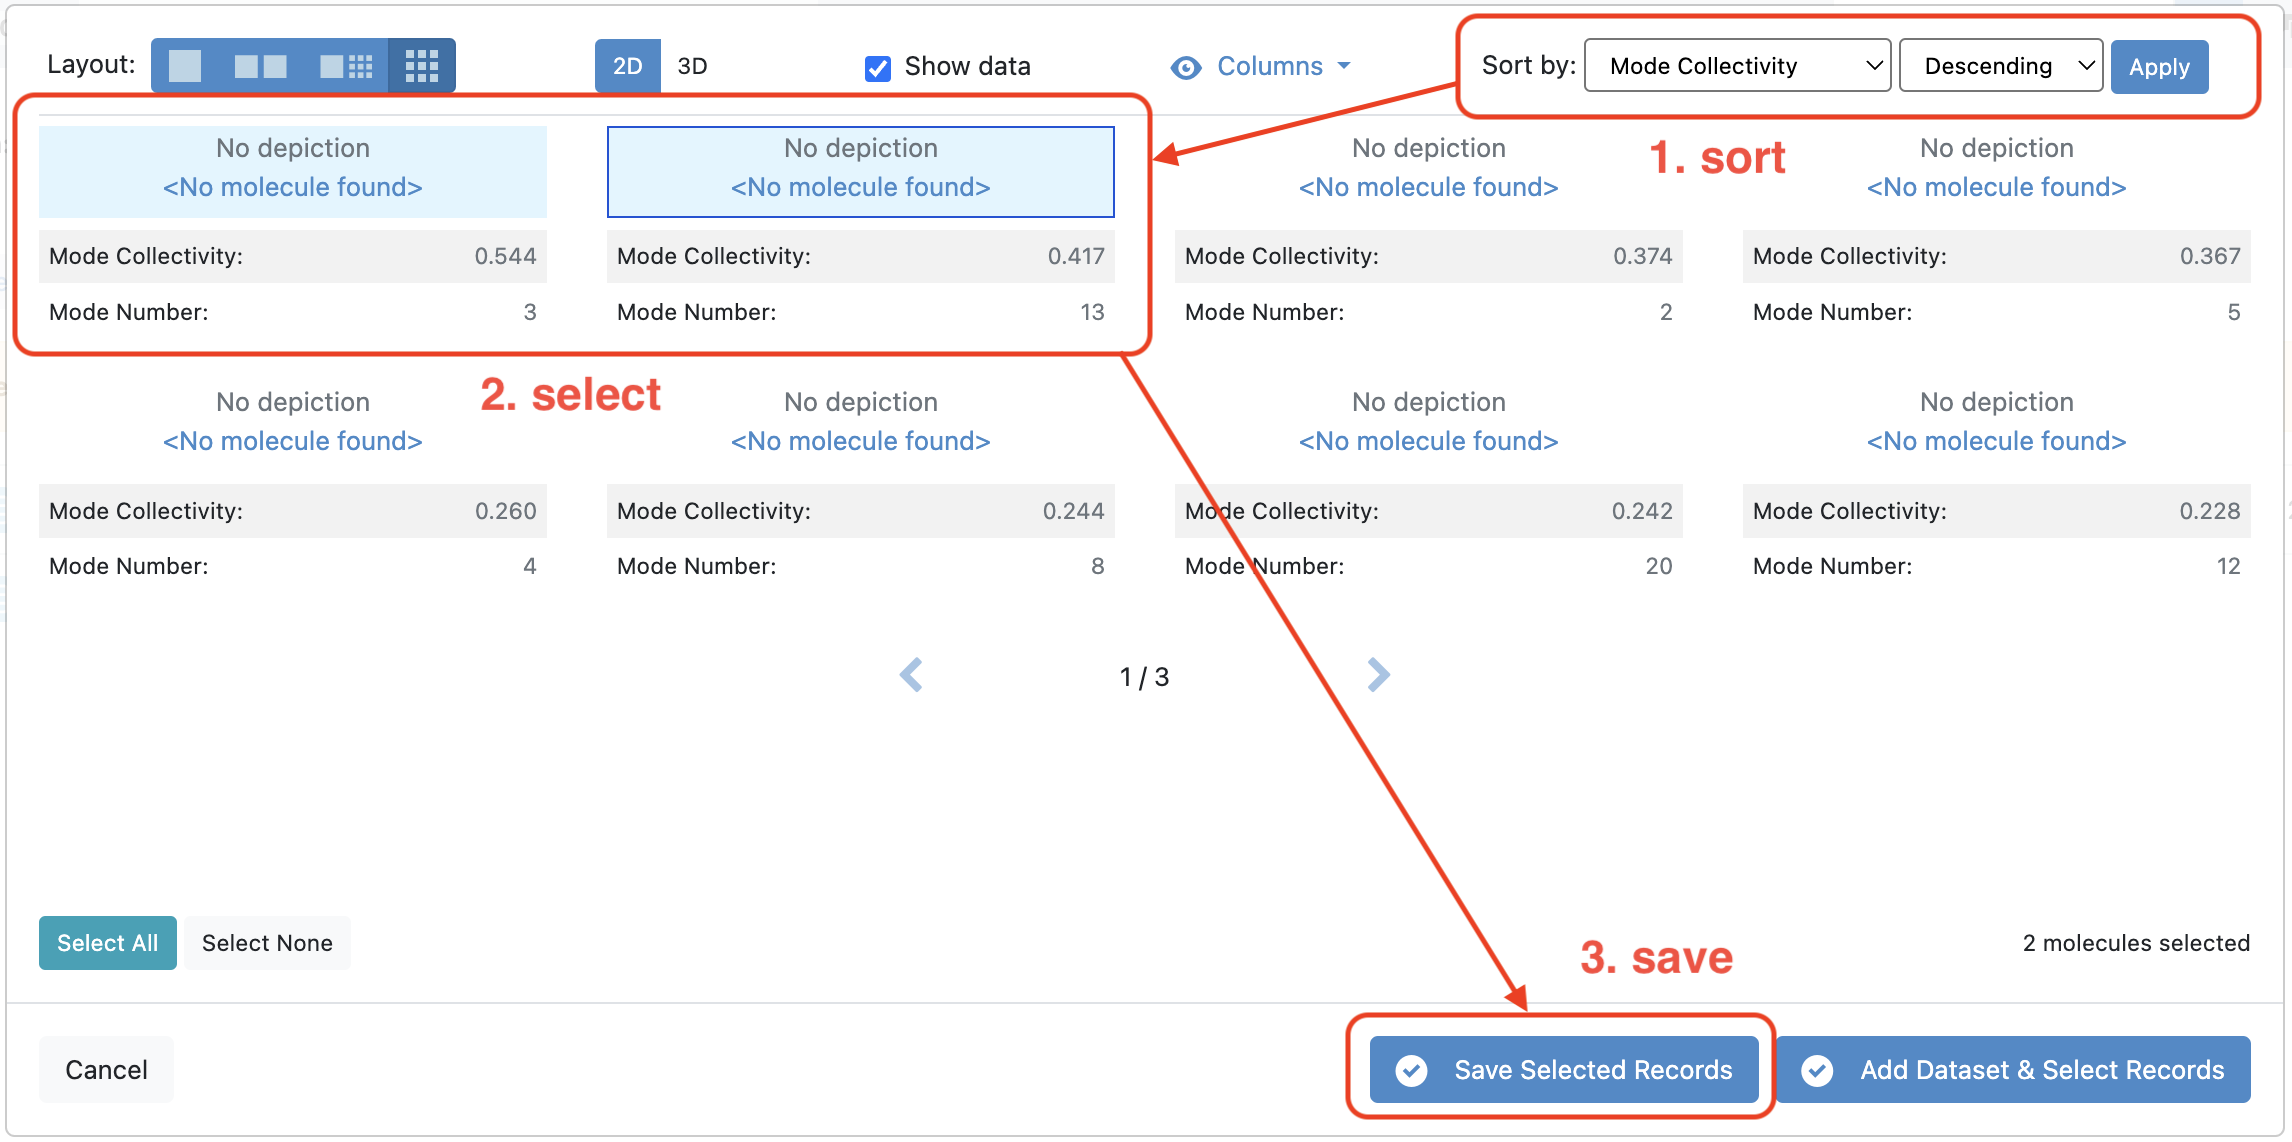
Figure 2. Sorting the modes by collectivity, selecting the top two modes, and saving them to a dataset.
Caution
Values from your calculations, such as Mode Collectivity, and therefore the ranking of the modes, may not match the ones shown in the screenshots due to structural differences in the conformations generated by the Solvate and Equilibrate Target Protein Floe.
Click the blue “Save Selected Records” button at the bottom of the page and then “New Dataset” in the pop-up window. Give the dataset a name that you will remember. This dataset will contain only the two modes that are going to be used as input for the weighted ensemble simulation.
Search and Run the Floe in Orion
Navigate to the Floe page using the blue navigation bar.
On the Floe page, click on the Floes Tab, where you will find a list of the available floes and packages.
Under the Category Floe Filters on the left, click on the caret next to the Packages filter to expand the list of packages and click on the OpenEye Cryptic Pocket Detection Floes package. This will ensure that the floes listed in the middle of the page are from this package.
From this list, select the Run a Normal Mode-Guided Weighted Ensemble MD Simulation Floe and then click on the “Launch Floe”” button to launch the Job Form.
Proceed to the Provide Input Files and Parameters to Run the Floe section for instructions on running the floe.
Selecting Input Normal Modes (Option 2)
Using the navigation bar, go to the 3D & Analyze page. Make sure that the normal mode output dataset is the ‘Active Dataset.’ Make sure that your 3D & Analyze page is set up to view the representative protein structure with the normal mode represented with orange arrows for the mode vectors. To do this, click on the ‘Layout’ drop-down in the Active Data Bar and select Analyze with 3D (see the previous tutorial for details). Set the x-axis of the scatter plot as the Mode Number and the y-axis as the Mode Collectivity. Follow the steps below to set up the normal mode input for the Run a Normal Mode-Guided Weighted Ensemble MD Simulation Floe.
Clicking on a single data point on the scatter plot will display the representative structure and the normal mode vectors for that dataset record.
You can select multiple data points by using the click-and-drag selection box or by holding the command key on your keyboard and clicking on data points. Select the two highest collectivity modes.
Right-click on one of the selected modes to activate a drop-down menu. Select the Send to Workfloe option.
A pop-up window will give you the option to select an existing workfloe or to search for a floe. Search and click on the Run a Normal Mode-Guided Weighted Ensemble MD Simulation Floe.
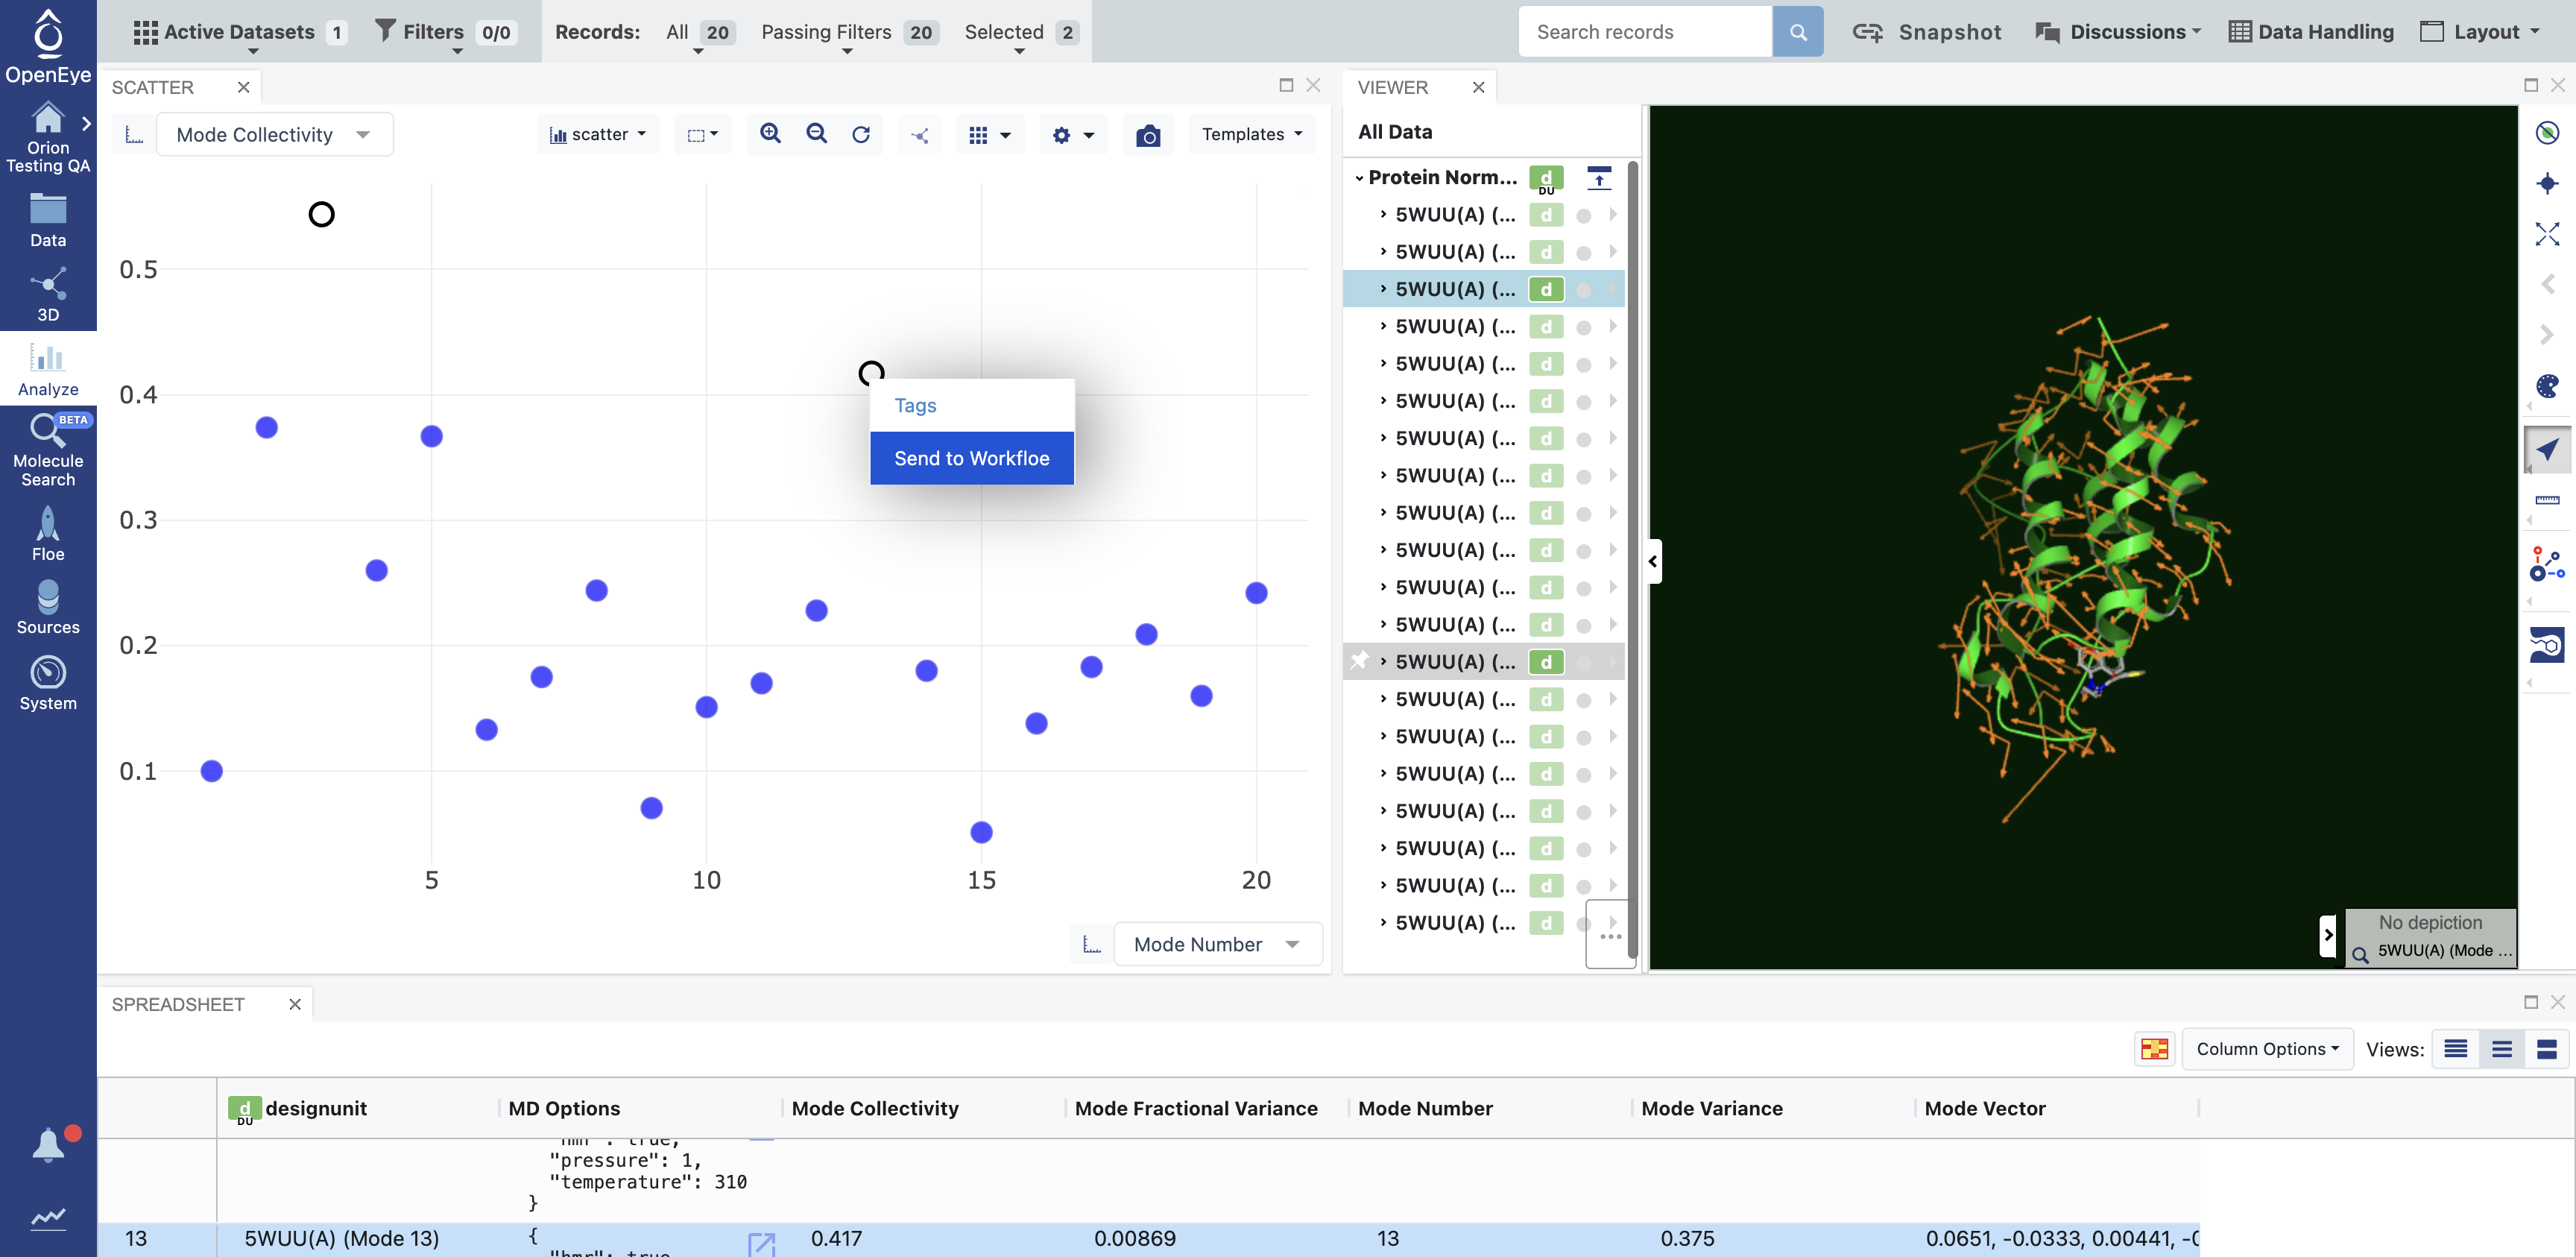
Figure 3. Send normal mode records directly to the floe from the 3D & Analyze page.
This will redirect you to the Job Form. The selected records will autofill the first Input Data field. Make sure that they have been assigned to the Protein Normal Mode Records parameter. You can change the assigned dataset by clicking on the inverted triangle on the “Choose Input” button.
The following section gives instructions on providing the remaining inputs to run the floe.
Provide Input Files and Parameters to Run the Floe
- Output path:
Select the destination for your output data by specifying the Output path.
- Protein Normal Mode Records:
If you choose Selecting Input Normal Modes (Option 1), this field should already be populated by the input records. If you choose Selecting Input Normal Modes (Option 2), add the records/dataset that you saved by selecting one or two normal mode records from the dataset generated by the Calculate Normal Modes Floe.
- Solvated and Equilibrated Design Unit:
Select the design unit output generated by the Solvate and Equilibrate Target Protein Floe. The default output dataset name is Solvated and Equilibrated Design Unit.
Caution
If more than two modes are provided to the Protein Normal Mode Records parameter, the floe will automatically select the first two modes based on the order they appear in the dataset.
You can customize the file names under the Outputs options, but in this case, we have used the default values. Set the value of Iterations parameter in the Weighted Ensemble Parameters parameter group to 5 if you want to perform a short test run.
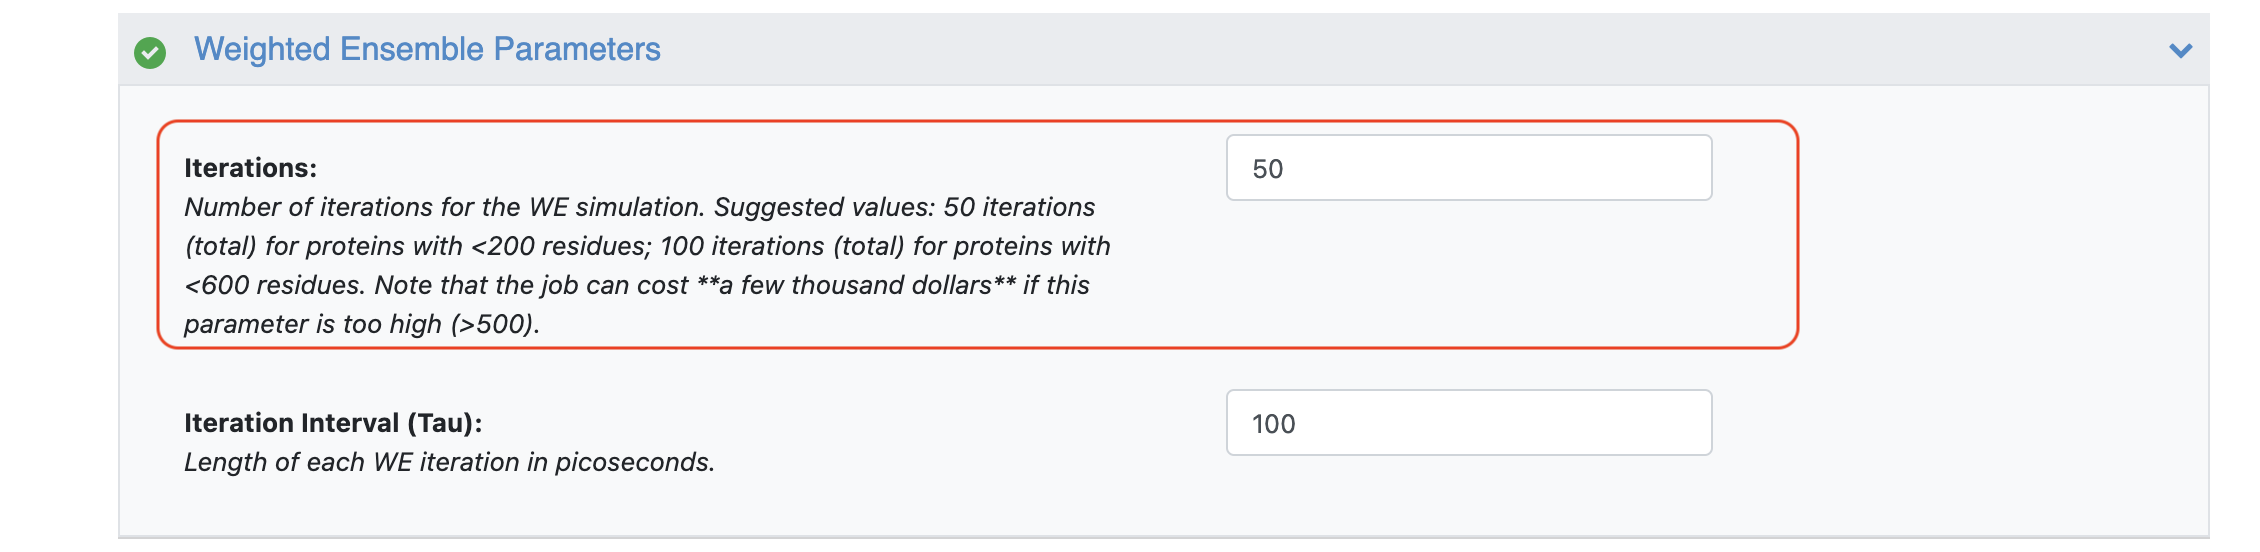
Figure 4. The Advanced Weighted Ensemble parameters on the Job Form.
Once your floe parameters have been set, click on the “Start Job” button. The floe will generate two outputs: a dataset (default name: Protein Sampling Summary Table) and a collection (default name: Protein Sampling Data).
Tip
This part of the tutorial will take the longest time to finish running. We recommend running it overnight. You can check on your simulation’s progress using the instructions in the next section.
Monitoring a Weighted Ensemble MD Simulation (Optional)
You can keep track of the progress of your simulation job by checking the number of records in the output dataset, which equals the number of weighted ensemble iterations that have been run. Alternatively, you can inspect the dataset on the Spreadsheet Panel in the 3D & Analyze page.
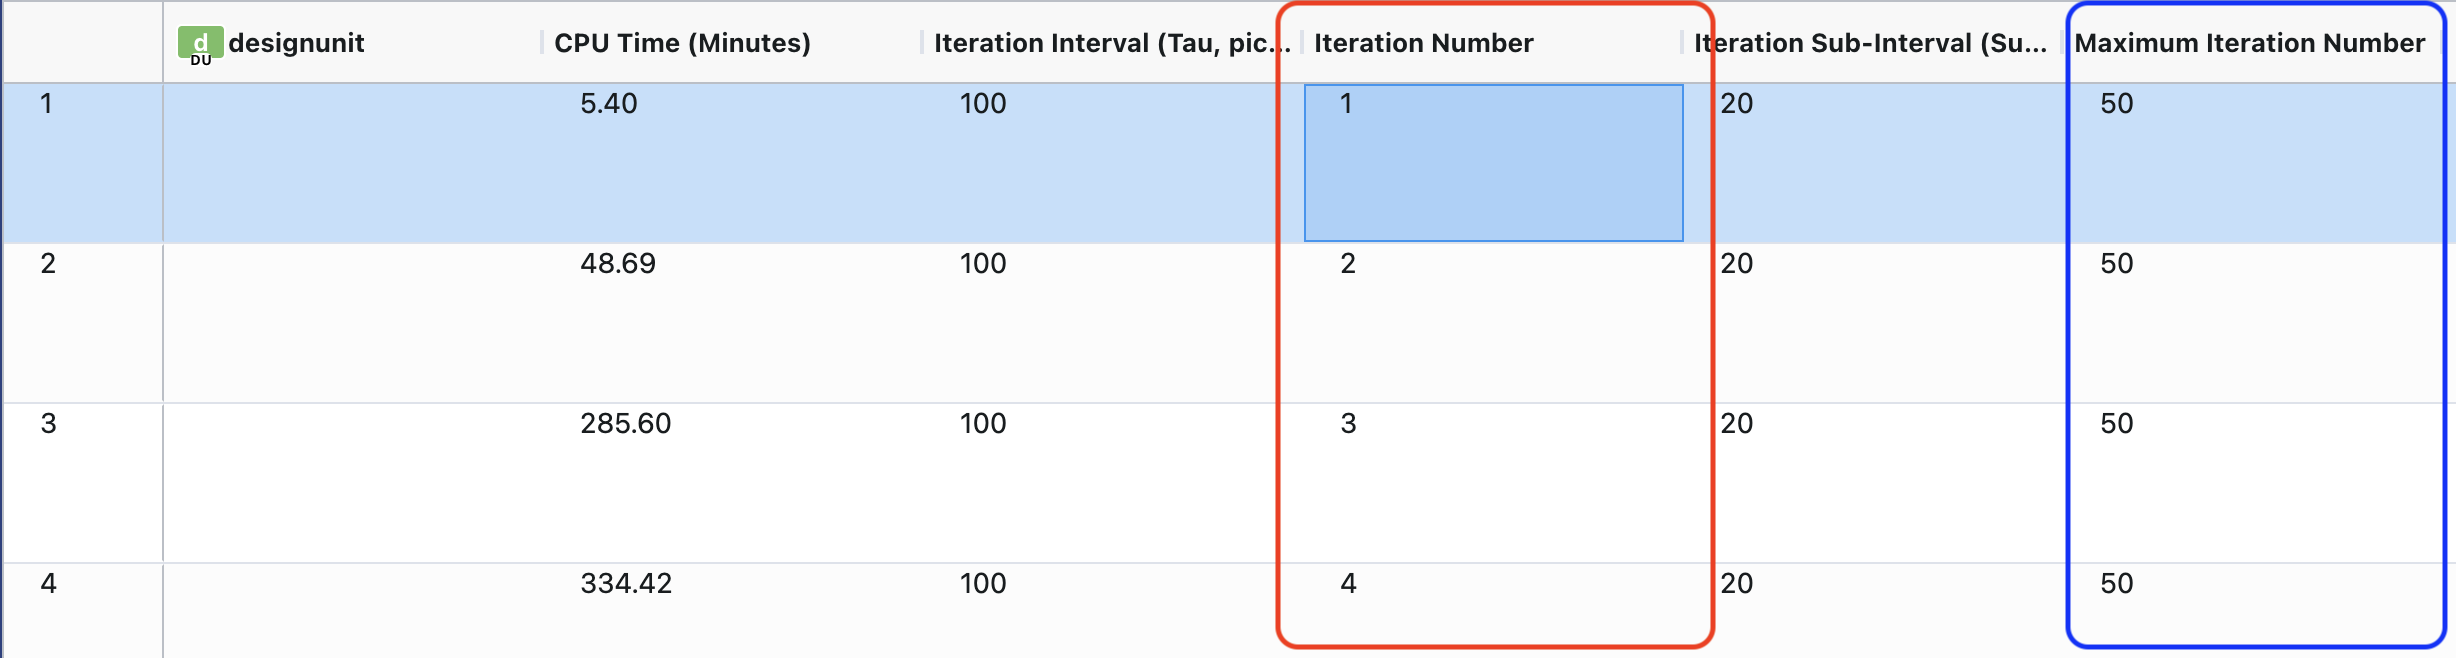
Figure 5. Output dataset visualized as a spreadsheet in the 3D & Analyze page.
In Figure 5, you can see that Iteration Number (highlighted by a red box) is currently at 4, indicating the number of completed iterations to date. The Maximum Iteration Number column (highlighted by a blue box) keeps track to the total number of iterations for the simulation to complete. The Mode Numbers field indicates the modes that were chosen as the input progress coordinates.
You can also inspect a few summary statistics during the course of the simulation using the Scatter plot in the 3D & Analyze page. Set the x-axis to Iteration Number and the y-axis to another column, such as Segment Count, Wall Clock Time, or CPU Time.
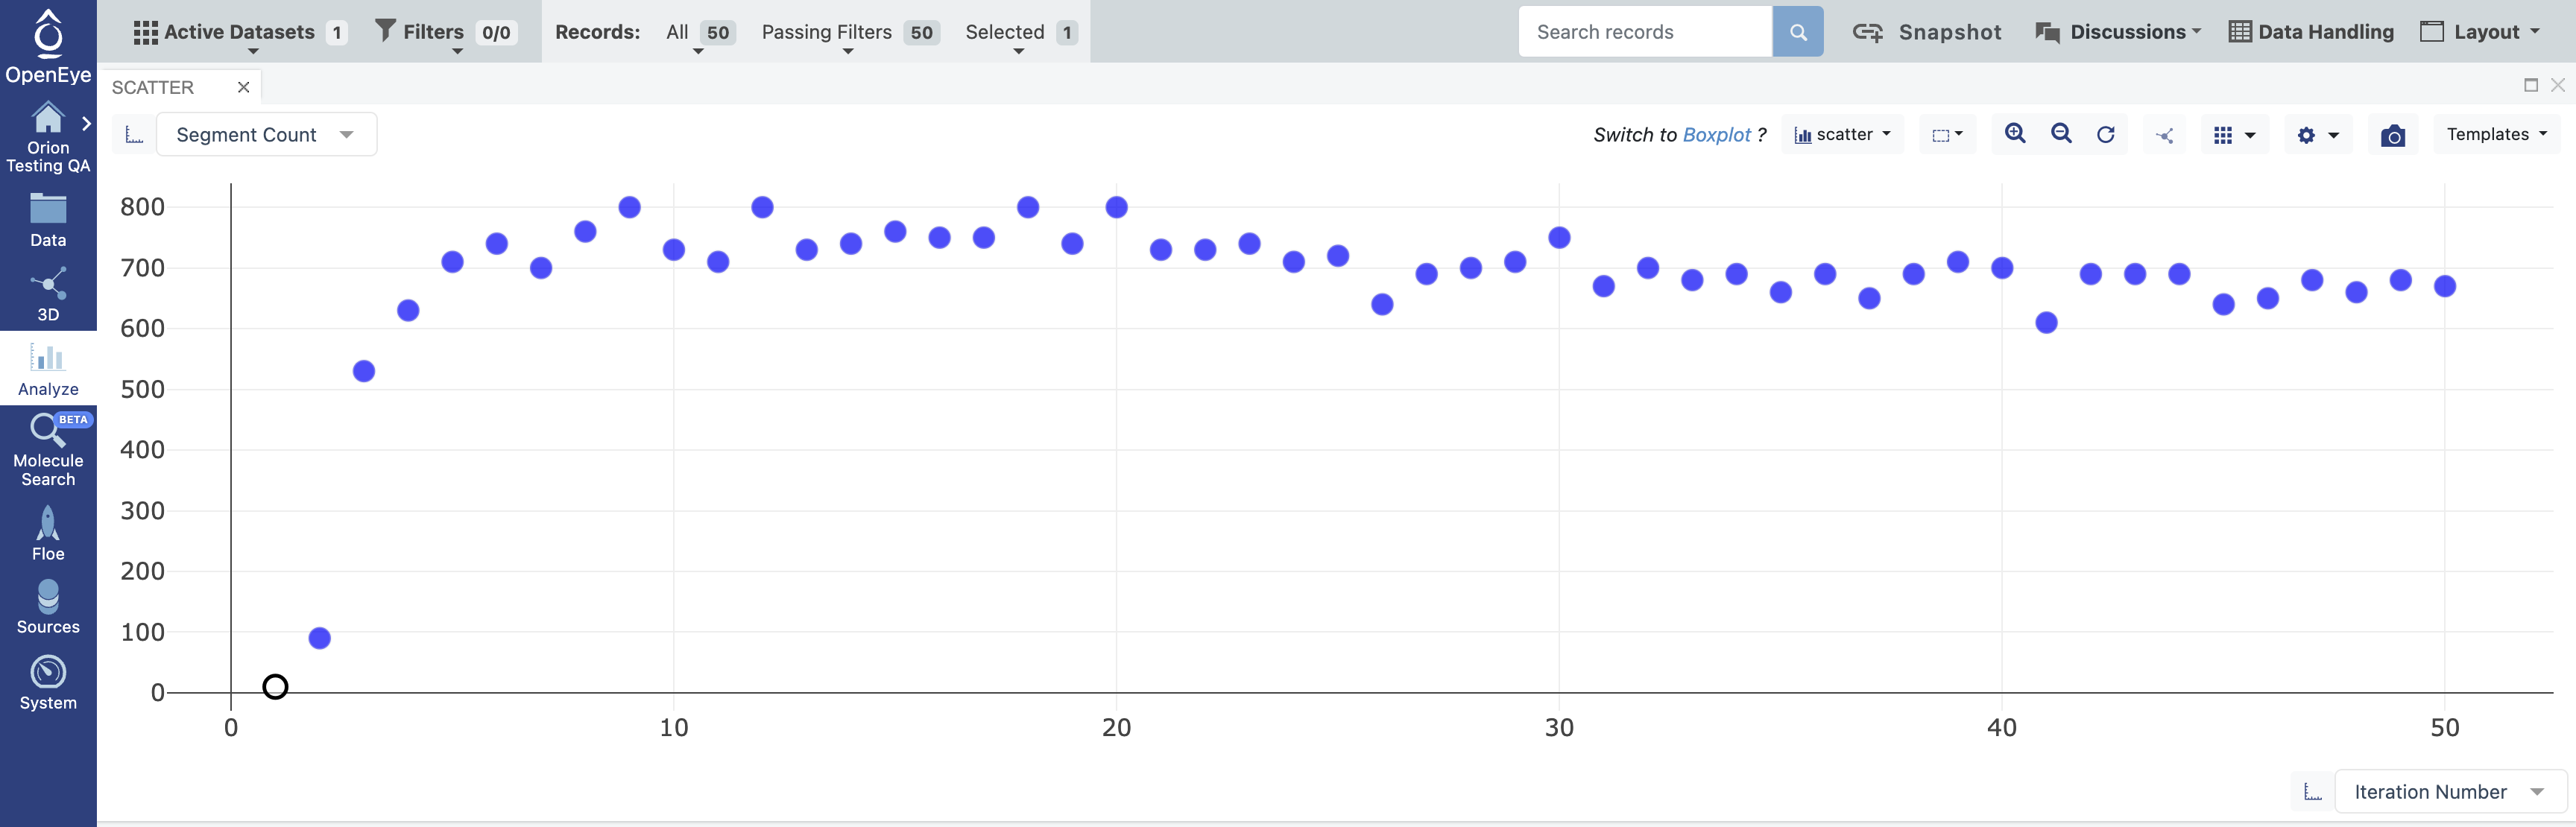
Figure 6. Segment Count versus Iteration Number. The data points show how many parallel simulations ran for each iteration.
Continue a Normal Mode-Guided Weighted Ensemble MD Simulation (Optional)
To continue the weighted ensemble simulation, navigate to the the Floes tab on the Floe page. Under Packages, select OpenEye Cryptic Pocket Detection Floes, and select the Continue a Normal Mode-Guided Weighted Ensemble MD Simulation Floe. Click the “Launch Floe” button.
This will open the Job Form. Select the output collection from the previous floe as the Collection parameter. Note that this floe will append data to the input collection. Input a value of 5 for the Additional Iterations parameter.
Click on the green “Start Job” button.