Prepare Vendor Database for Gigadock and FastROCS
In this tutorial, compounds from a collection provided by OpenEye will be prepared for Gigadock and FastROCS. Running the floes in this tutorial will cost approximately $45.
This tutorial uses the following floes:
Note
OpenEye prepares several vendor collection for use in Orion. This tutorial is for those who wish to prepare their own custom in-house databases or other vendor database for Gigadock and FastROCS.
Note
If you have not created a tutorial project, see the directions in the Preliminary Setup Tutorial.
Import Mcule Database into Orion
Download the latest version of Mcule In Stock database in .smi.gz format from the Mcule database website to your local machine. Then upload the file to Orion.
On the Data page, under My Data, create an Input Data folder if one does not exist.
Click the “Add Data” button and select Upload.
Select the Mcule In Stock database file from your local machine.
A warning will appear that large files are selected and advise you to deselect the “Convert to Datasets” checkbox to avoid unnecessary processing.
Alternatively, click “Show Advanced Options” and select None for the processing method of the file.
Warning
The file upload may fail if the “Convert to Datasets” checkbox is not deselected.
Click “Upload.” The file should have the format of mcule_purchasable_in_stock_xxxxxx.smi.gz, where the x’s correspond to the date of the most recent update. In this tutorial, that appendage will be omitted.
Important
The cost of preparing the database molecules is roughly linear with the number of molecules.
Create Gigadock and FastROCS Collections
Locate the Prepare Giga Collections Floe on the Workflows tab of the Floe page.
Click “Launch Floe” to bring up the Job Form and set the following parameters.
Output Path: Use Tutorial/My Data/Mcule In Stock Collections as the path.
Inputs
Input File(s) (Semi-Optional): Click the “Choose Input” button and select the mcule_purchasable_in_stock.smi.gz file that you uploaded above. It should be in the path Tutorial/My Data/Input Data.
Outputs
Mcule In Stock Gigadock Collection: Molecules ready for use with the Gigadock Floe.
Mcule In Stock FastROCS Collection: Molecules ready for use with the FastROCS Floe.
Click the “Start Job” button to begin the floe. This job may take up to 10 hours to complete and cost approximately $40.
Note
If you are using this tutorial as a guide to prepare your own set of molecules and the input files are in CSV format, see the Prepare Molecules in a CSV File for Gigadock and FastROCS How-To Guide in addition to this tutorial.
View Collection Properties
Collections cannot be introspected by the Orion UI like datasets can. To view basic information (i.e., molecular properties) of the prepared collections, it is necessary to first run the Collection Info Floe.
Locate the Collection Info Floe on the Workflows tab of the Floe page.
Click “Launch Floe” to bring up the Job Form and set the following parameters.
Output Path: Use Tutorial/My Data/Mcule In Stock Collections as the path.
Inputs
Input Collection: Click the “Choose Input” button and select the Mcule Purchasable In Stock GigaDock Collection generated in the previous step of the tutorial as follows. It should be in the Tutorial/My Data/Mcule Purchasable Collections path.
Note
You could select the Mcule In Stock FastROCS Collection instead of the GigaDock collection. It will have nearly identical molecular properties to the Gigadock collection, but will have a maximum of 10 conformers per molecule rather than 200.
The floe will take about 15 minutes to run and cost about $1. Once the floe completes, go to the Jobs tab on the Floe page. Click on the job name to see the Details panel. You can access the Floe Report from the Reports section.
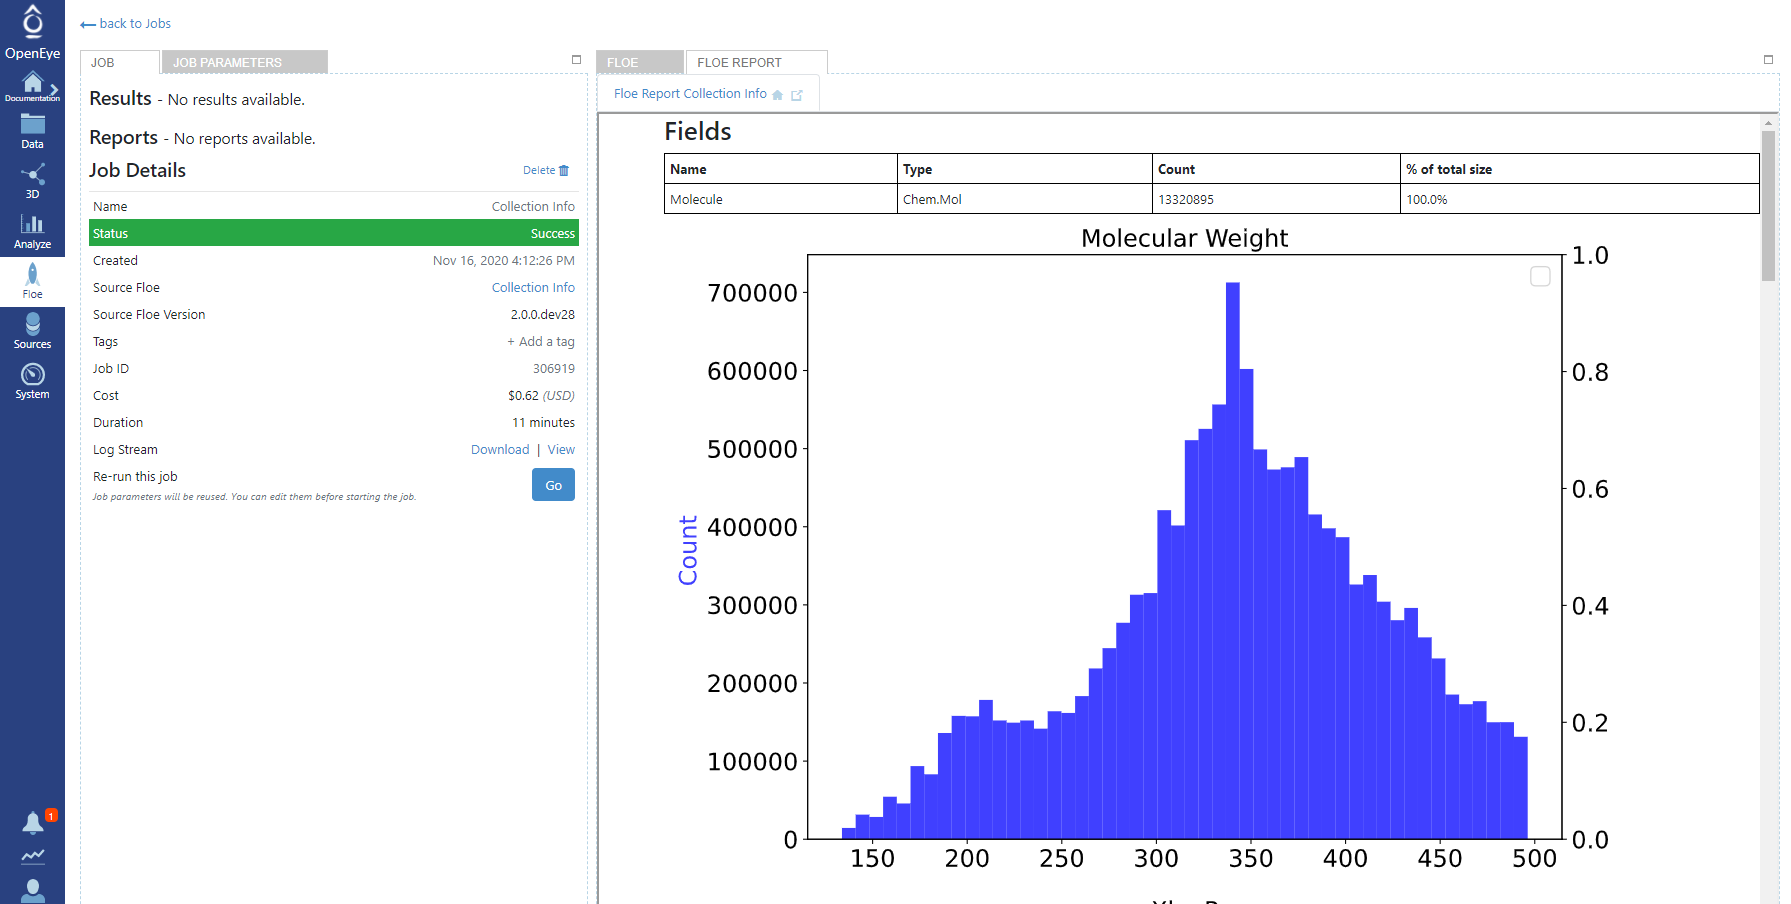
Figure 1. The Floe report for the Collection Info Floe using the Mcule collection.
View of a Random Sample of the Collection
The previous step in the tutorial examined the distribution of basic molecular properties of the prepared molecules. In this step, a random sample of the collection will be converted into a dataset and examined on the 3D & Analyze page.
Note
Collections are not directly viewable on the 3D & Analyze page.
Locate the Sample Collection Floe on the Workflows tab of the Floe page.
Click “Launch Floe” to bring up the Job Form and set the following parameters.
Output Path: Use Tutorial/My Data/Mcule In Stock Collections as the path.
Inputs
Input Collection: Click the “Choose Input” button and select the Mcule Purchasable In Stock FastROCS Collection generated in the previous step of the tutorial. It should be in the path Tutorial/My Data/Mcule Purchasable Collections.
Note
You could also select the Mcule In Stock GigaDock Collection instead of the FastROCS collection. It will have nearly identical molecular properties to the FastROCS collection, but will have a maximum of 200 conformers per molecule rather than 10.
The floe will take about 15 minutes to run and cost about $1.
To see the sample dataset in the 3D Viewer on the 3D & Analyze page, you first need to activate the datasets.
Navigate to the Data page from the blue navigation bar.
In the My Data folder, select the Mcule In Stock Collections subfolder.
In the ‘Show’ drop-down menu, be sure that the Datasets option is selected.
Locate the Sample Dataset dataset. Make it active by clicking on the white circle with the plus symbol which will then become a green checkmark.
This dataset should appear in the ‘Active Datasets’ drop-down. If other datasets are active, you can deselect them in the list or click the “Clear All” button.
Next, switch to the 3D & Analyze page and select the 3D Modeling layout from the Layout drop-down. Click the X on the Plot panel to remove it from the page view.
You can now browse individual records using the mouse or up and down arrows.
For more detailed information on how to navigate the features in Orion, please see the User Guide, in particular the 3D & Analyze page and 3D Viewer.