Design Unit Preparation for Beta-Lactamase (Optional)
For the purpose of this tutorial, we will prepare a design unit from the PDB structure (1JWP) of the apo form of Beta-lactamase. Using an apo protein structure to start these simulations is ideal. Starting with a protein structure that either has a ligand bound or where the bound ligand was removed may result in biasing the pocket search to favor that ligand binding pocket.
For more tutorials and information about protein preparation using SPRUCE, please refer to the Spruce documentation and the Spruce tutorials.
Note
If you have access to a stack with access to the MMDS database, proceed with preparing your protein PDB using Option 1. Otherwise, proceed with Option 2.
Design Unit Preparation using a MMDS Reference Structure (Option 1)
If the protein being prepared has a reference structure in the MMDS database, this is the best route to preparation.
Finding a reference structure using MMDS
For the OpenEye Cryptic Pocket Detection Floes package, we usually want to use an apo protein structure where a small drug molecule ligand is not present. However, it helps with the Spruce preparation of apo proteins to use a reference structure. The OpenEye MMDS dataset is an excellent starting place to find reference structures.
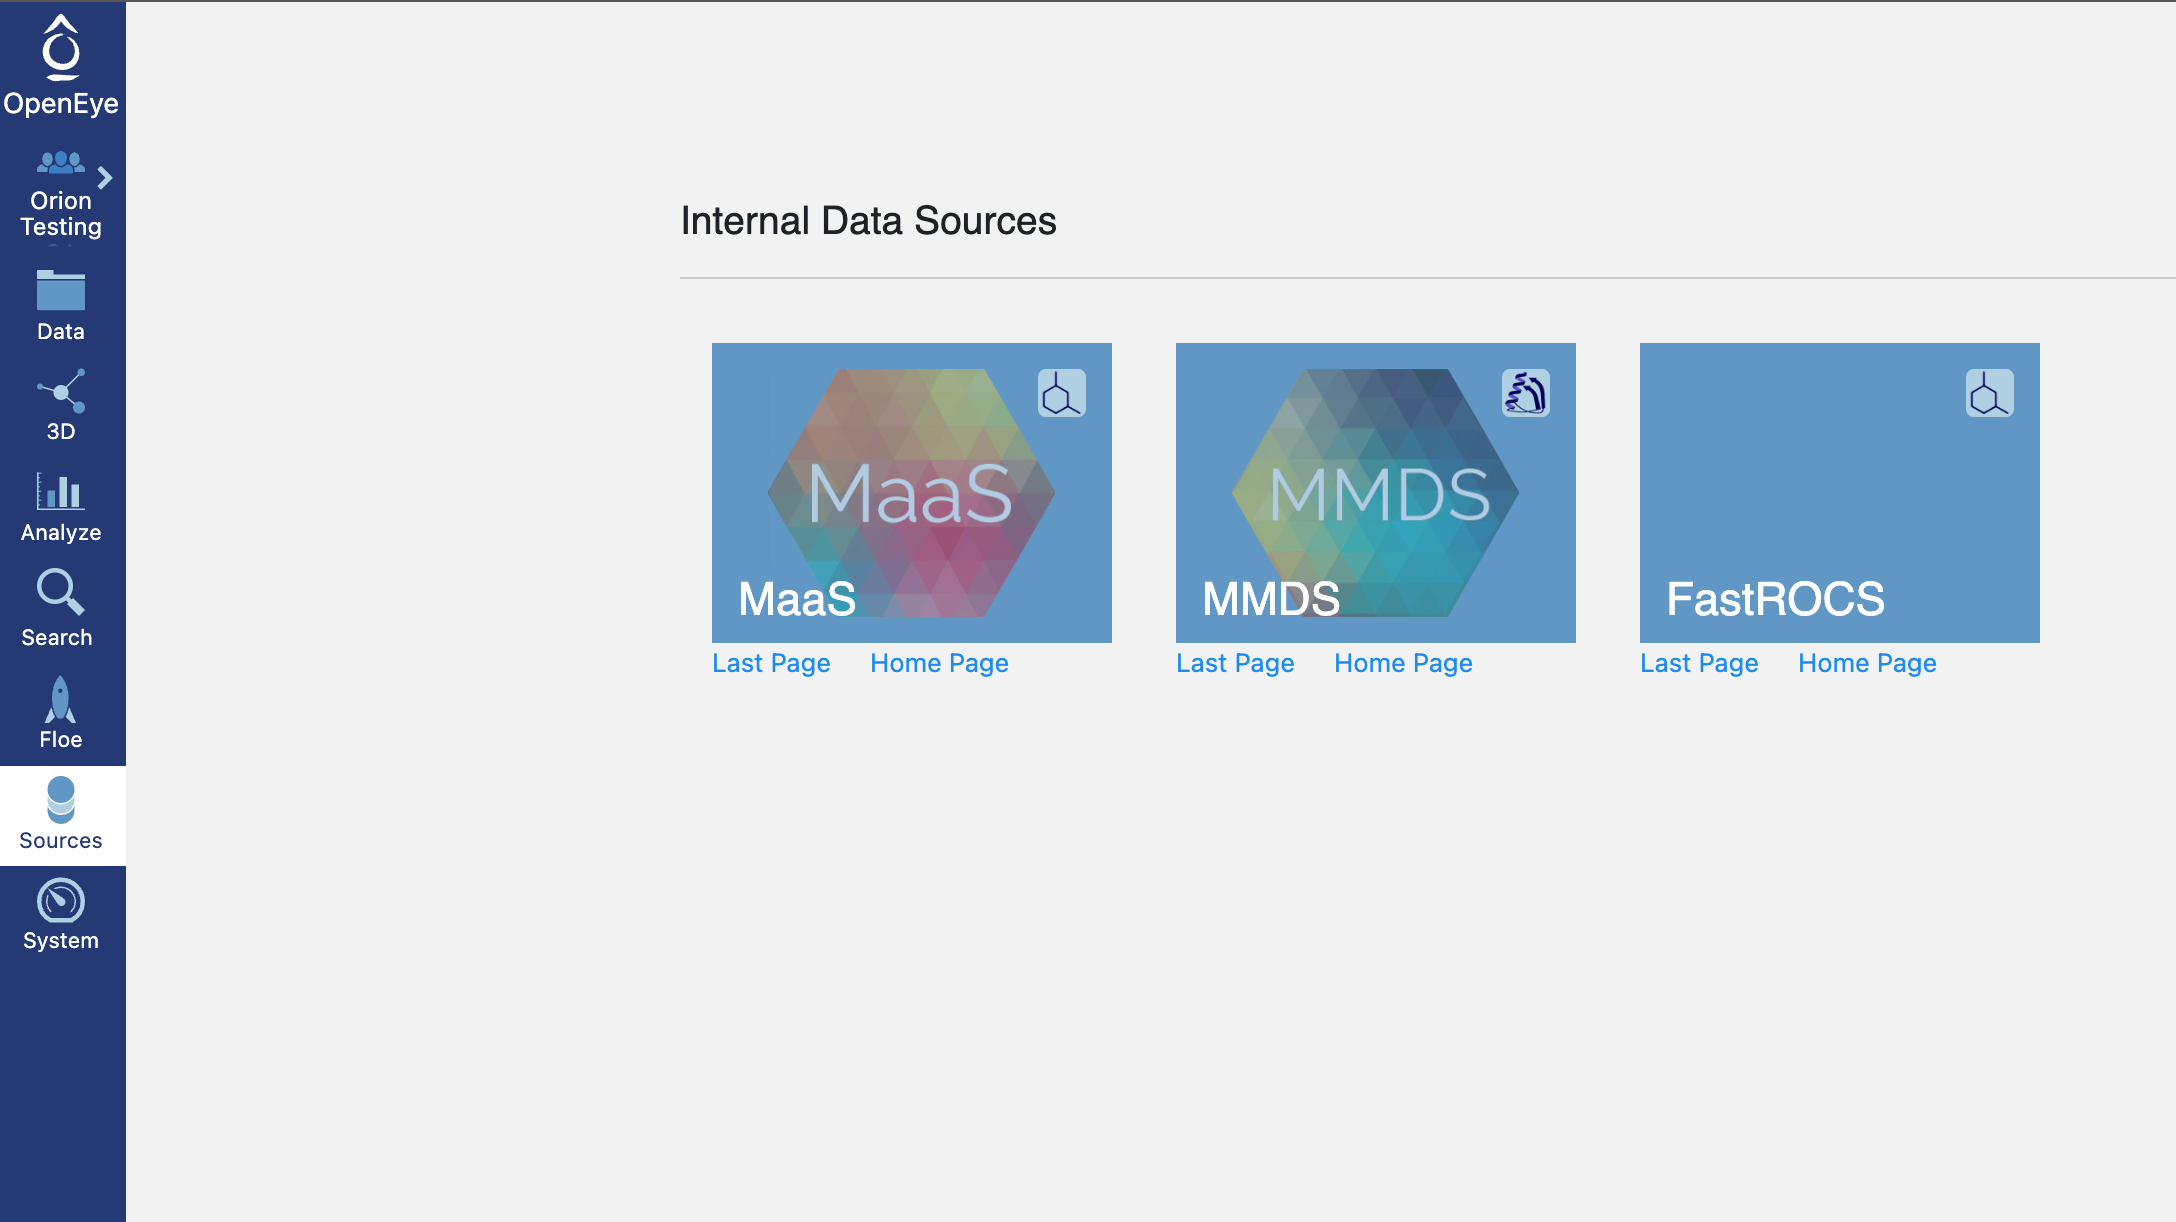
On Orion, the left column of options “Sources” will direct you to a page with three options. Click on MMDS. If you do not see MMDS as an option, we recommend that you use the preparation instructions in Option 2:
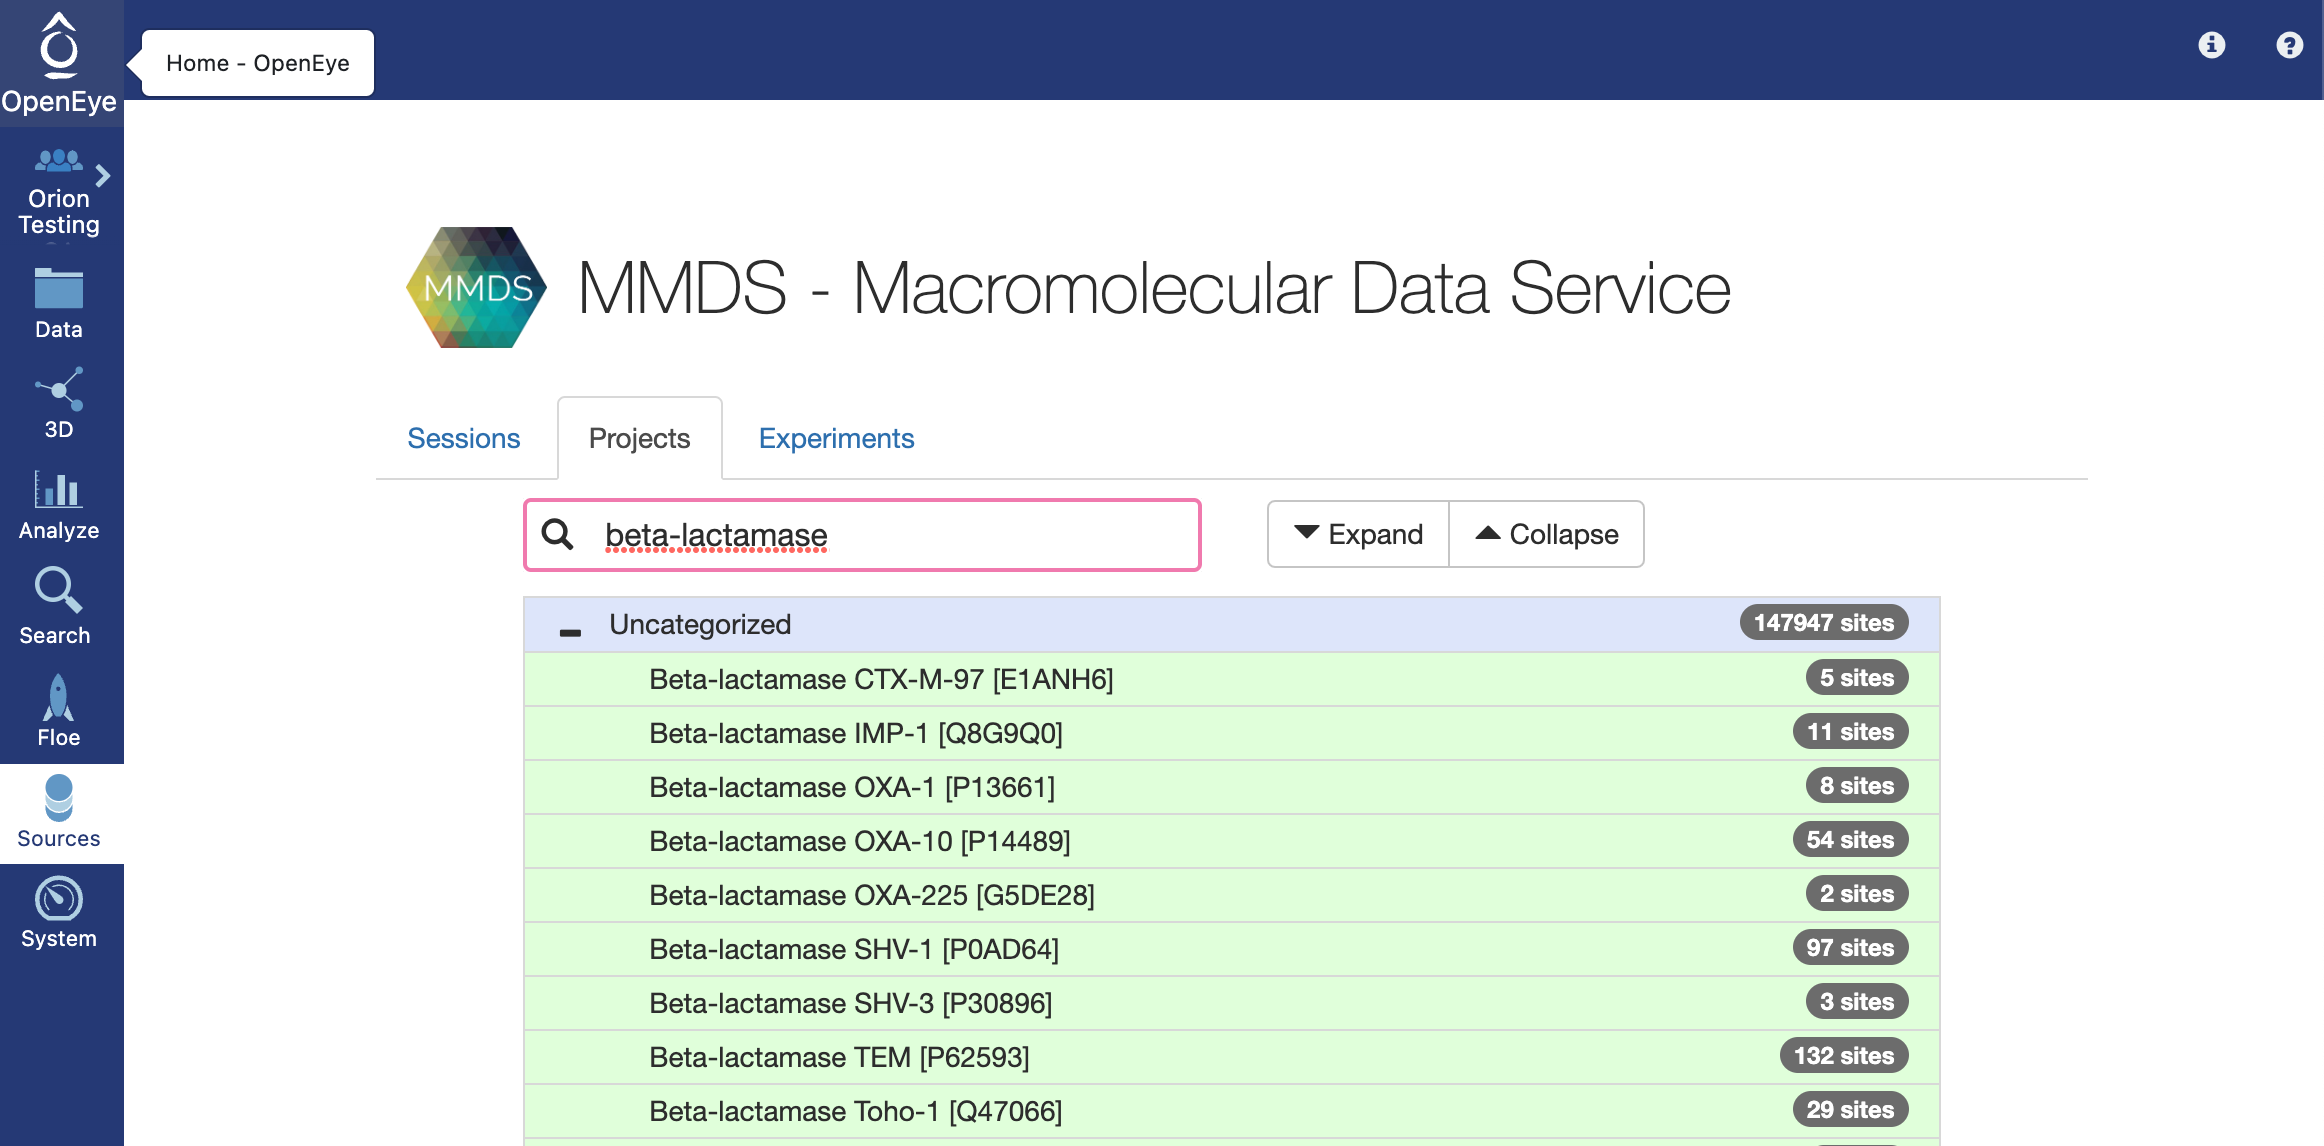
Enter “beta-lactamase” into the search bar on the MMDS page. Select the first option “Beta-lactamase CTX-M-97”. This will redirect you to the 3D viewer for the protein.
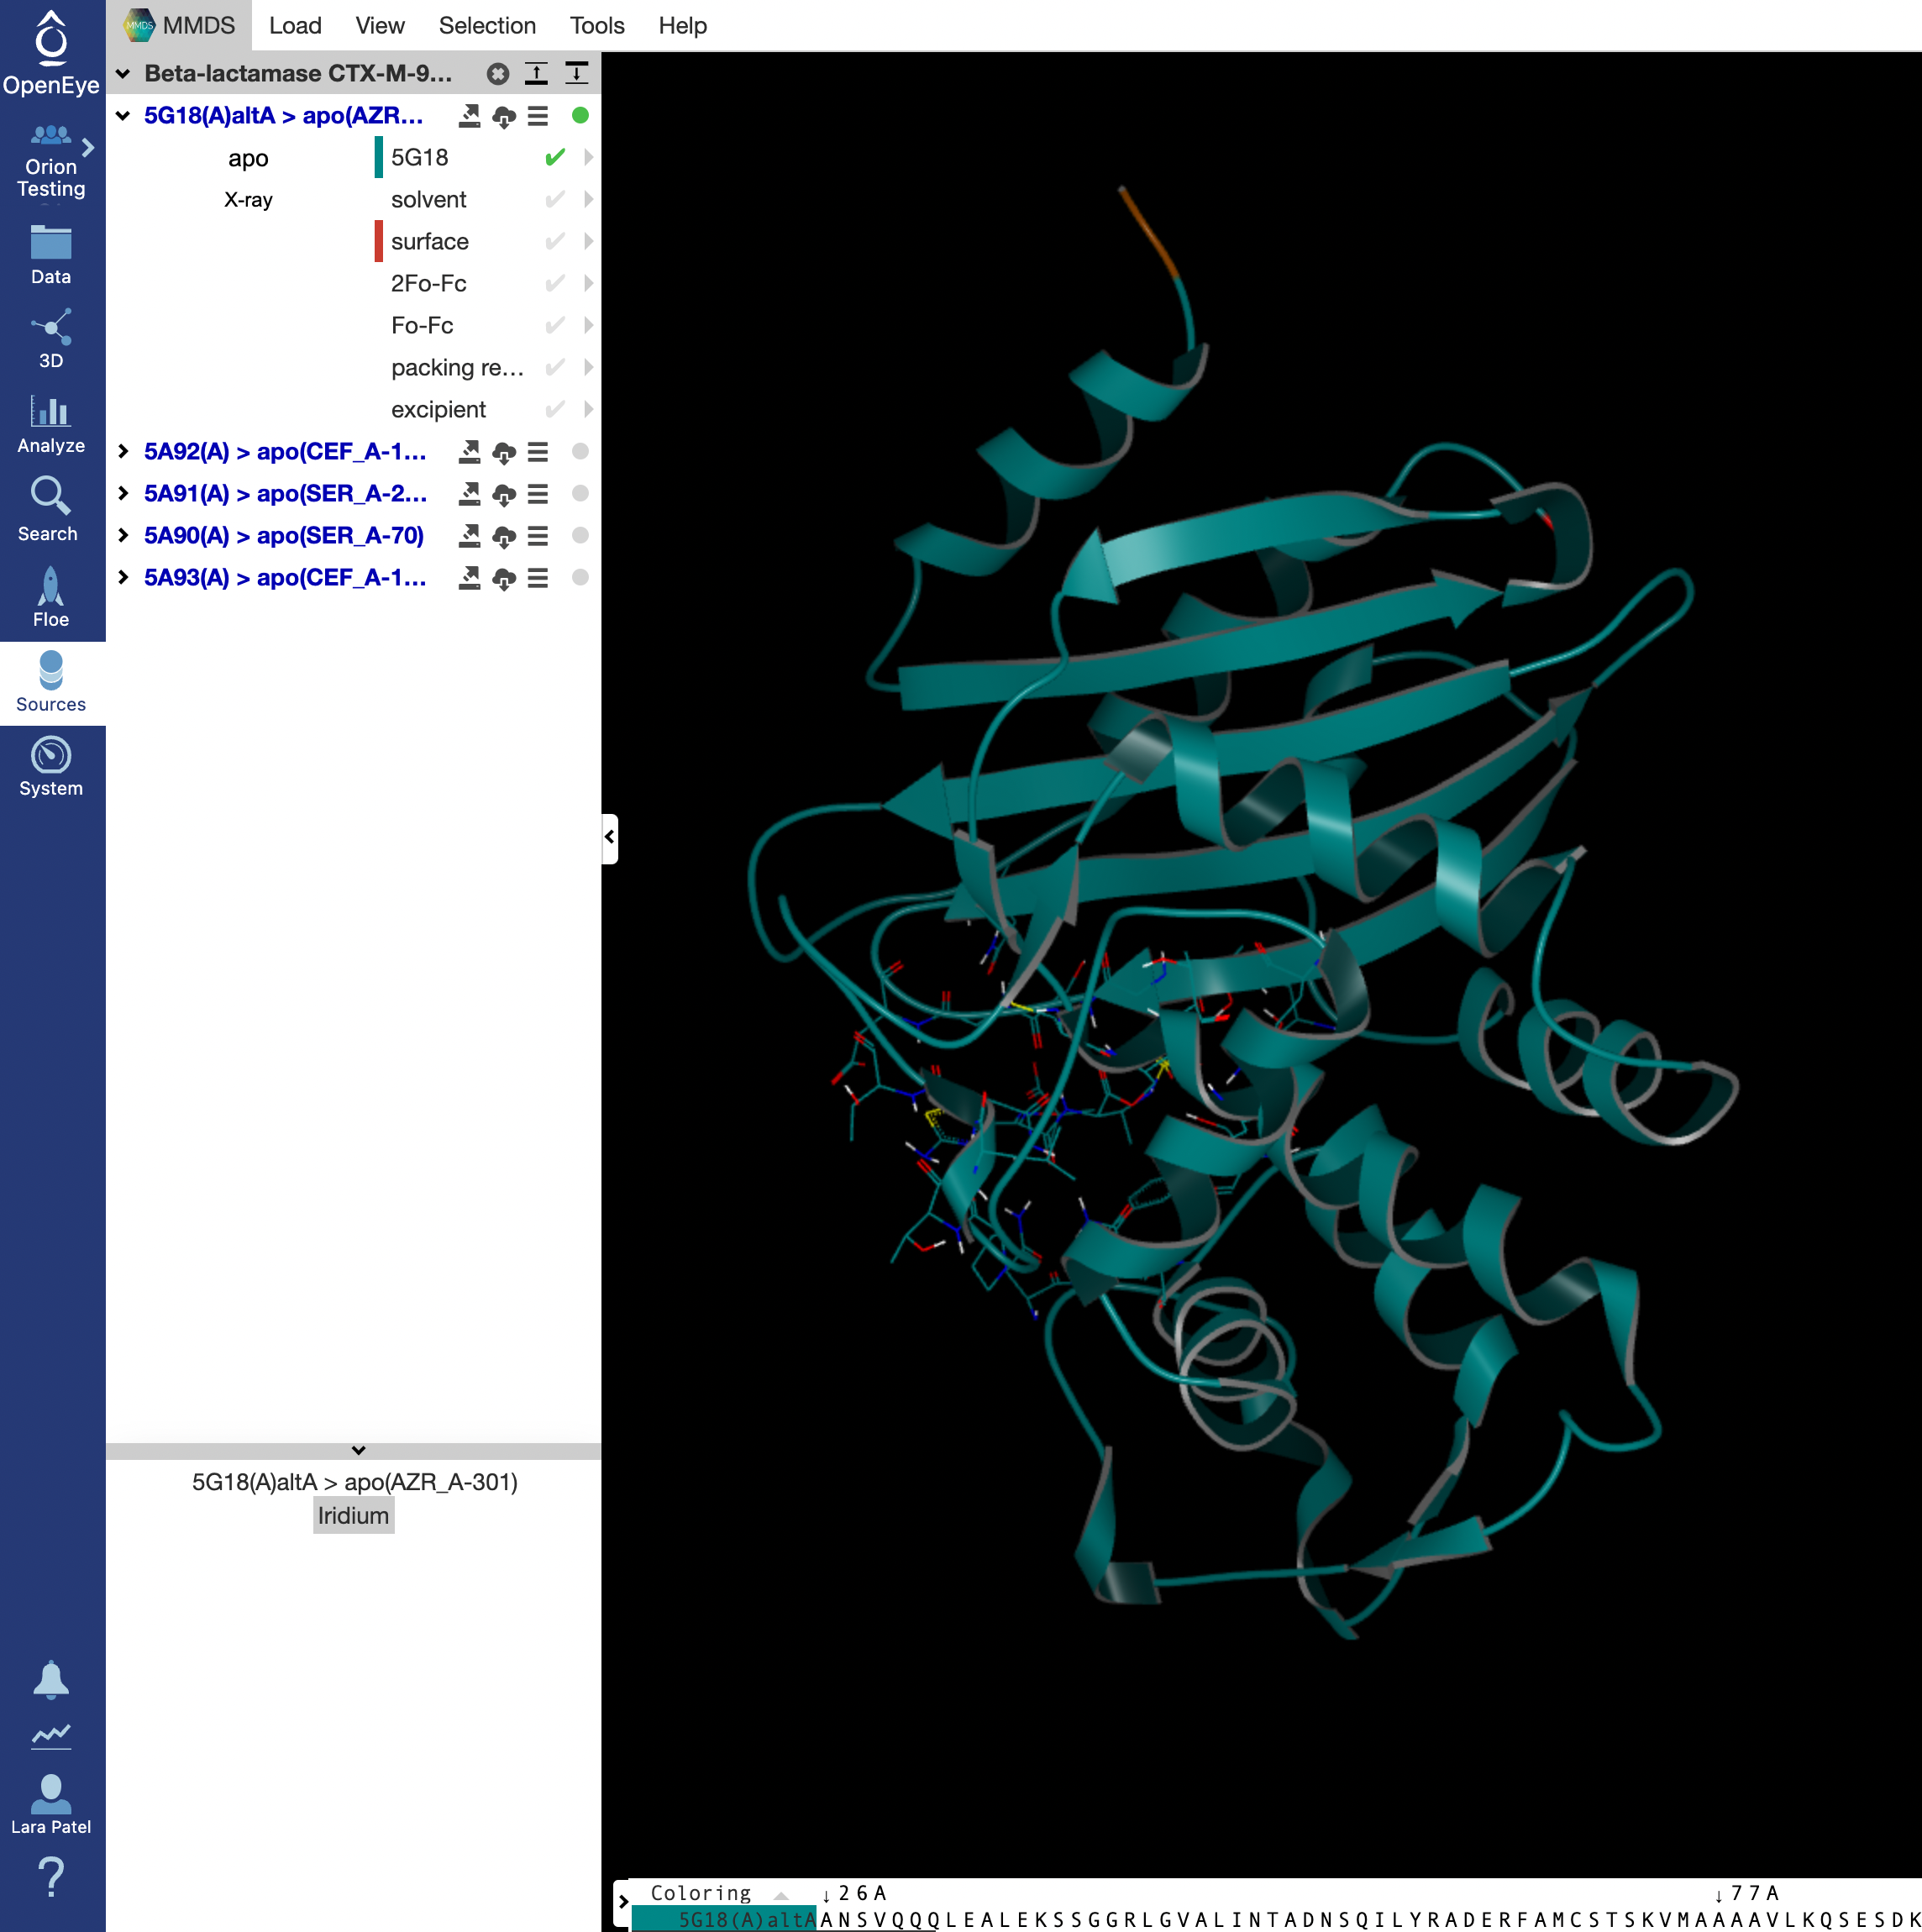
The 5G18(A)altA > apo(AZR_A-301) structure should automatically show up as the first option. We will be generating a dataset for this structure that will serve as the reference structure. On the left side options, the design unit name will be shown in blue with four icons next to it. Click on the first icon with an arrow pointing to the right.
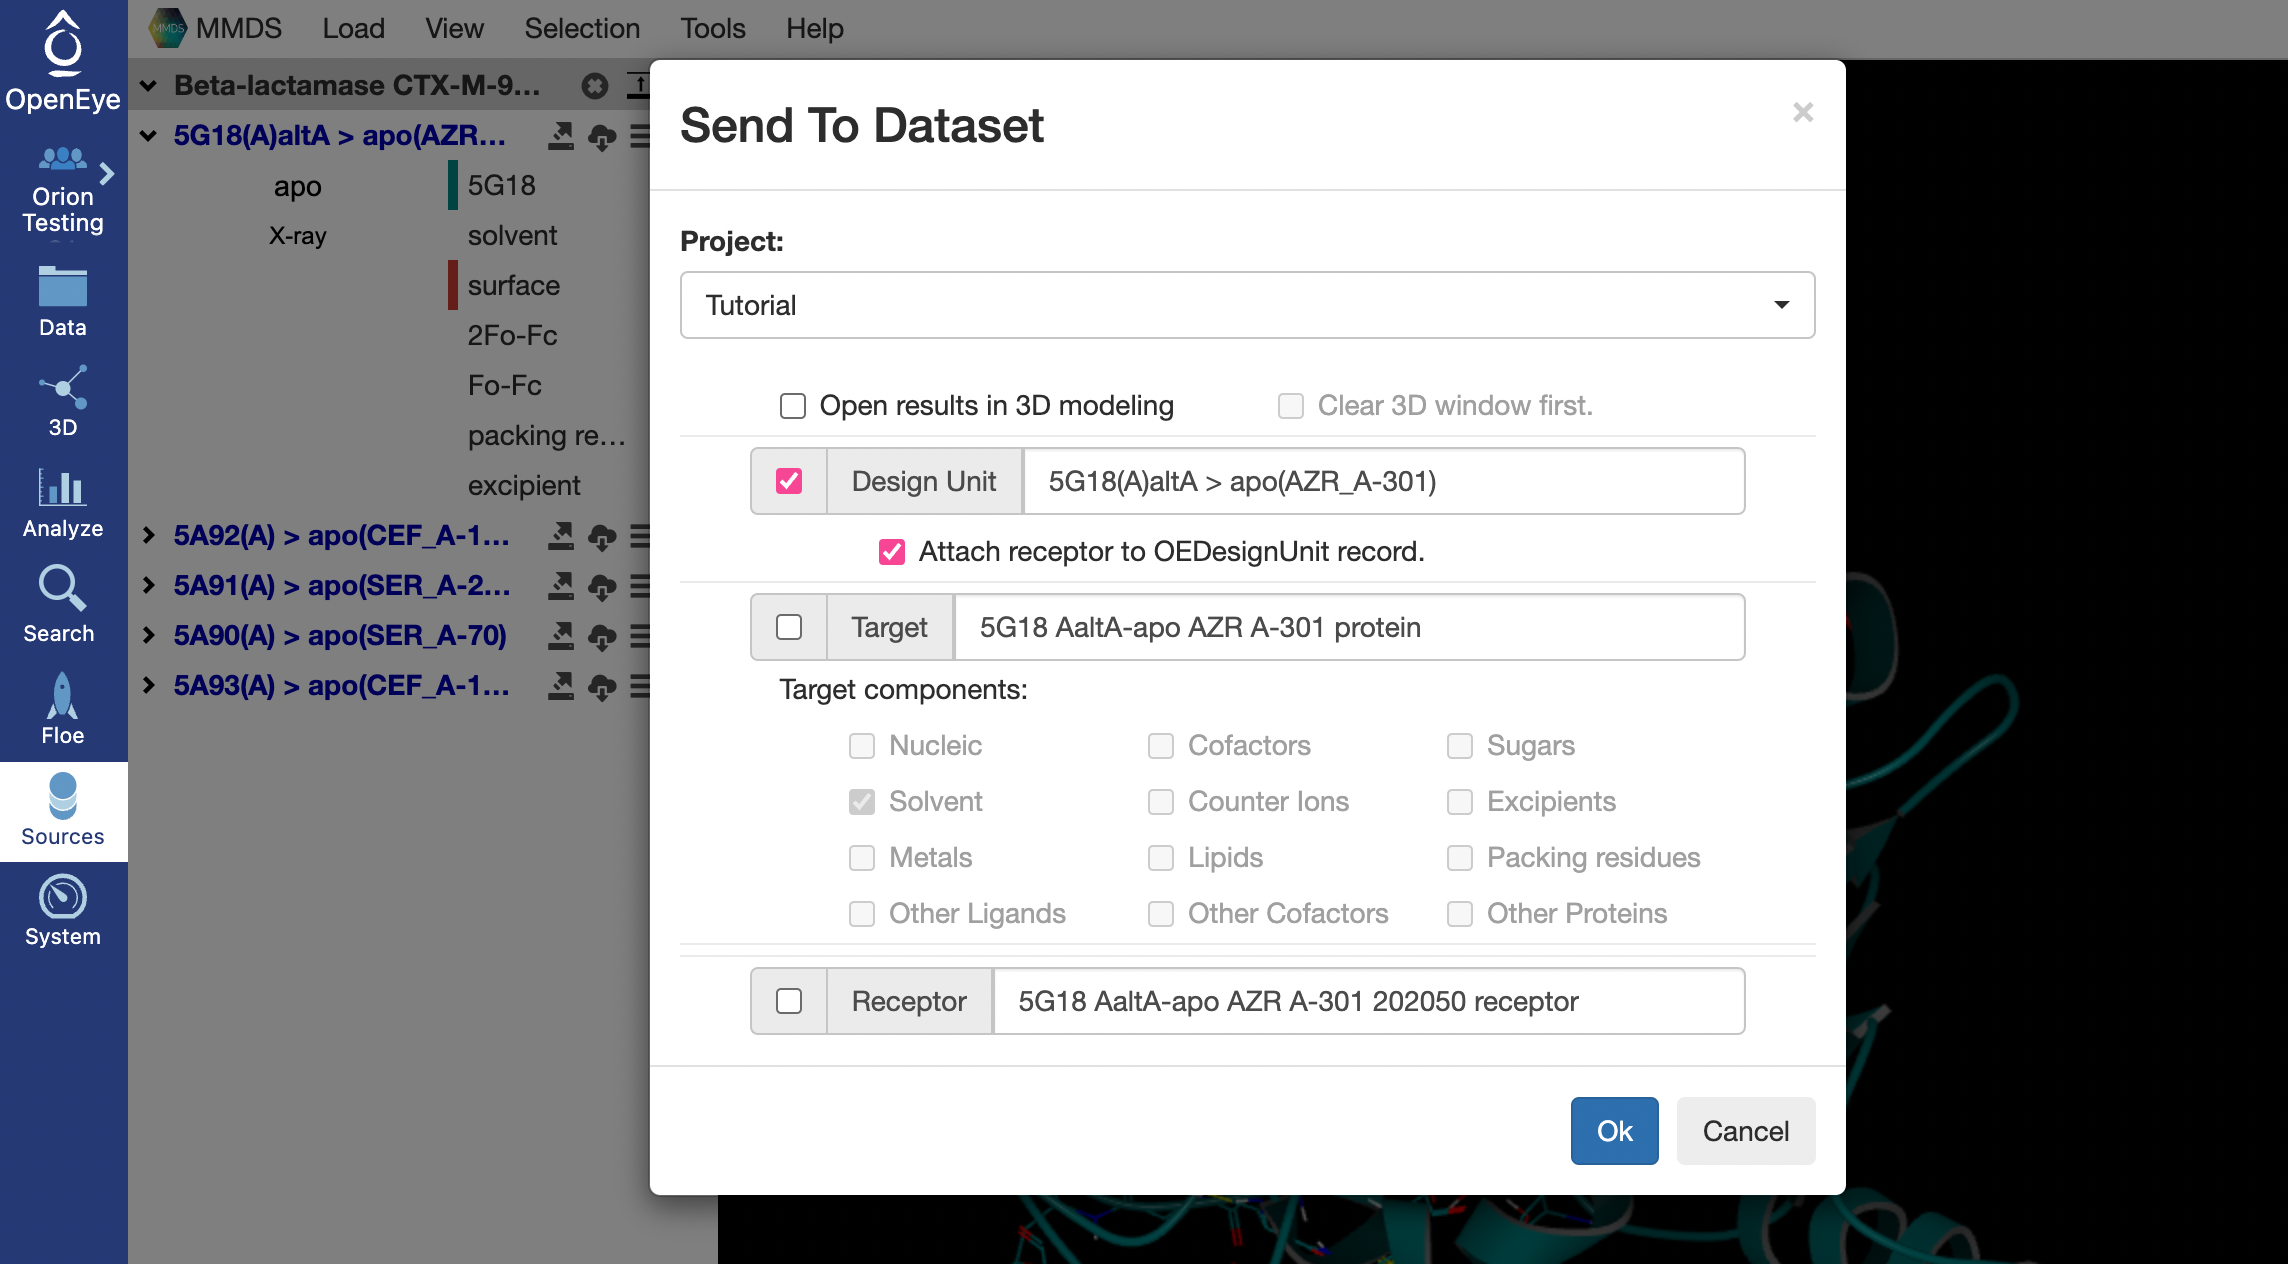
This should open a pop-up window. Choose the project space where you want the file to be sent and click “Ok”. This will generate a dataset with a design unit for the MMDS structure in “My Data” of the chosen project space.
Preparing the PDB using Spruce
On Orion, use the bar on the left side of the screen to navigate to Floe. Click on the tab at the top of that page named Floes. Type into the search bar “SPRUCE - Protein Preparation”.
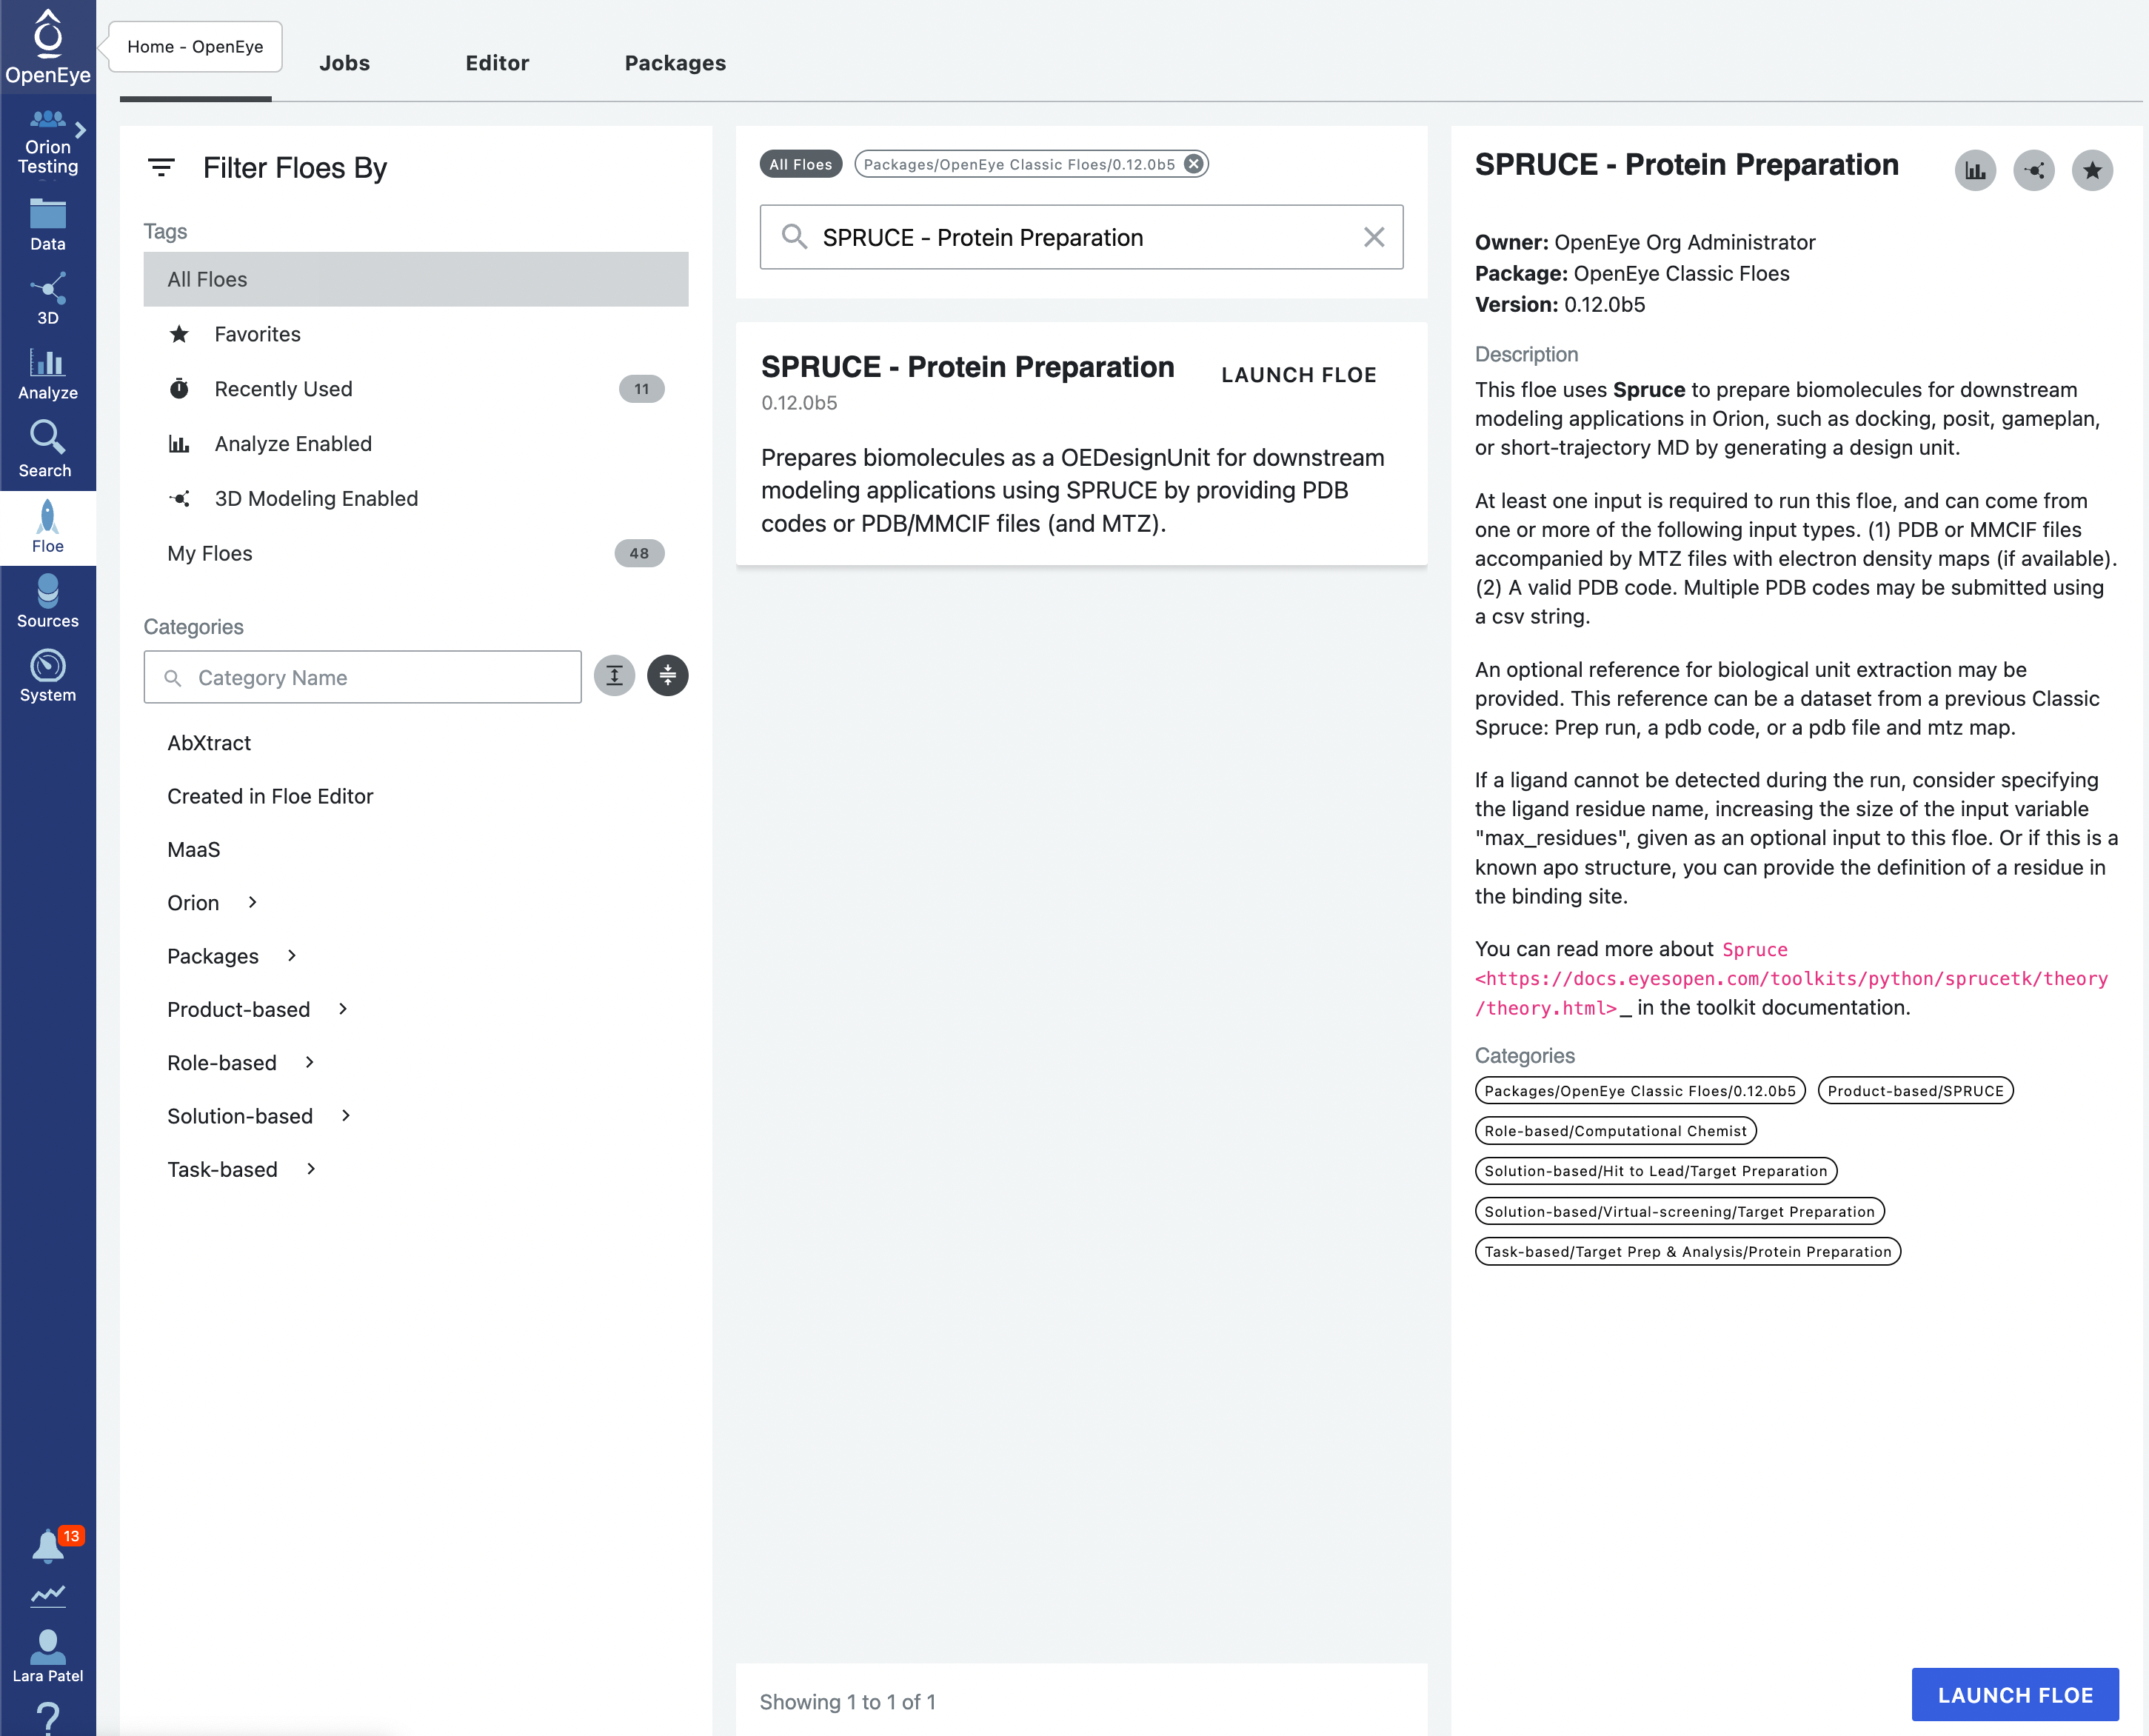
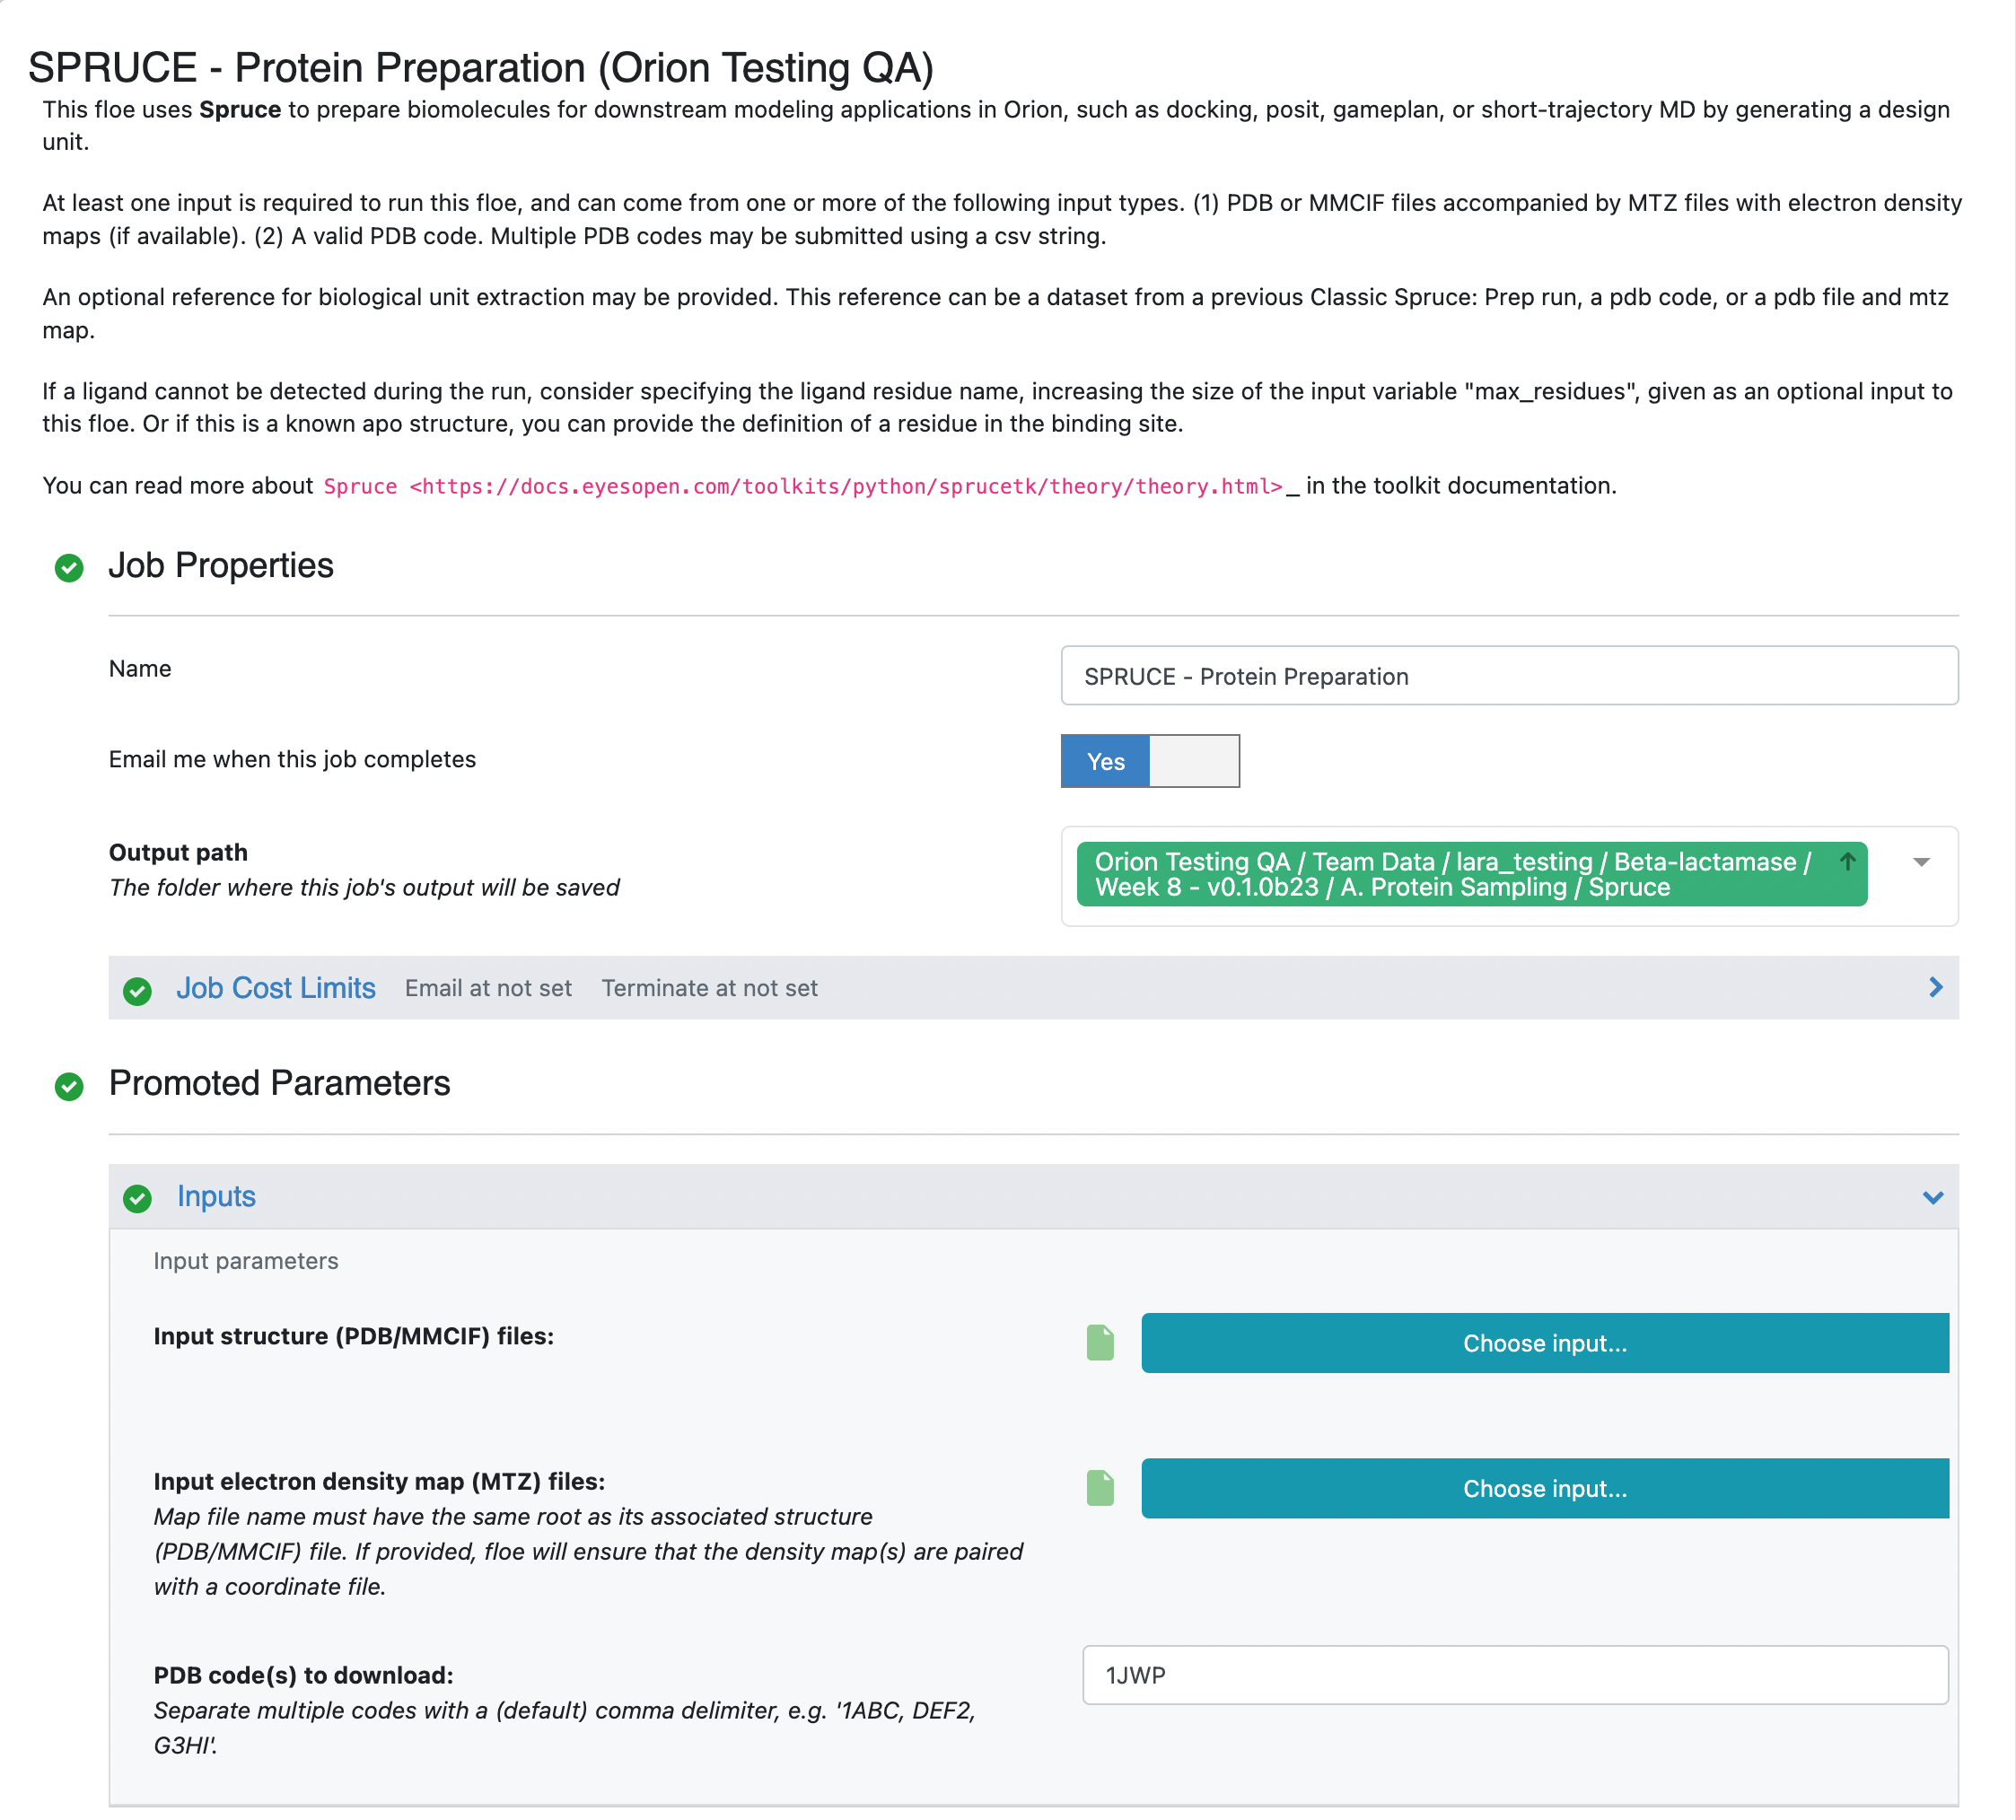
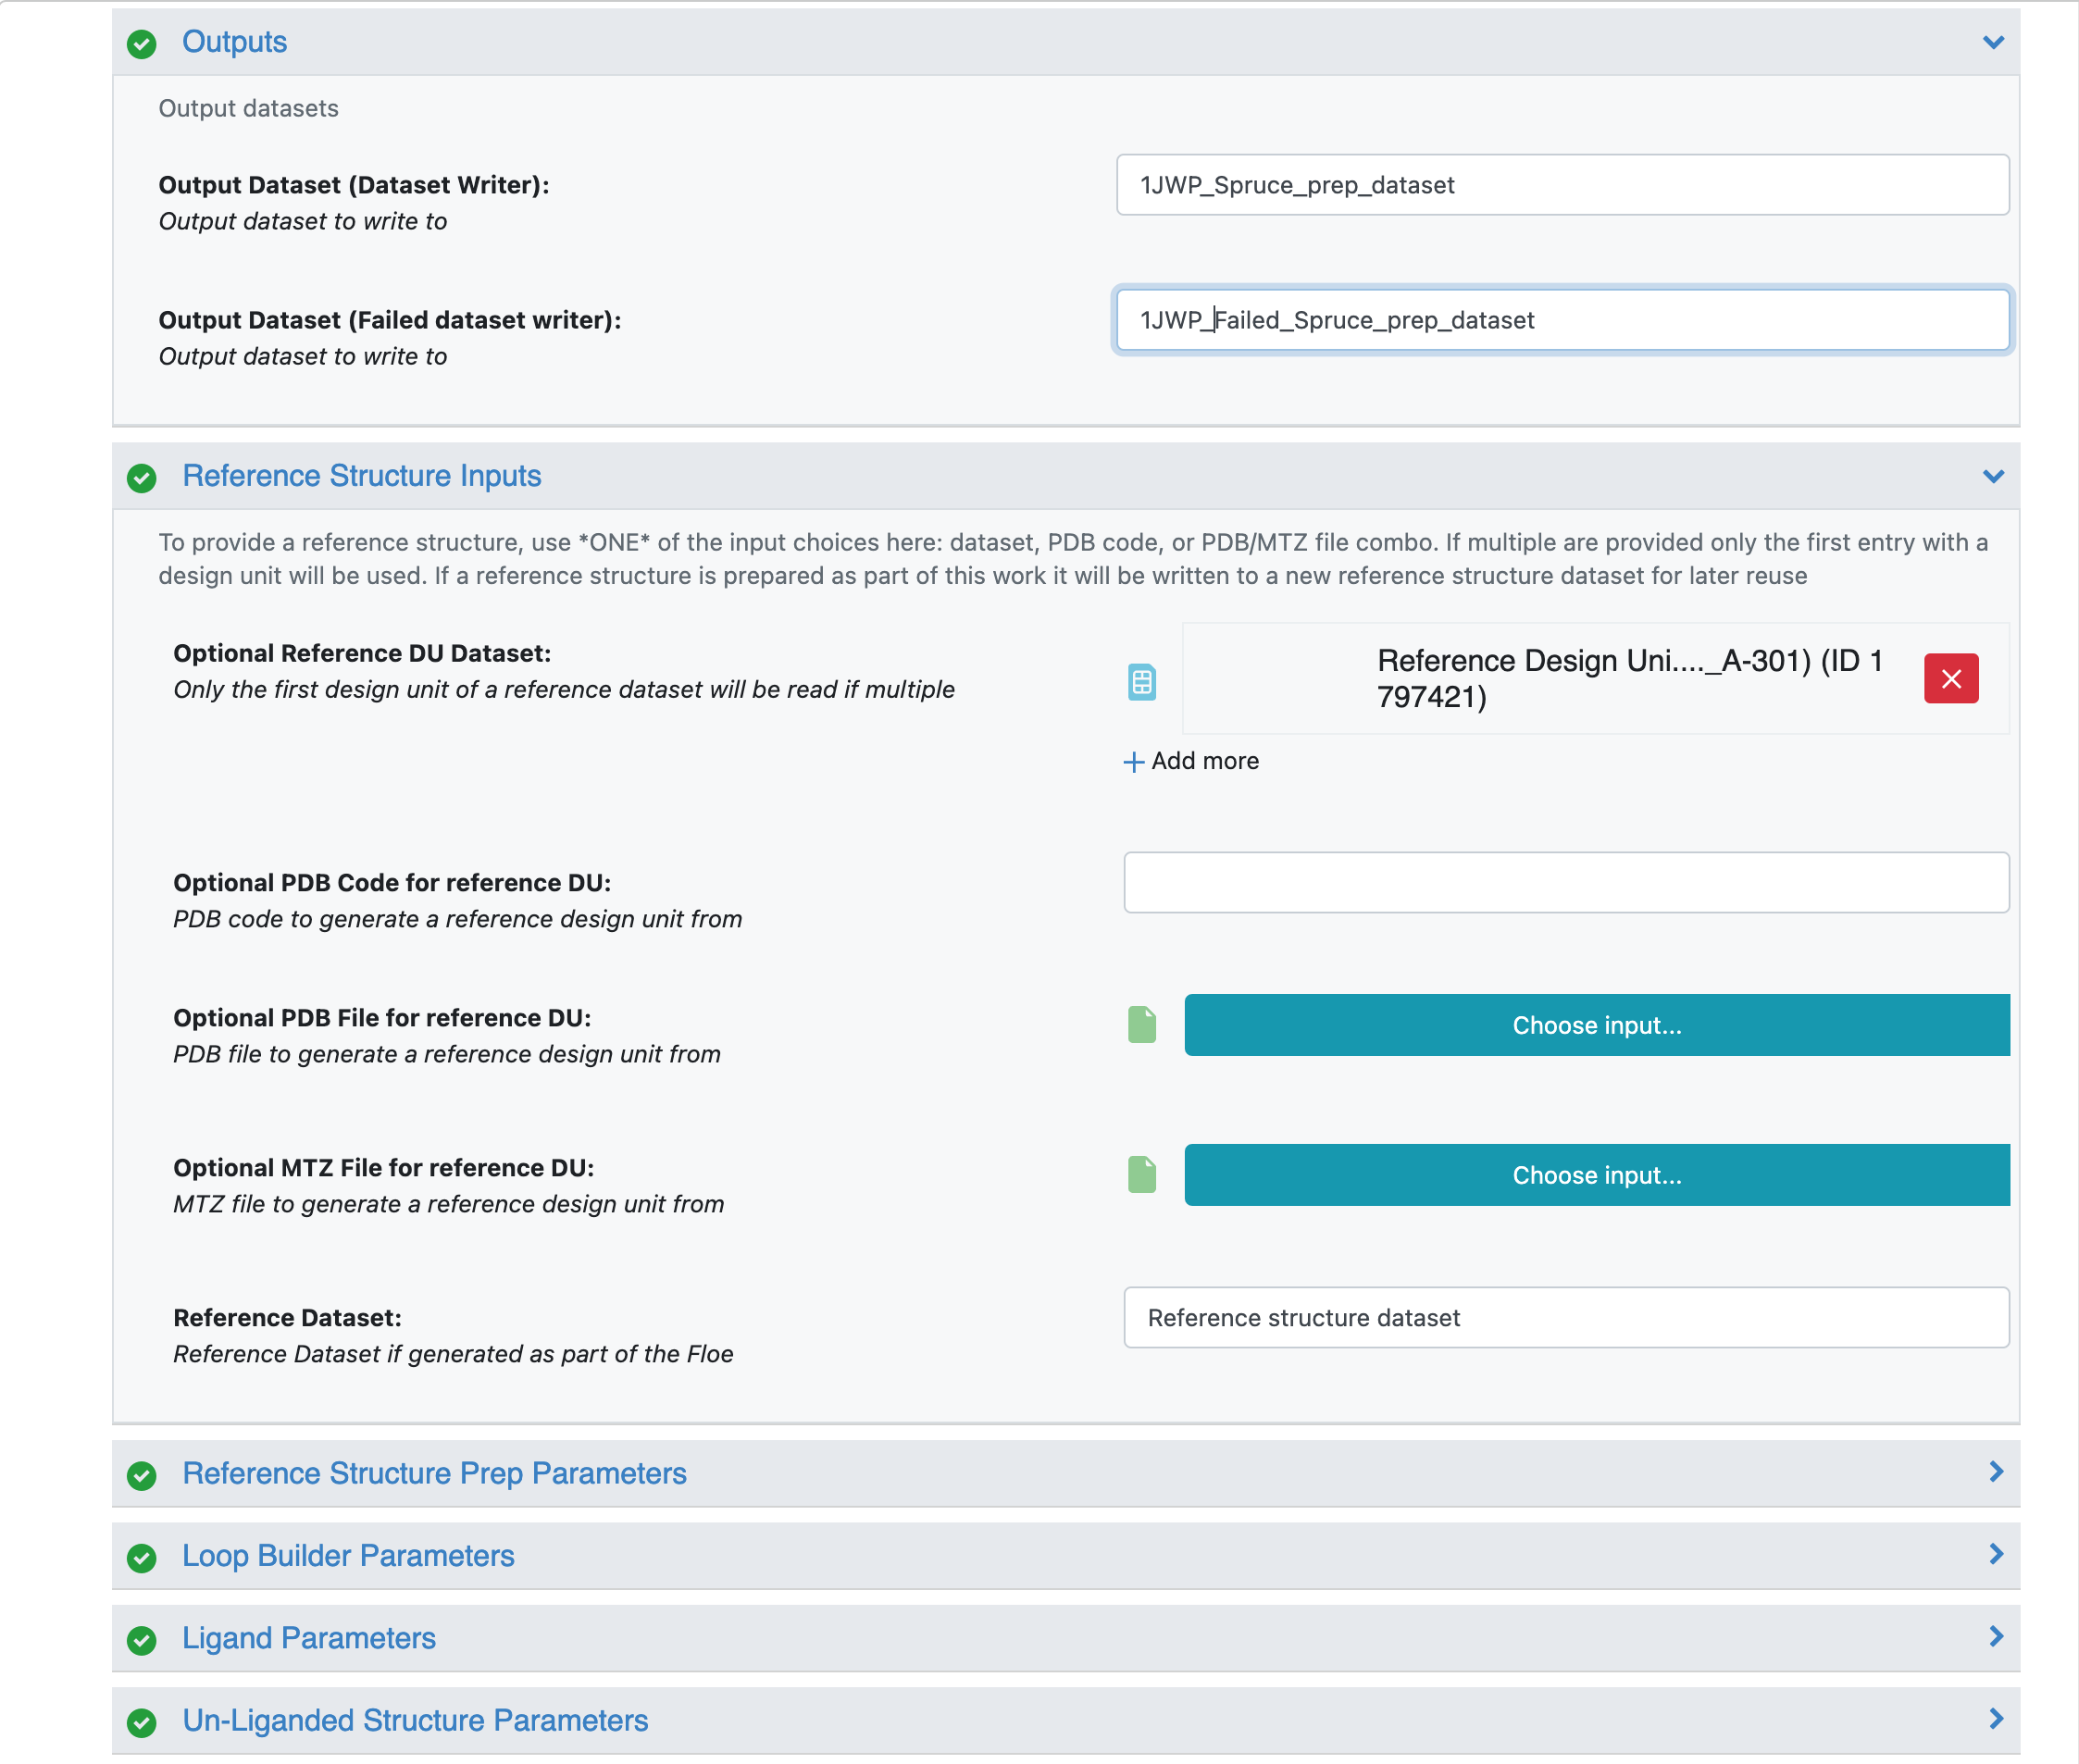
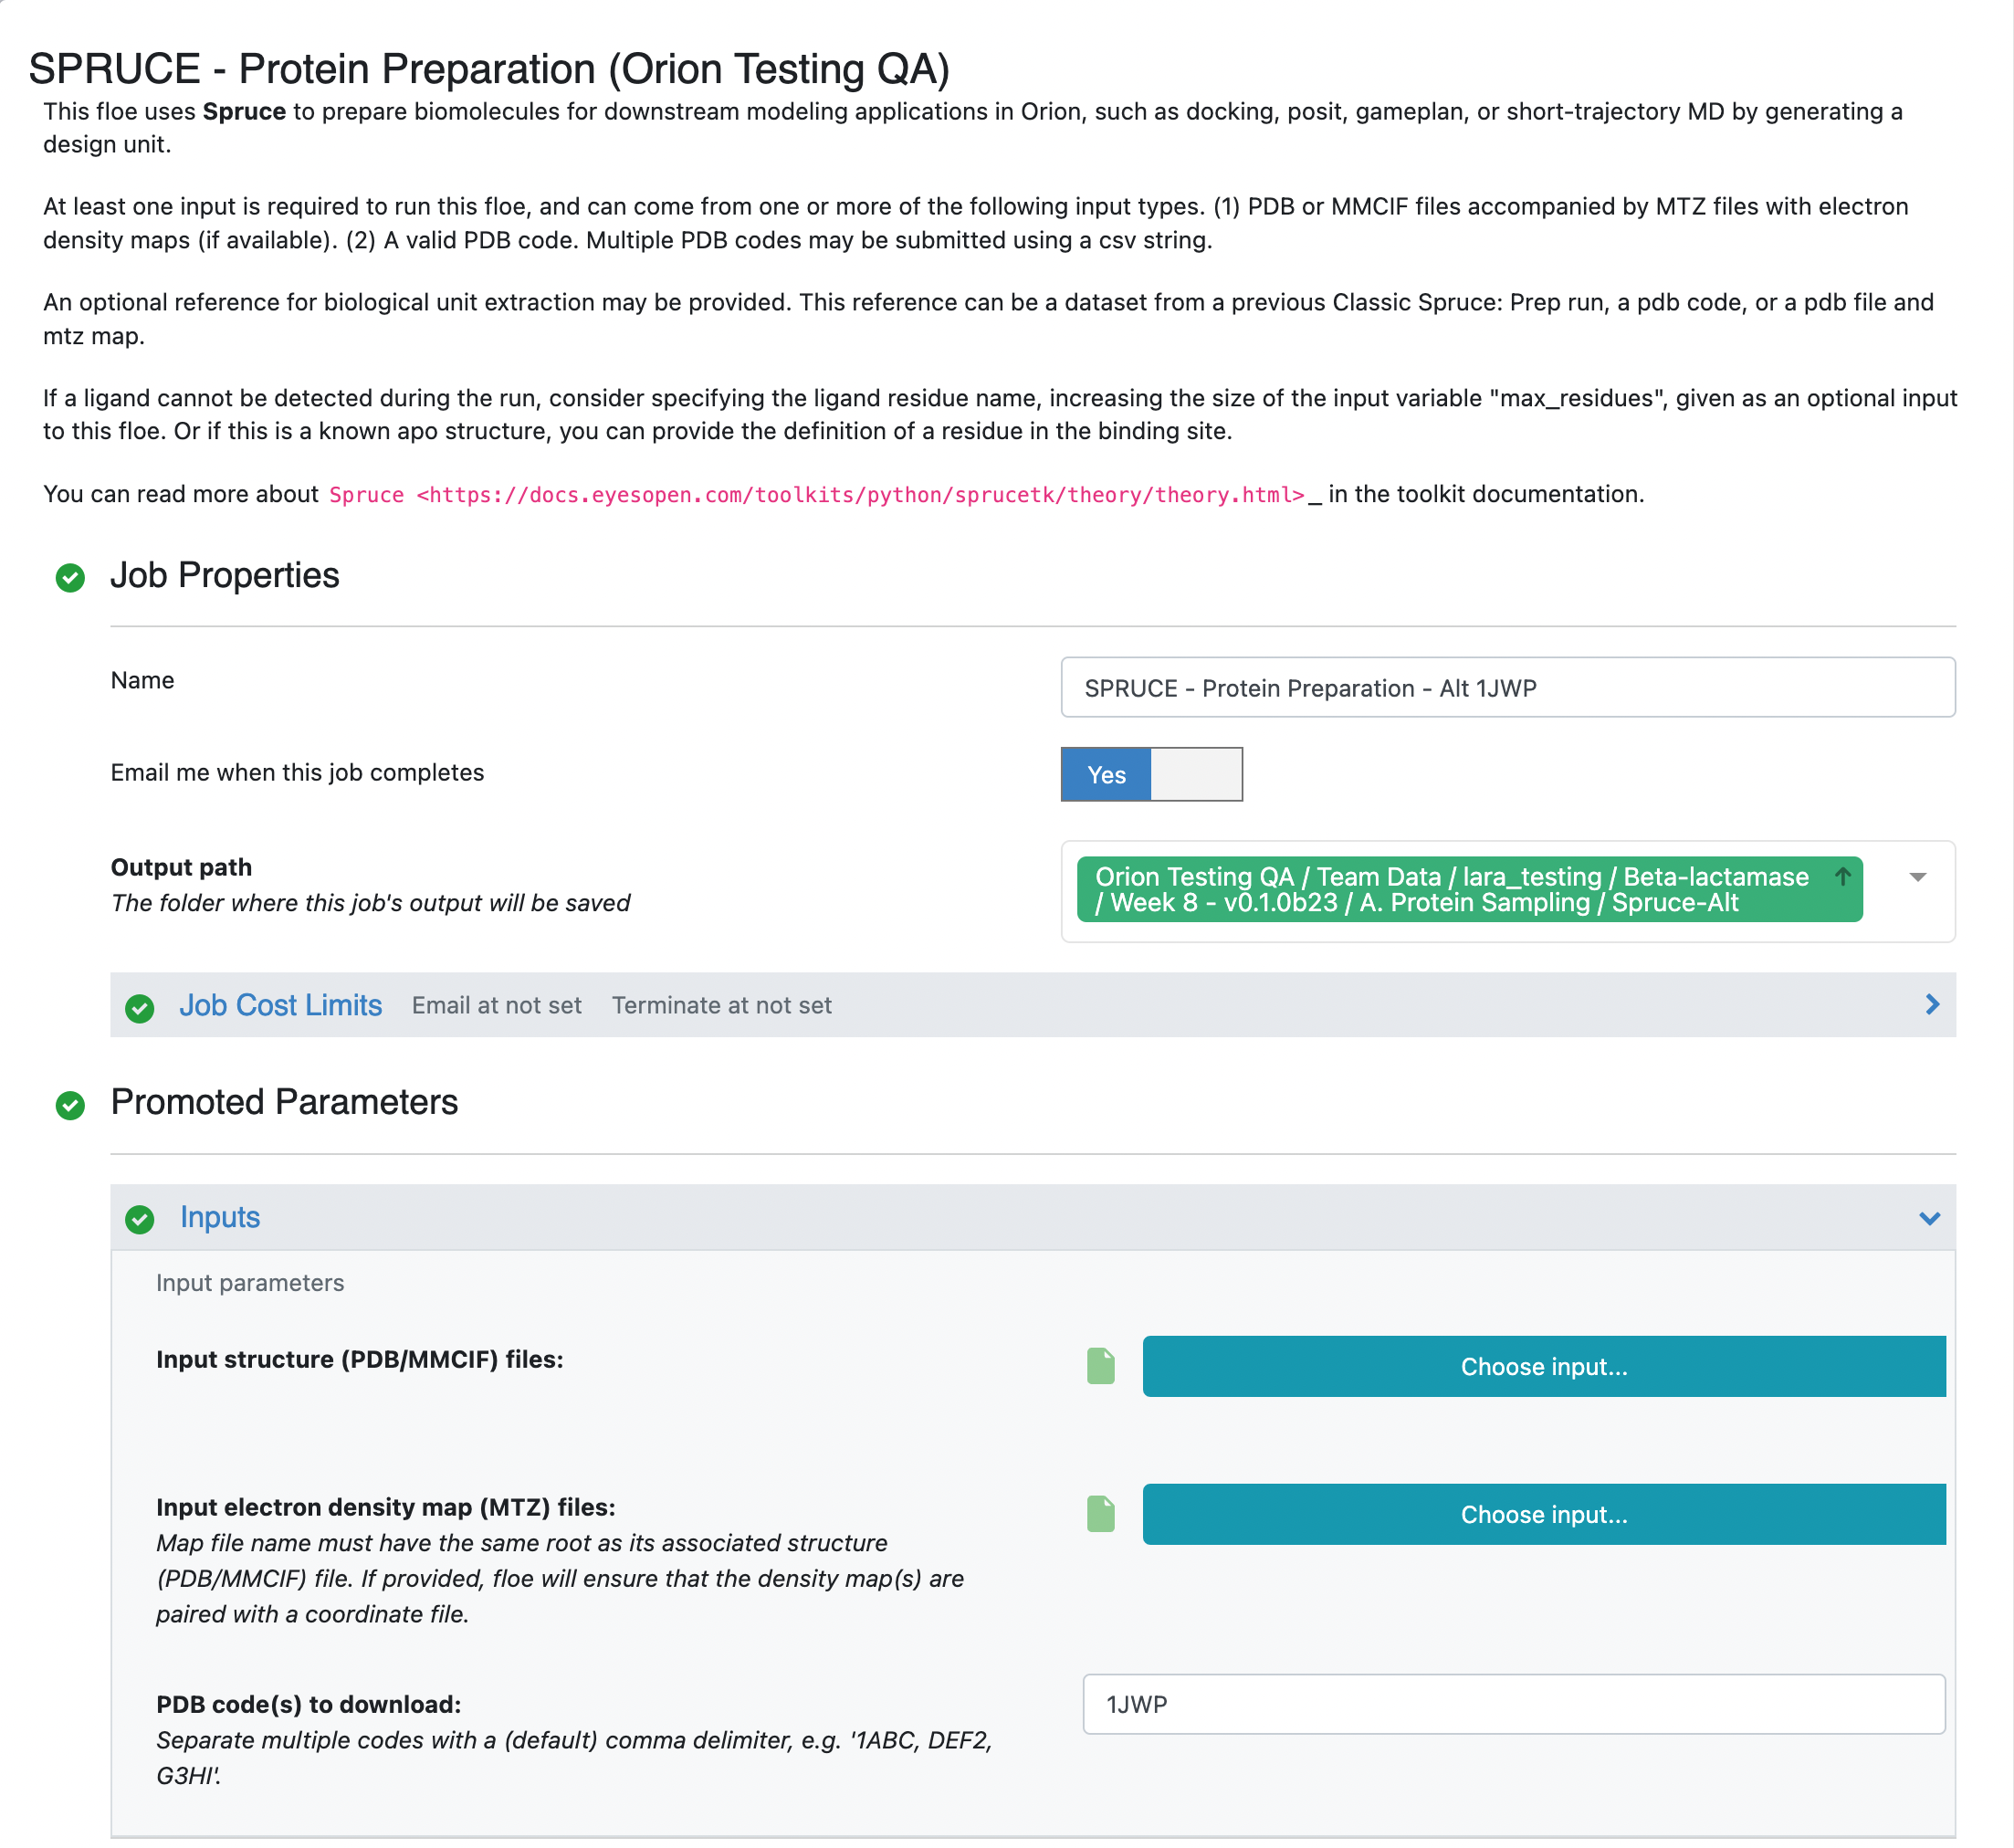
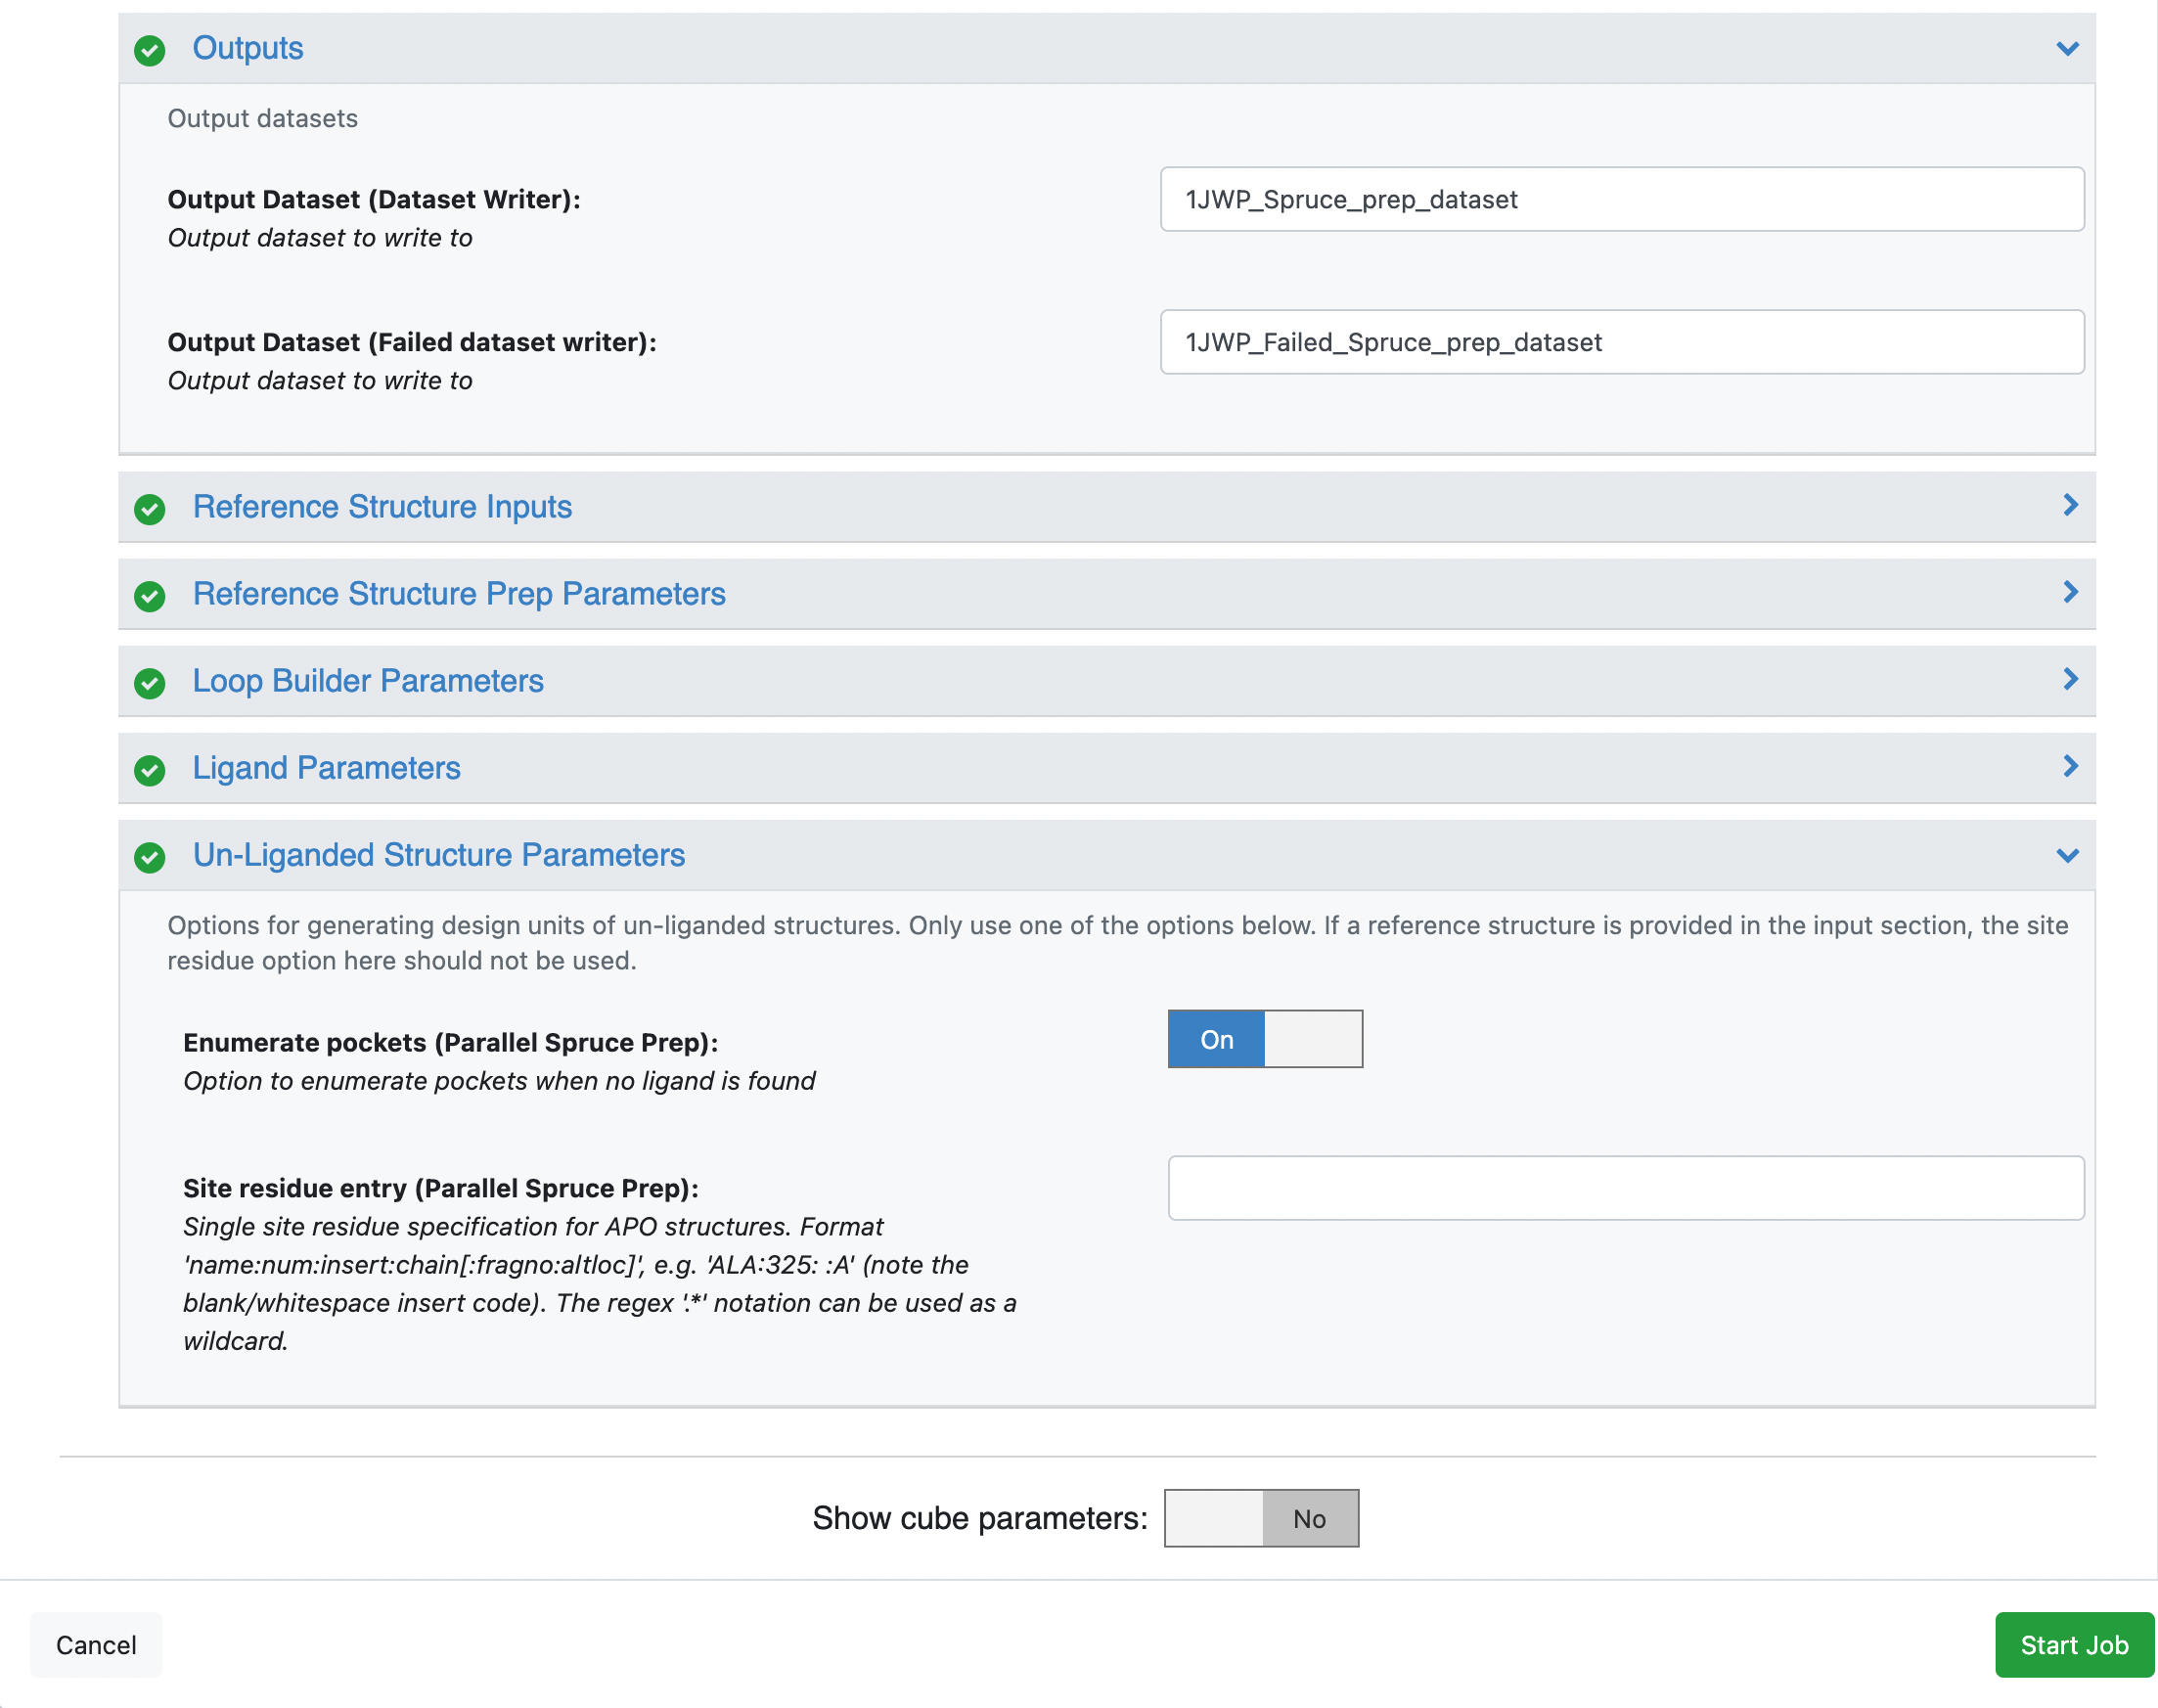
Click on the blue LAUNCH FLOE button in the bottom-right corner. This will open up a window for the Floe options. Choose where the output from the floe will be placed by specifying the output path. You can change the name of the floe job and the output dataset files to be something descriptive and distinct. Specify the PDB code(s) to download as 1JWP. Click on the “Choose input…” button of the “Optional reference DU Dataset” input parameter. We will use the 5G18 dataset that we generated in the previous step for this input. All other options can be left with their default values.

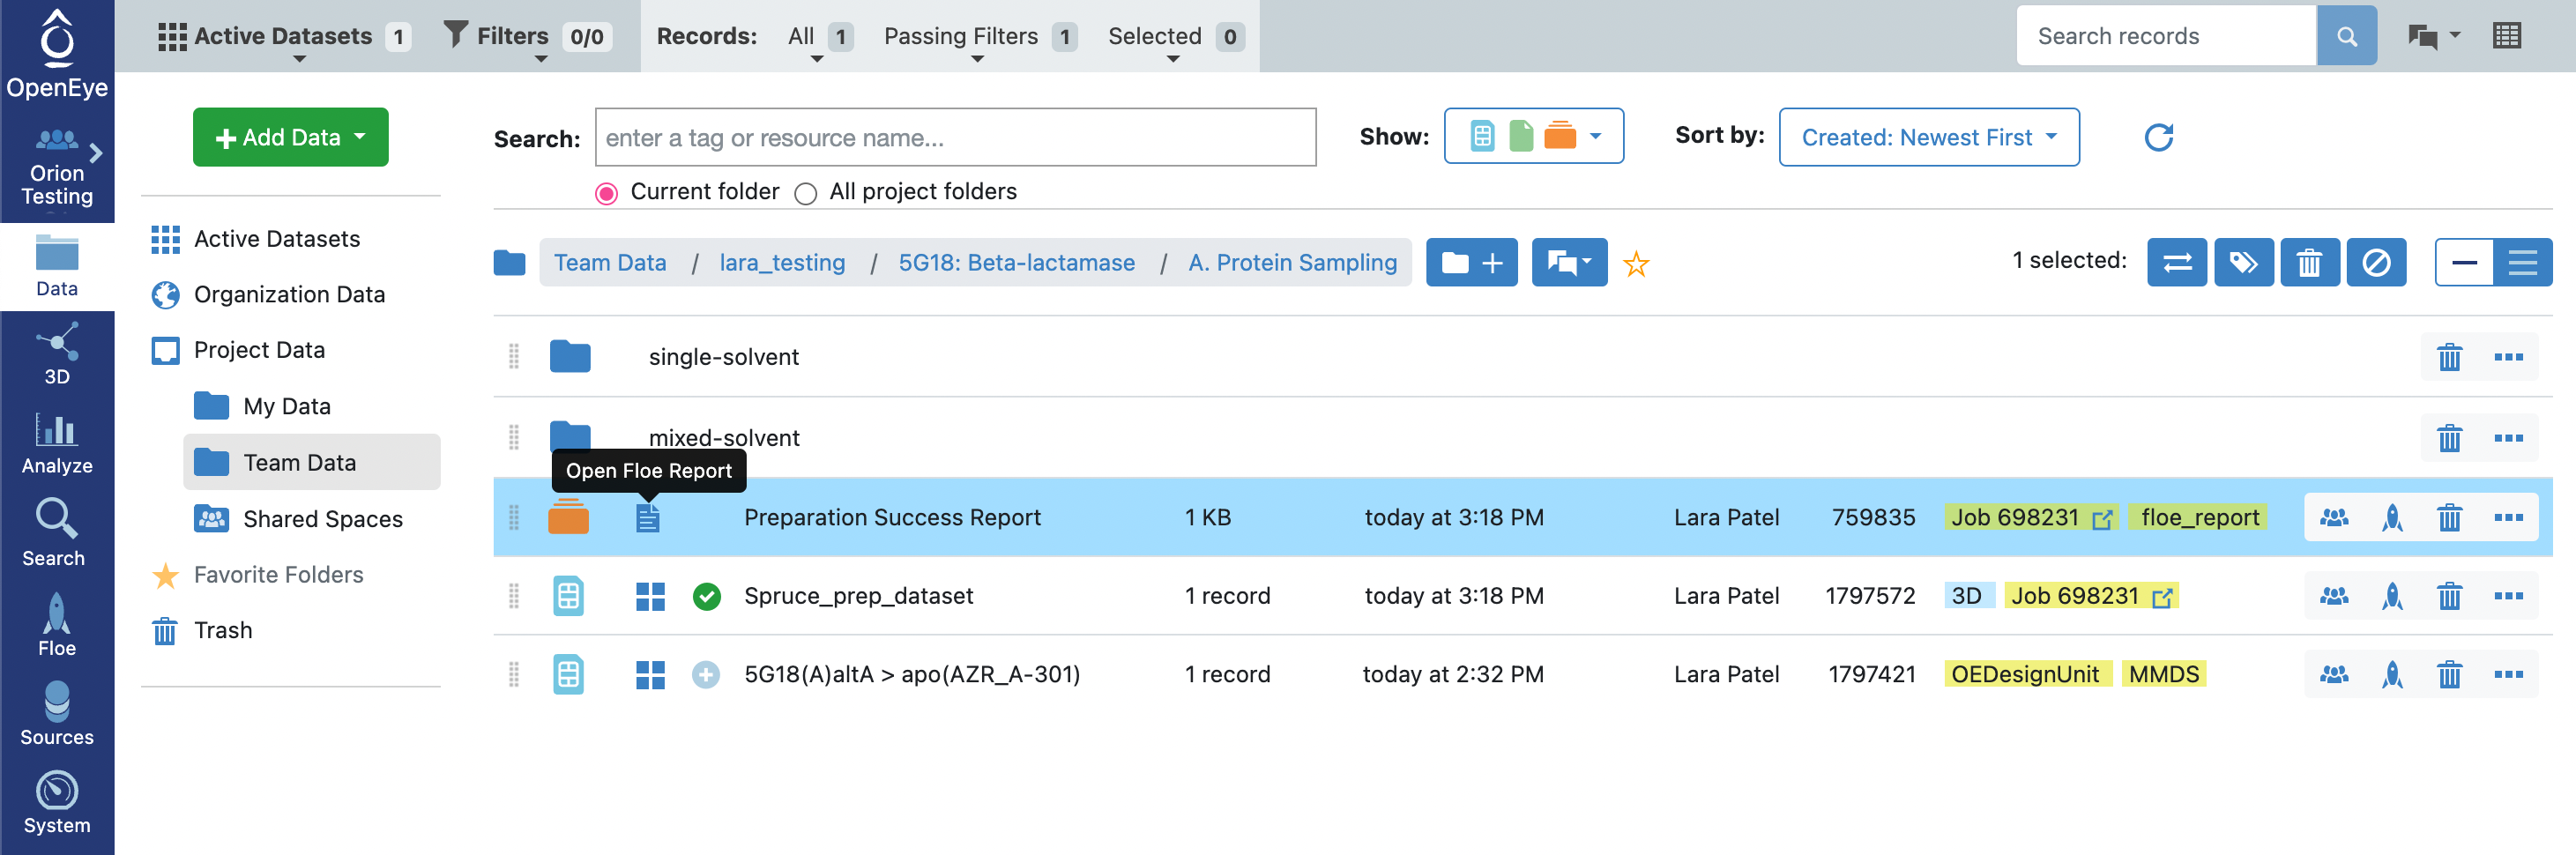
Click on the green “Start Job” button at the bottom of the Floe options. The floe should take approximately 10–15 minutes to complete. Once the job is done, take a look at the Preparation Success Report by double clicking on the page icon to the right of the orange folder icon (indicative of a collection). You will see that there were no issues detected for the preparation of the 1JWP PDB structure. In the preparation of other proteins, the success and failure reports are used to communicate issues encountered in the protein preparation. Fatal issues are redirected to the failure report, but issues with the quality of the prepared design unit(s) are reported in the success report.

The output design unit from the SPRUCE preparation of your protein includes several components, including a phosphate excipient. We do not want to carry the excipient component over to the simulation. As such, you will need to run the Subset Design Unit Floe following the instructions in this section of the tutorial.
Note
The SPRUCE - Protein Preparation Floe requires that there is enough information provided by the user to create a receptor. This information could include providing Ligand name(s) for the PDB being prepared, turning the Enumerate pockets option on, or providing a reference structure where a receptor has already been created. In the rare case, none of these options will work and the SPRUCE - Protein Preparation Floe will fail.
In a case like this, we recommend outputting the biological unit. After clicking on the LAUNCH FLOE button for the SPRUCE - Protein Preparation Floe, fill out the job parameters that you previously added and turn on the Show Cube Parameters option. This will reveal all of the Floes’ cubes and their respective parameters. Scroll down to the Parallel Spruce Prep cube and expand the options. Click on the General tab and scroll down to the option called Output biological unit and turn it on. Then click on the Start Job button. The Floe will output the intermediate biological units, but it will not evaluate the quality of the results. As such, this method should be a last resort and used with caution.
Design Unit Preparation without a MMDS Reference Structure (Option 2)
This method should be attempted on proteins where there is no access to the MMDS database or where there is no reference structure with a bound ligand available for the protein.
Preparing the PDB using Spruce
On Orion, use the bar on the left side of the screen to navigate to “Floes”. Click on the first tab at the top of the page named “Floes”. Type into the Floes search bar “SPRUCE - Protein Preparation”.
Click on the blue LAUNCH FLOE button in the bottom-right corner. This will open up a window for the Floe options. Choose where the output from the floe will be placed by specifying the output path. You can change the name of the floe job and the output dataset files to be something descriptive and distinct. Specify the PDB code(s) to download as 1JWP. Scroll down to the Un-Liganded Structure Parameters group and turn on Enumerate pockets (Parallel Spruce Prep). This will allow the floe to attempt to find pockets on the protein. This will initially be attempted with the OE functions and if that fails, it will attempt to find pockets using fpocket.
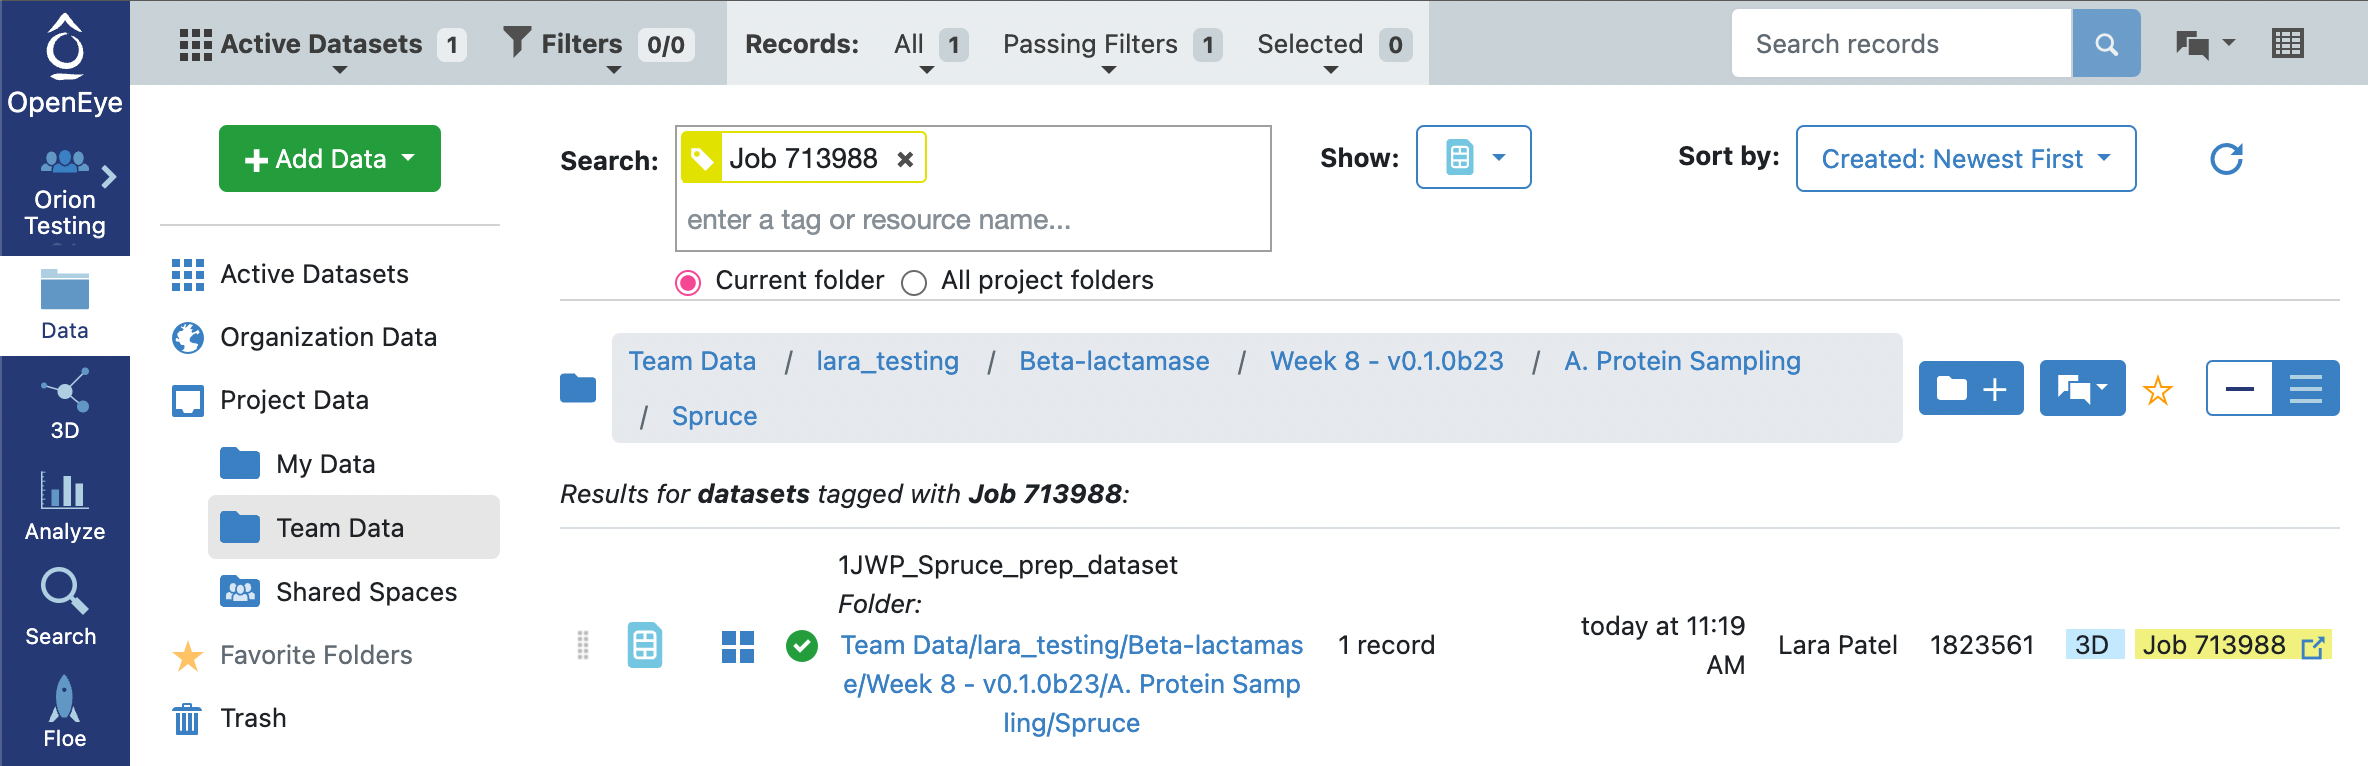
The floe will take approximately 20 minutes to complete. Note that with enumerate pockets on, the output dataset will contain design units for each of the protein structures on the input PDB with each of the pockets found on the protein. The next floe only accepts a single input design unit record. As such, we will need to select a record to output onto a new dataset. Click on the Data tab on the blue vertical navigation bar, clicking on the Team Data for your Project Data and then searching for the data associated with your job. This is typically done by searching for “Job” and then adding the job_id. This will show you a list of options below the search bar. Click on the tag that matches your job ID. This will show you all of the files associated with your job (assuming that files, datasets, and collections are visible).
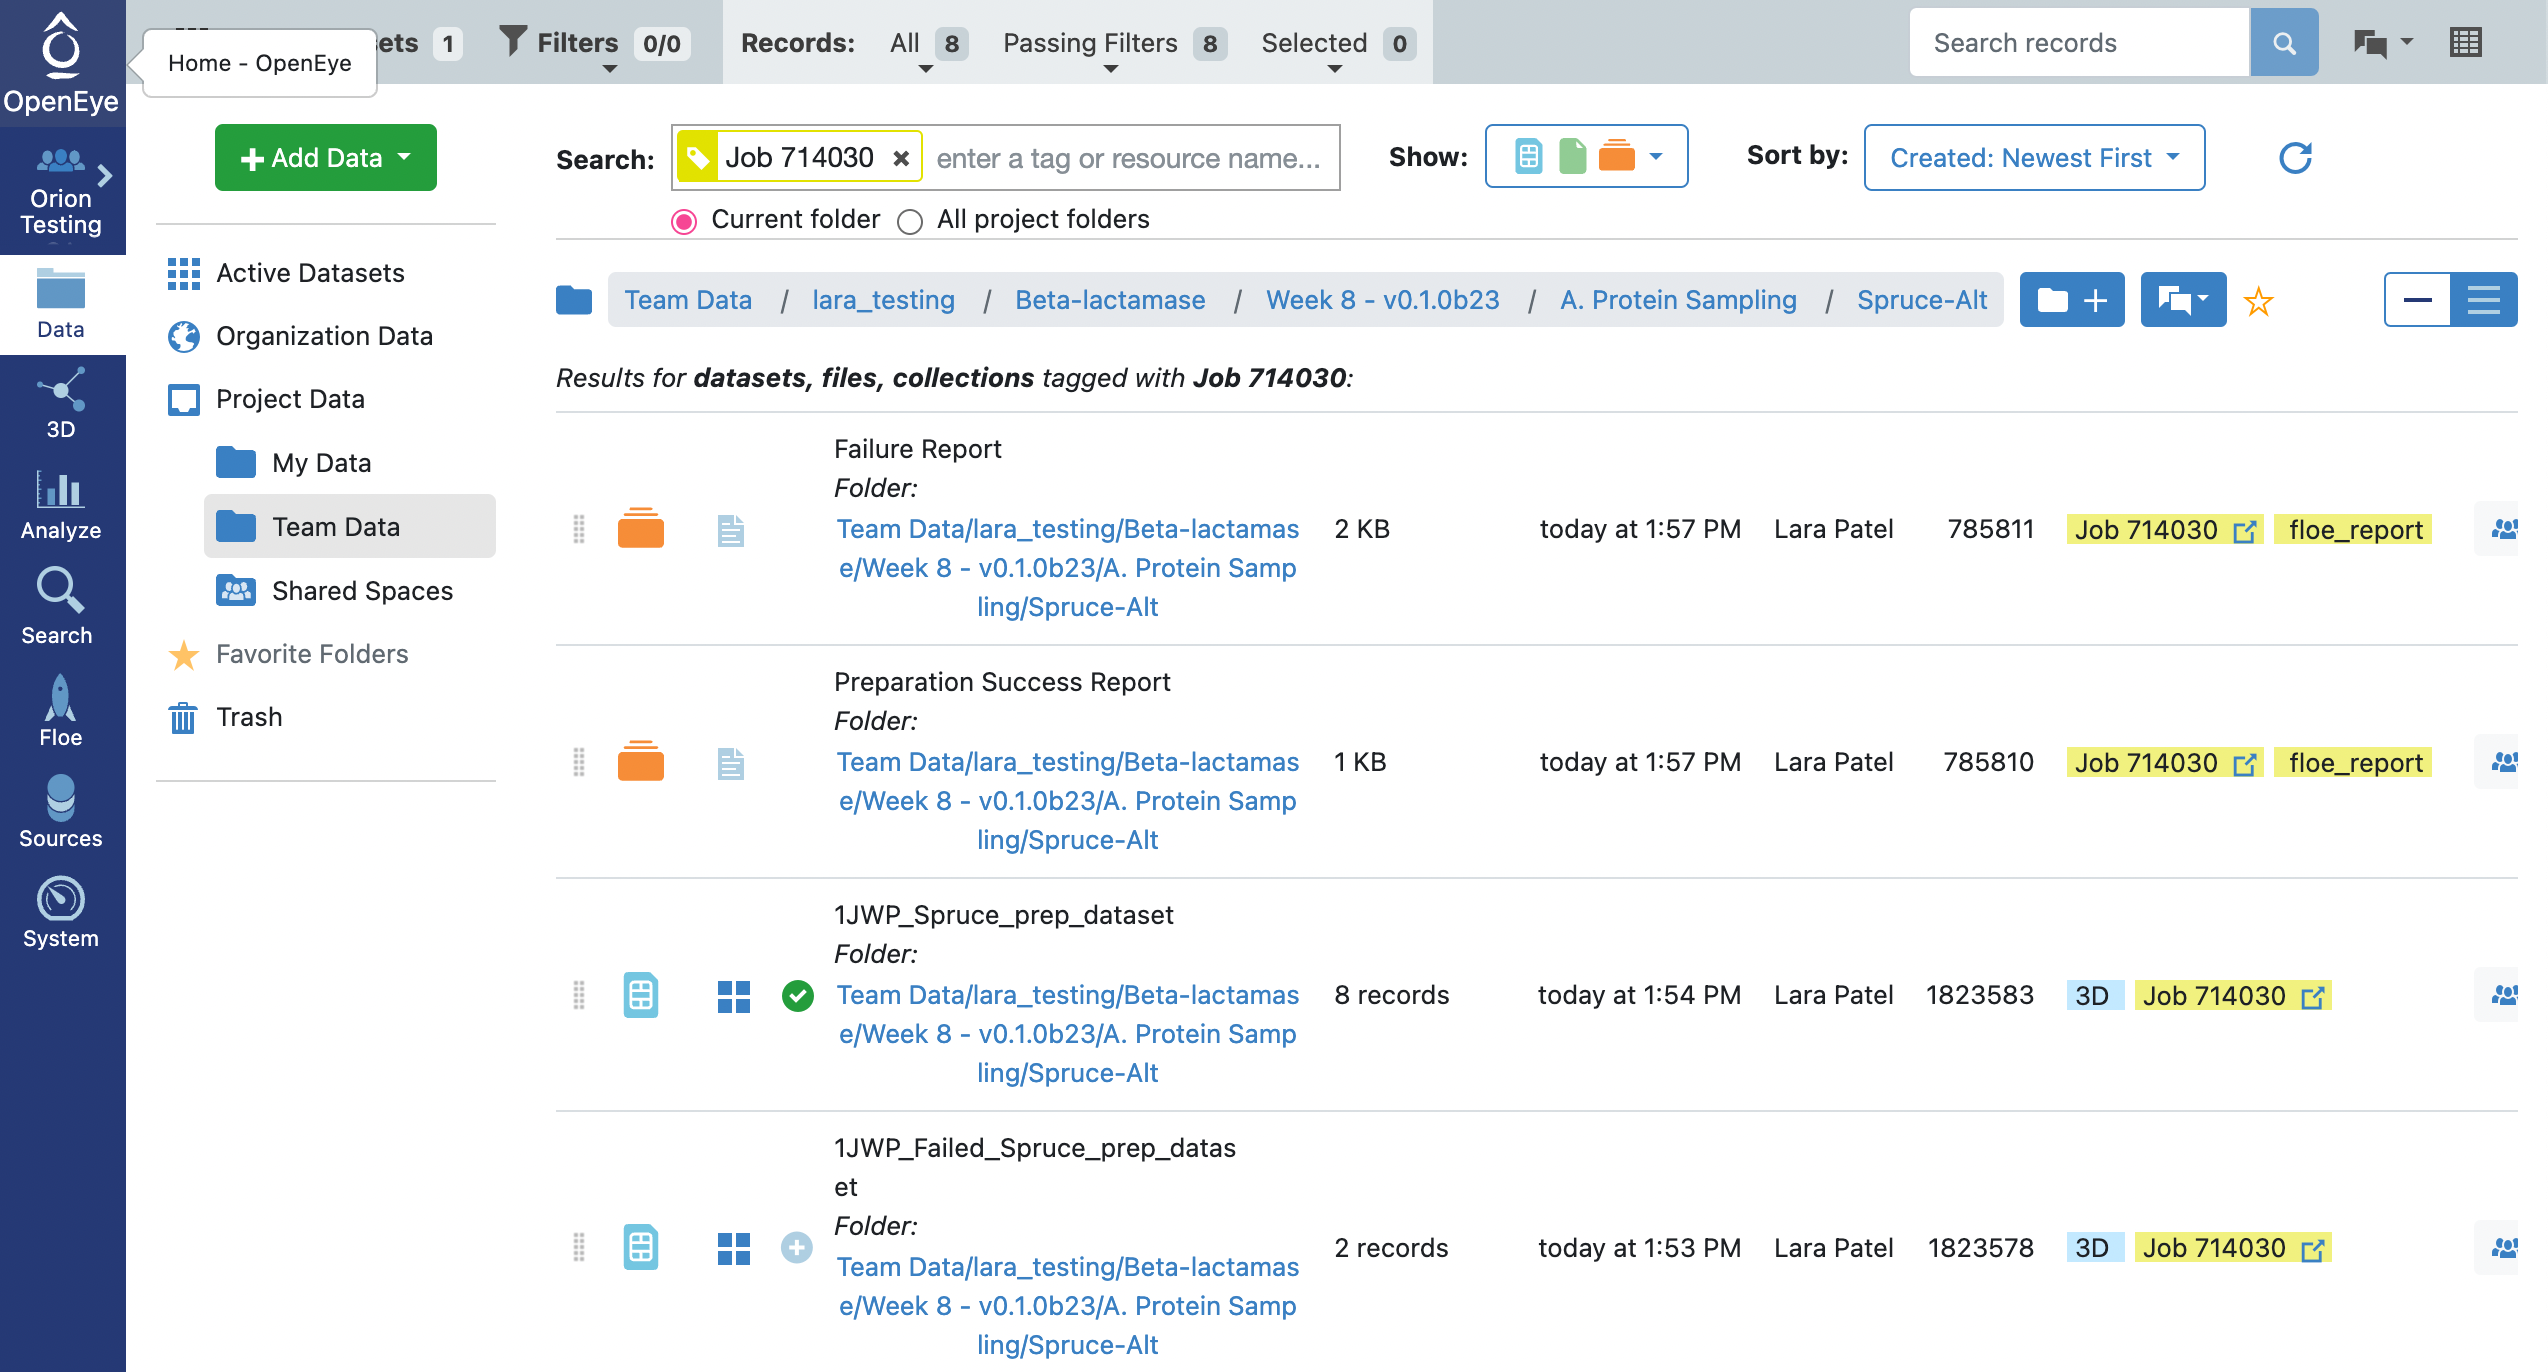
You will notice that there is a success dataset, 1JWP_Spruce_prep_dataset, and a failure dataset 1JWP_Failed_spruce_prep_dataset. Looking at the Failure and Success floe reports for this job, you will note that the attempt to enumerate pockets using the OE pocket finder failed to find pockets, but the subsequent search for pockets with fpocket succeeded. The design units in the success dataset represent all of the fpocket pockets identified for the input structure.
Click on the 1JWP_Spruce_prep_dataset icon of a circle with a plus sign so that it turns into a green circle with a checkmark, indicating that the dataset is part of your Active Datasets. You can see which datasets are Active Datasets by clicking on the Active Datasets tab in the top-left corner of the webpage.
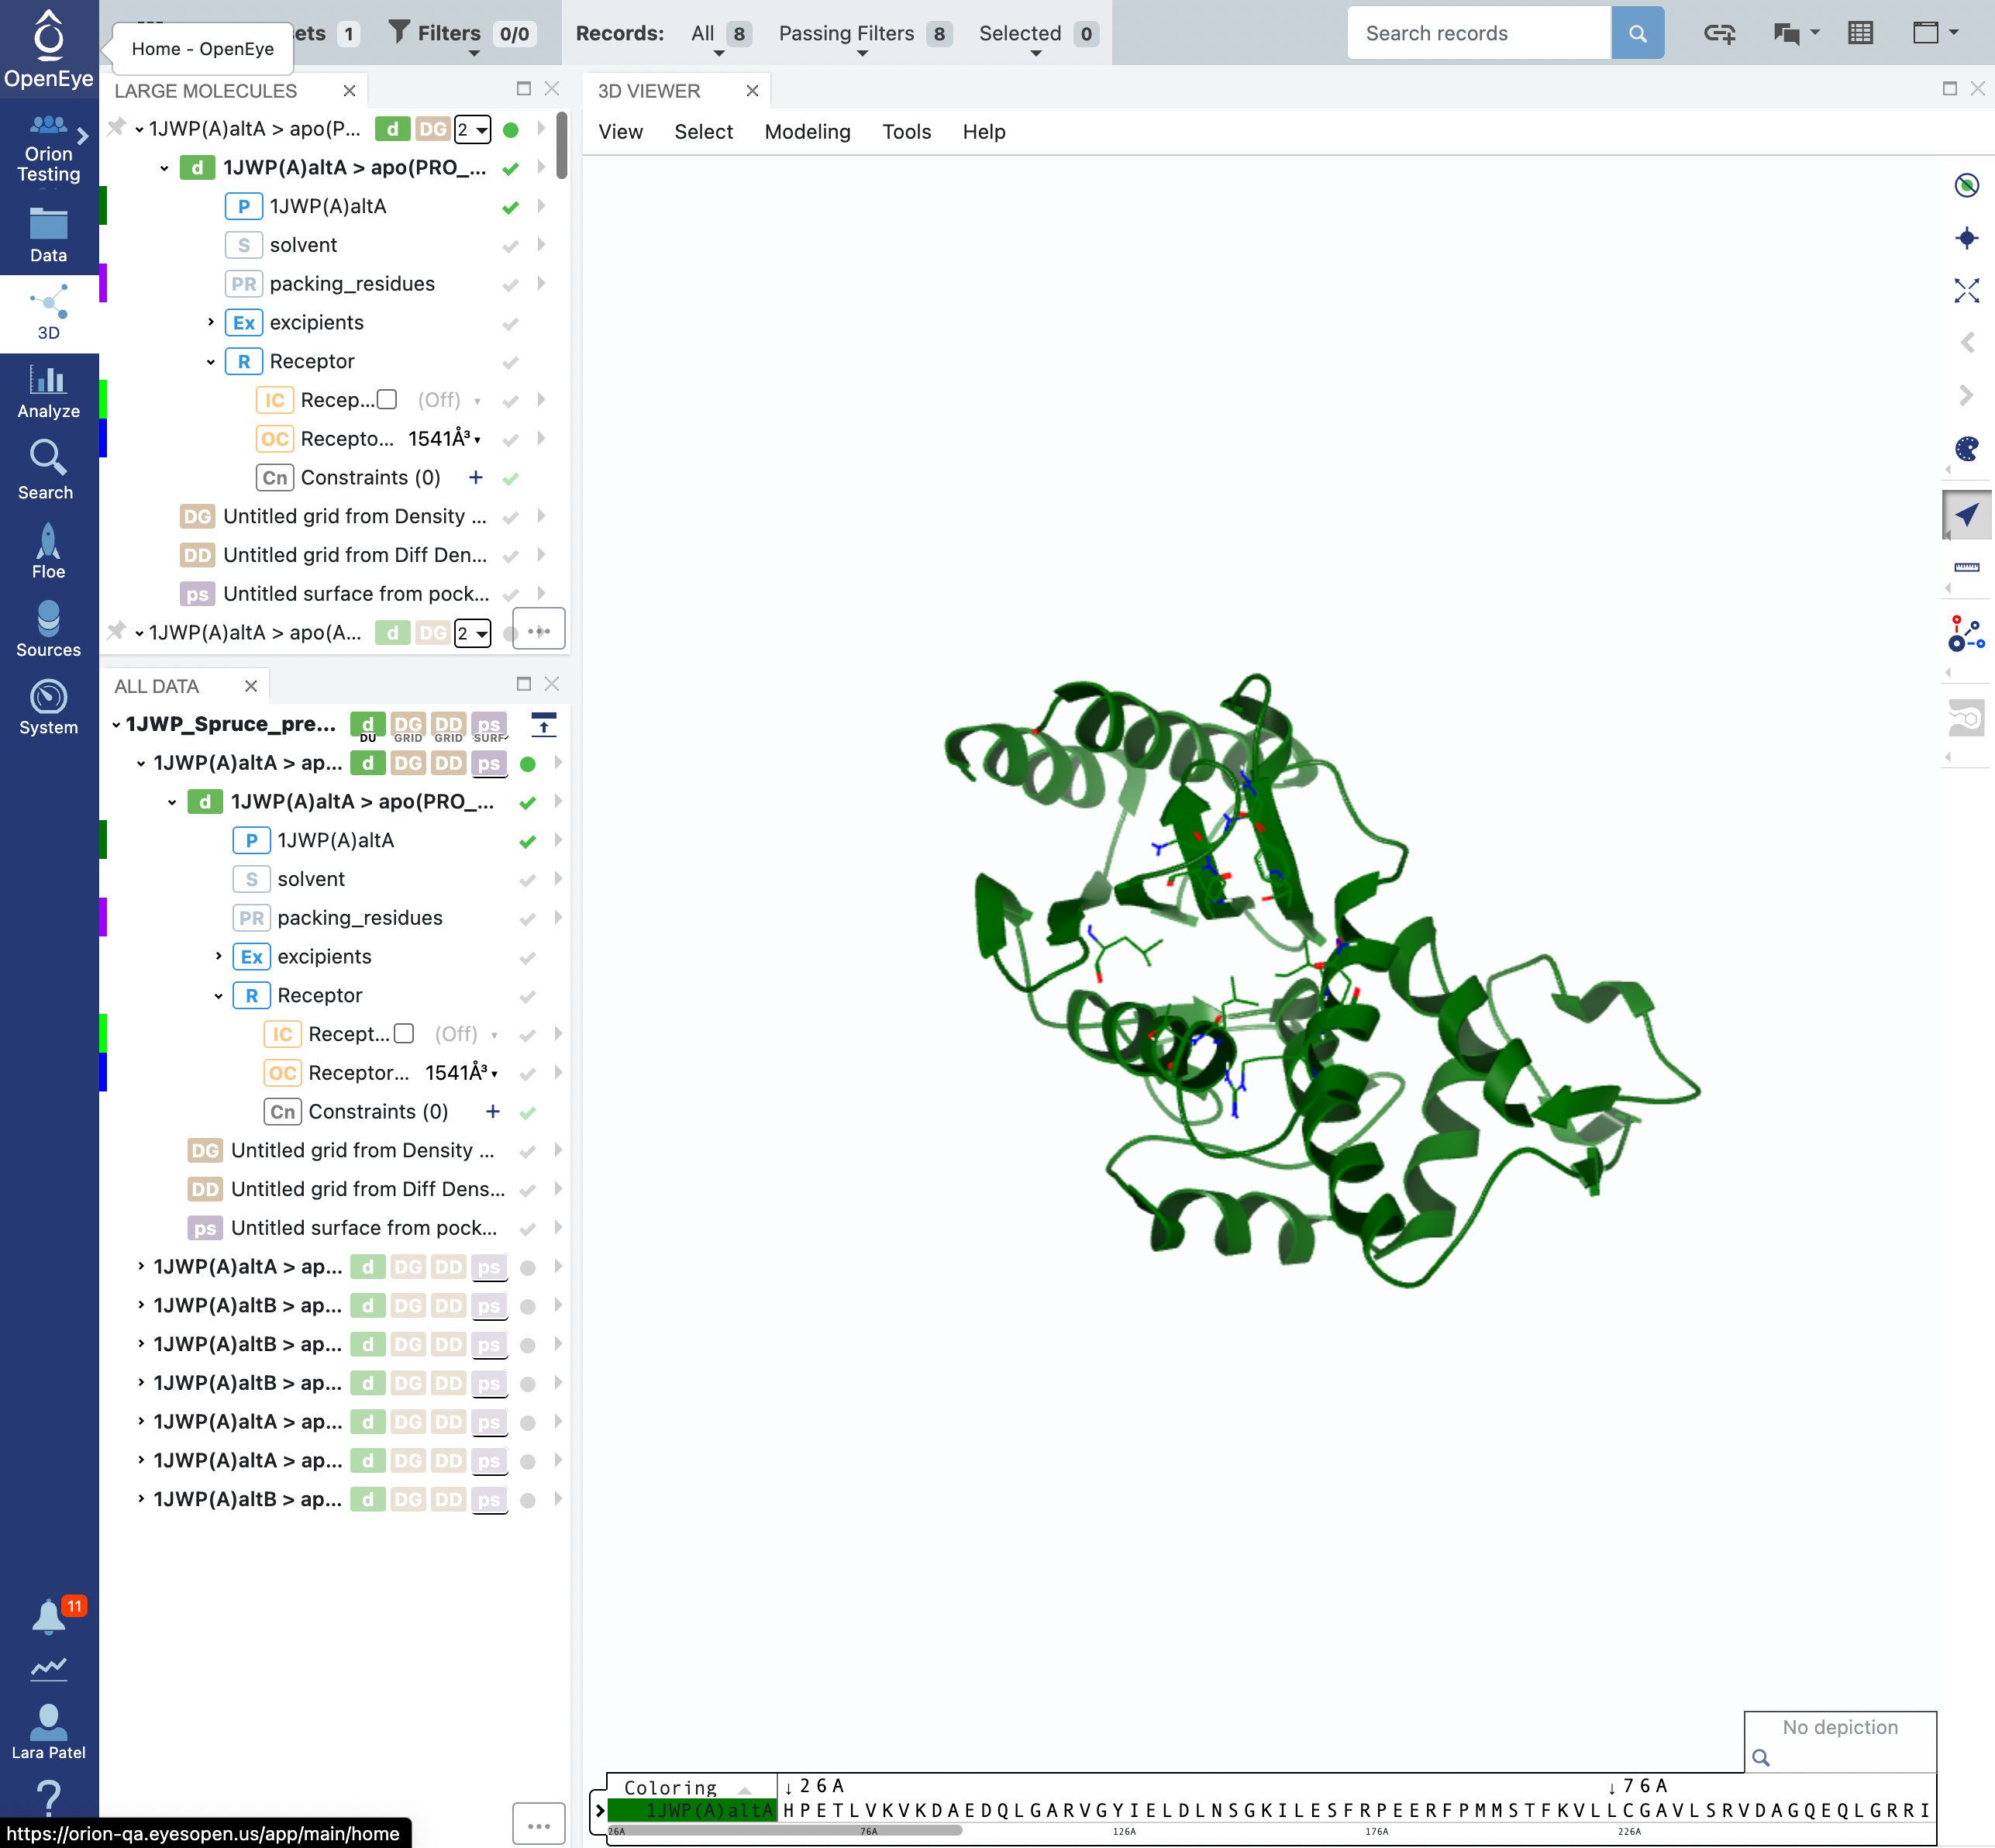
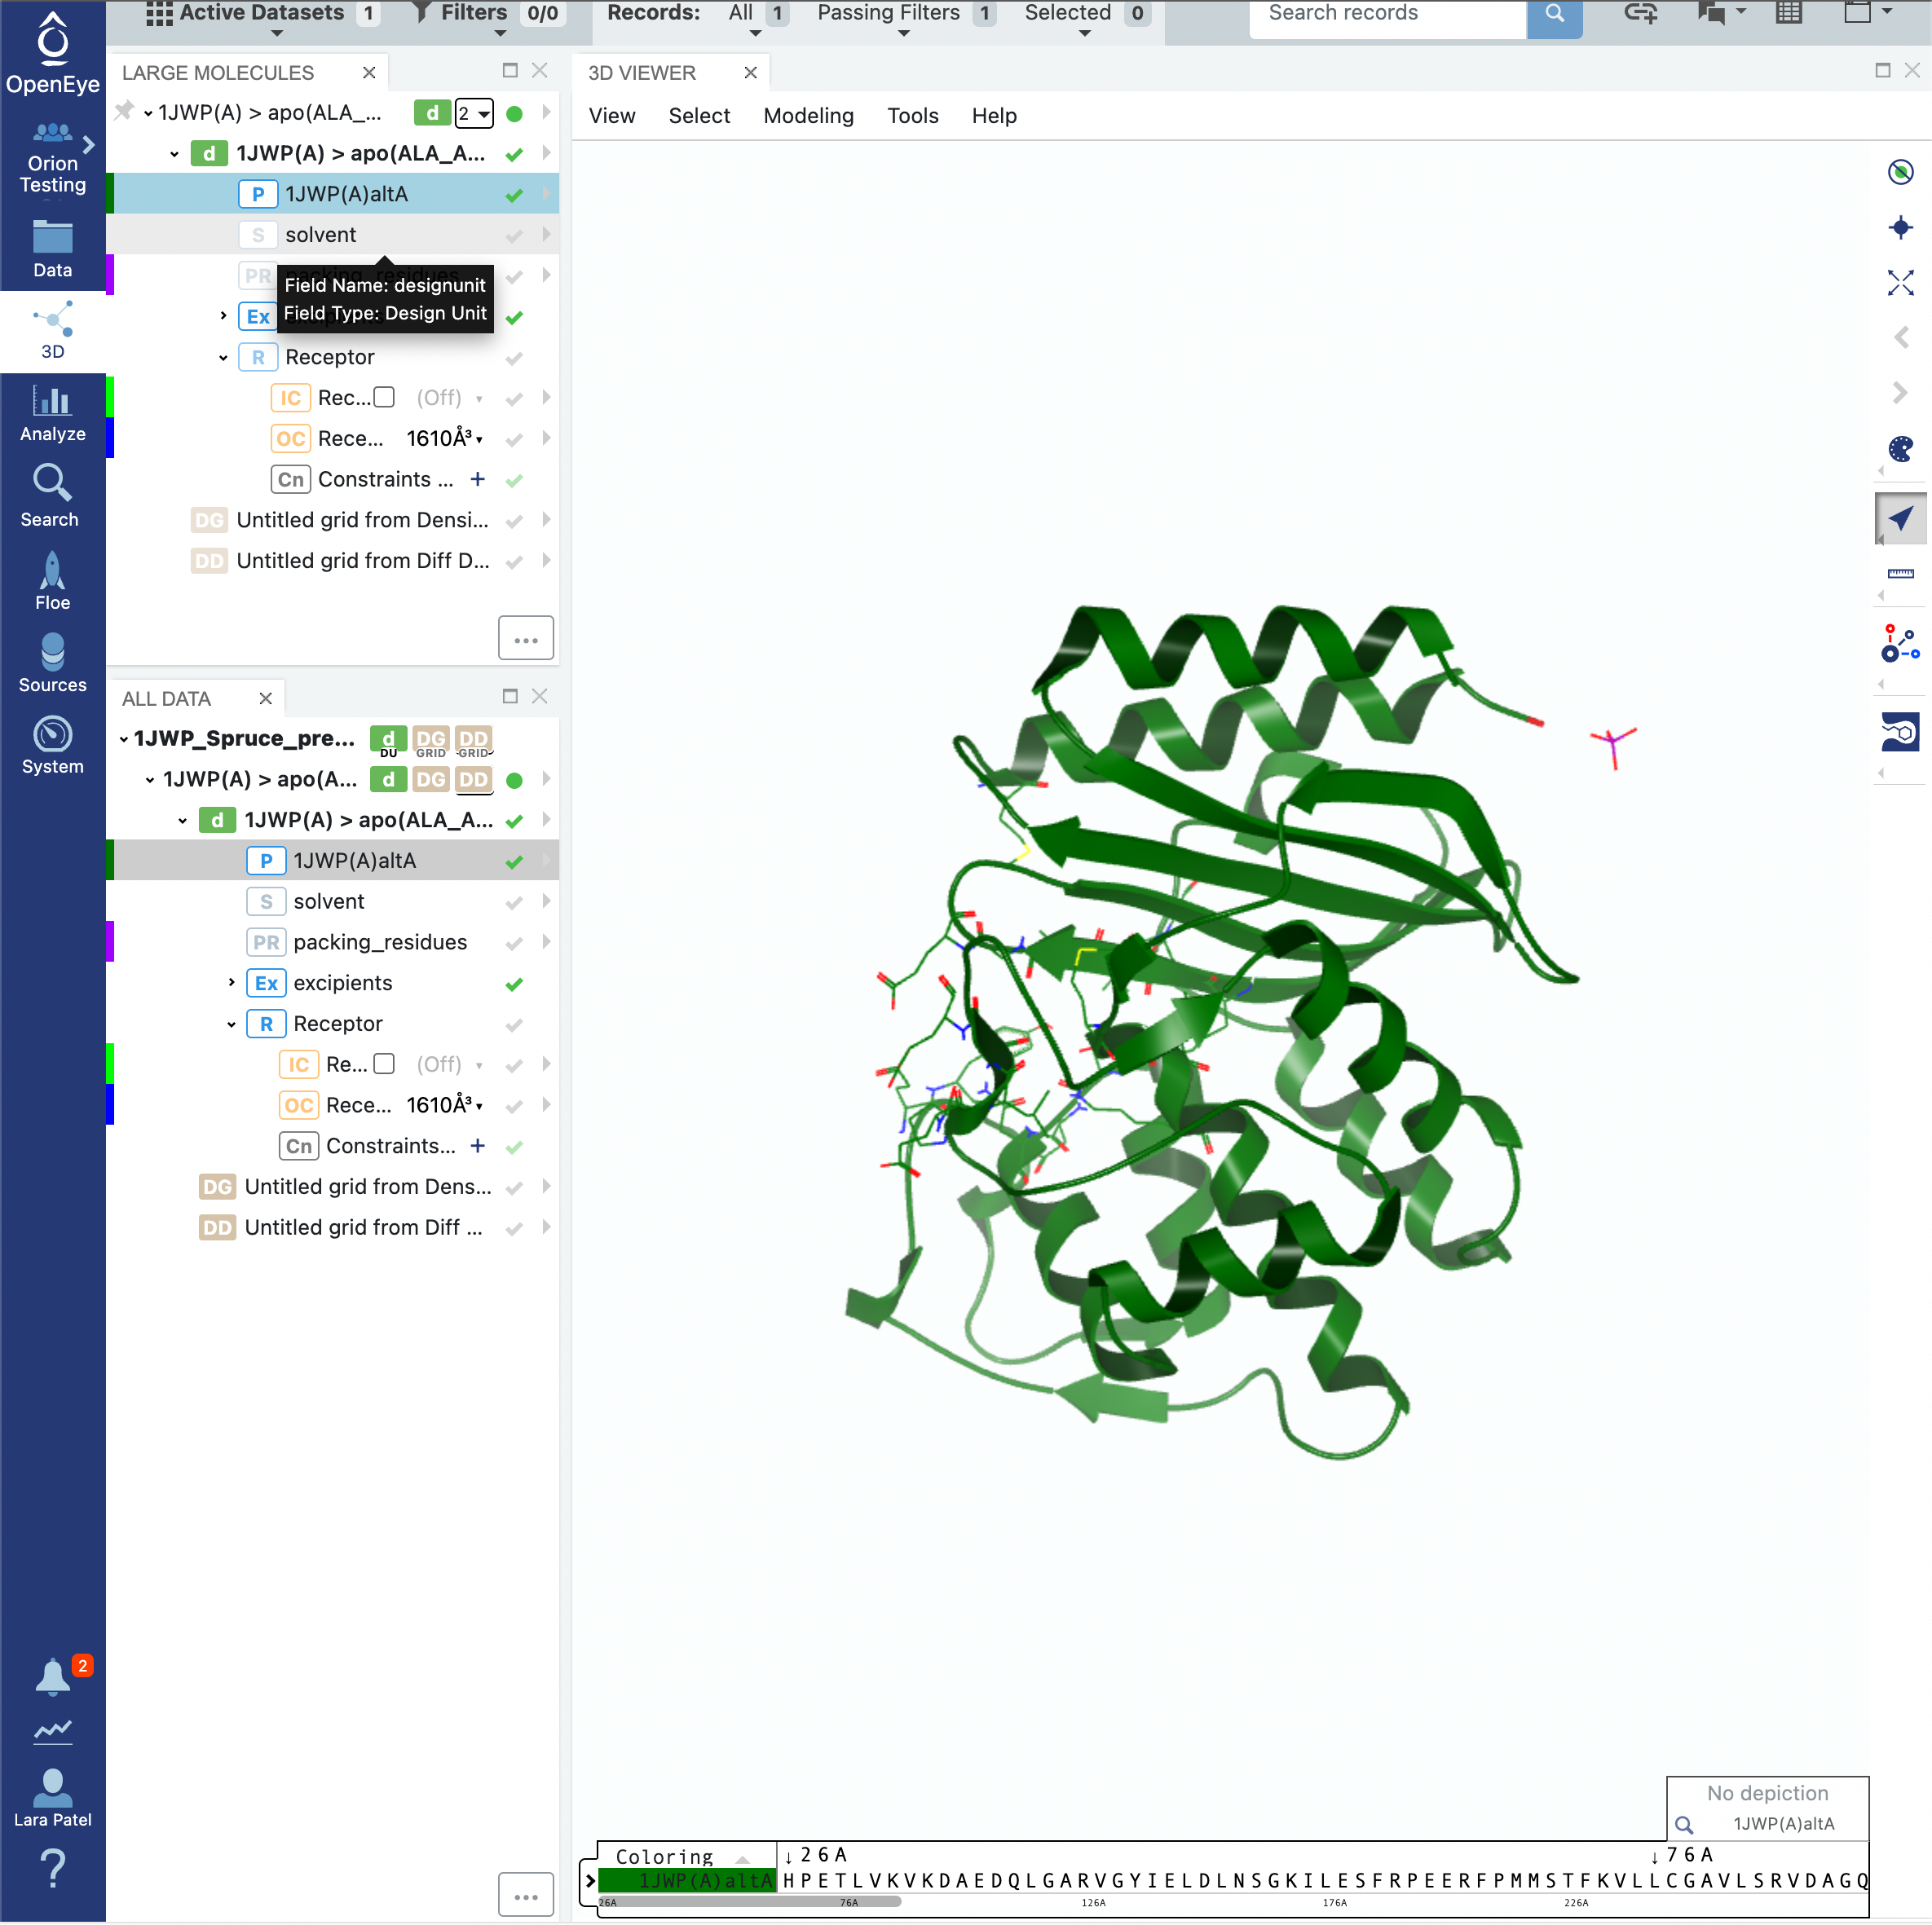
Click on the 3D tab on the blue vertical navigation bar. You will be able to see the dataset with records for each the structures and pocket combinations.
We will prepare the first record on the dataset. Click on the triangle next to the first record’s design unit name, click on the folder icon, and then click on the Duplicate this record… option in the drop-down menu.
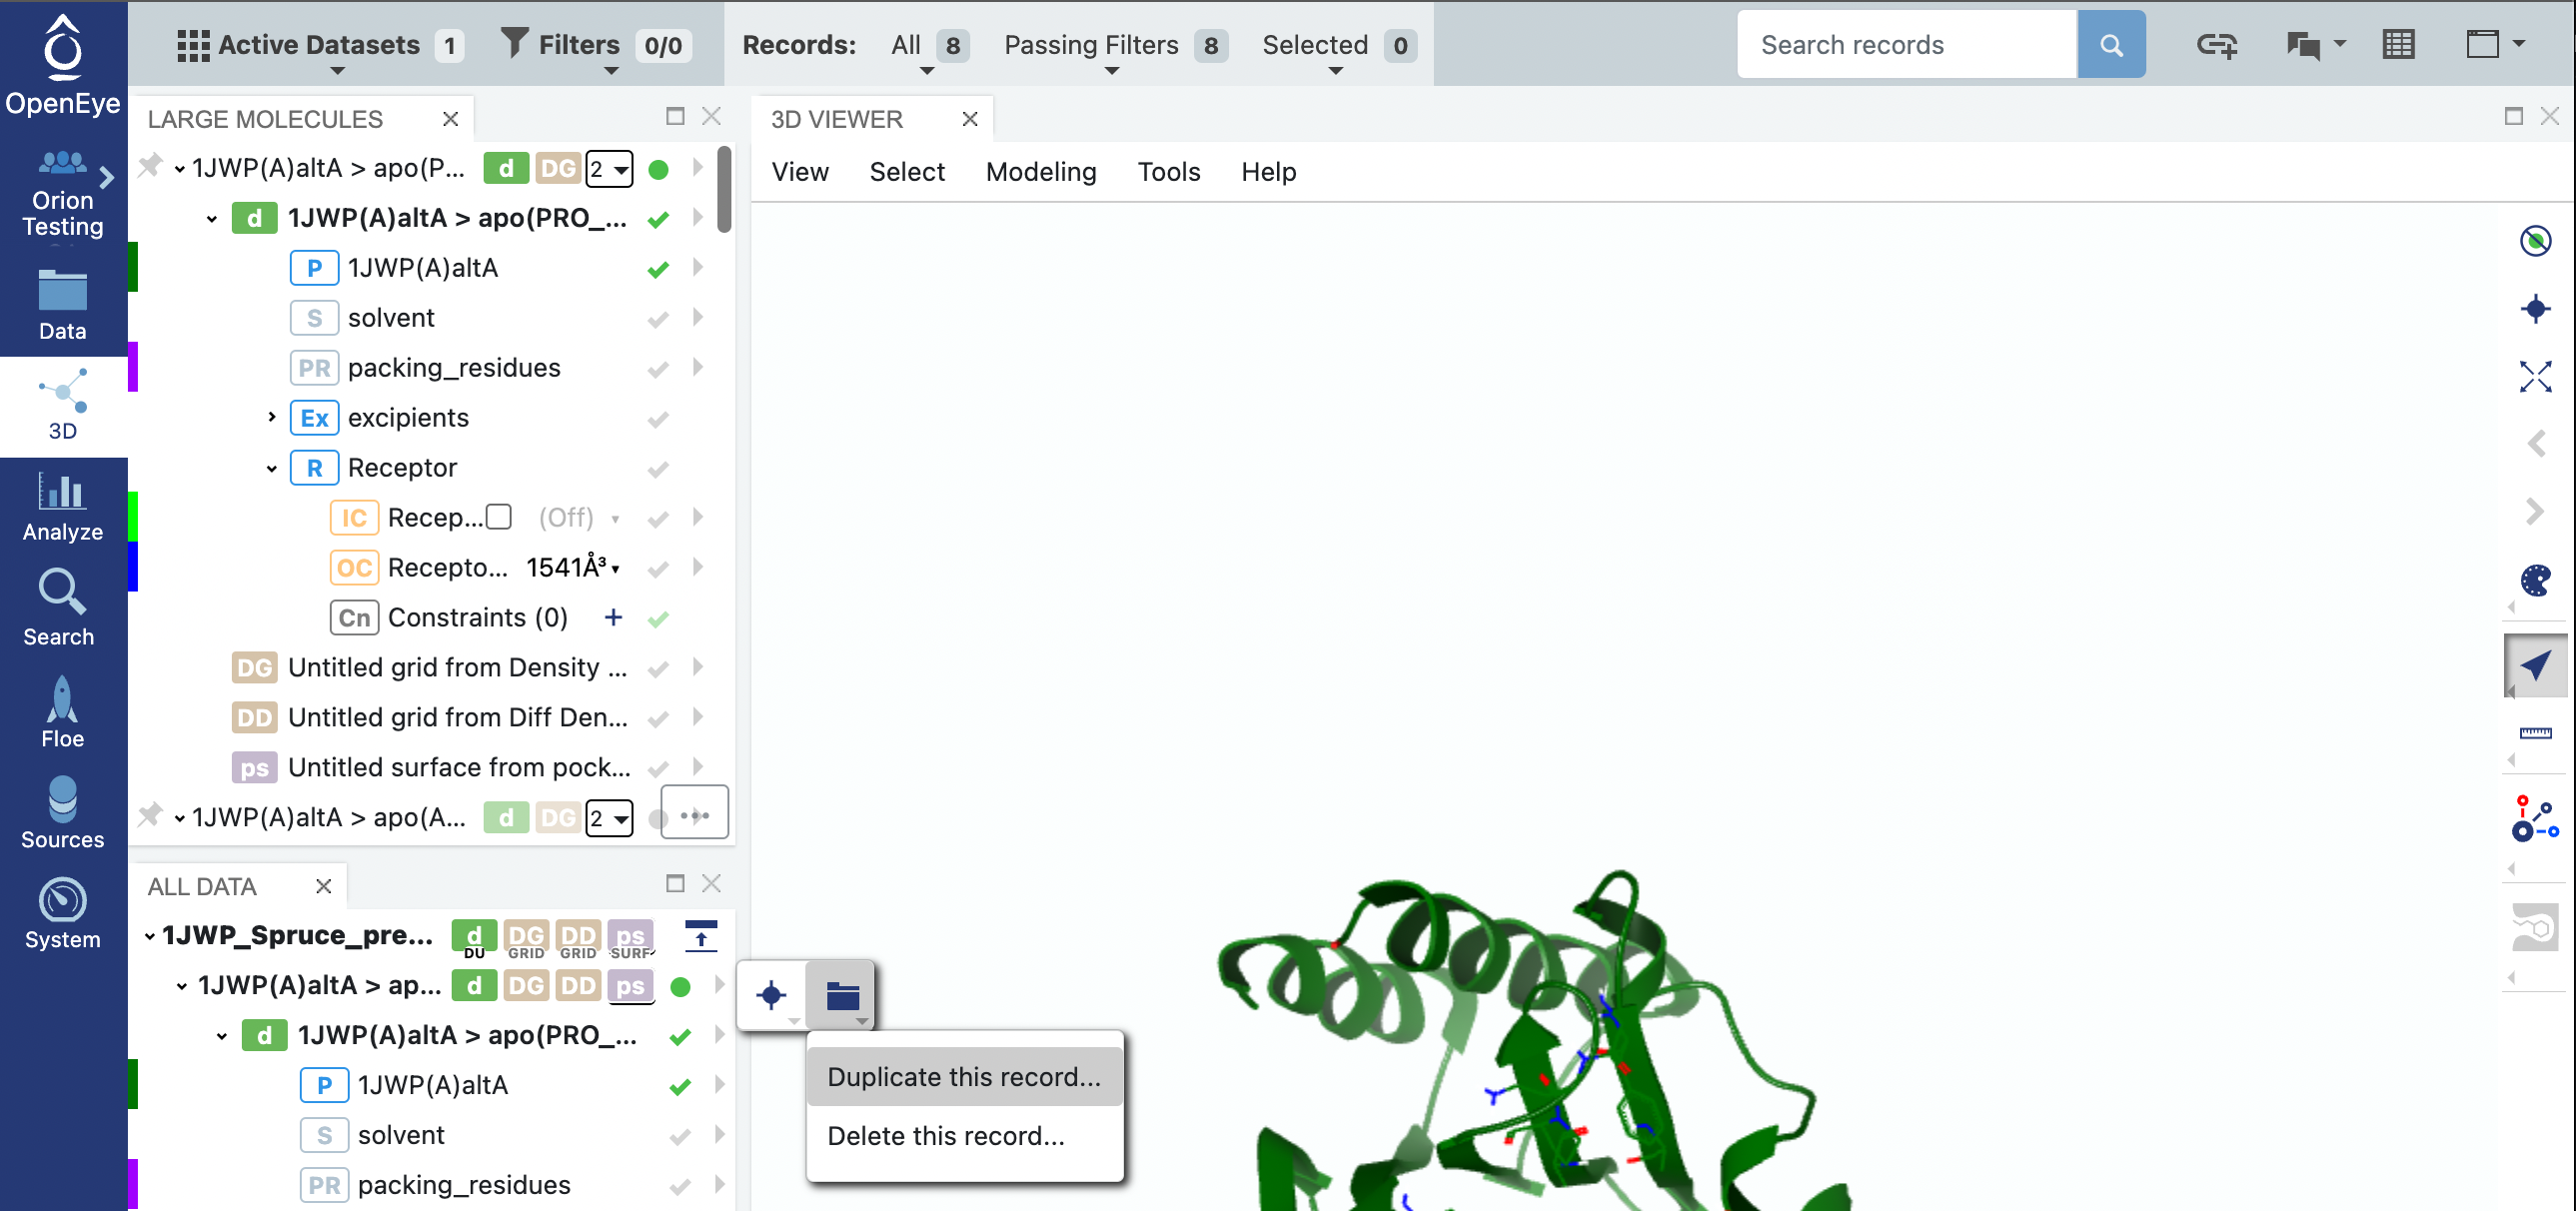
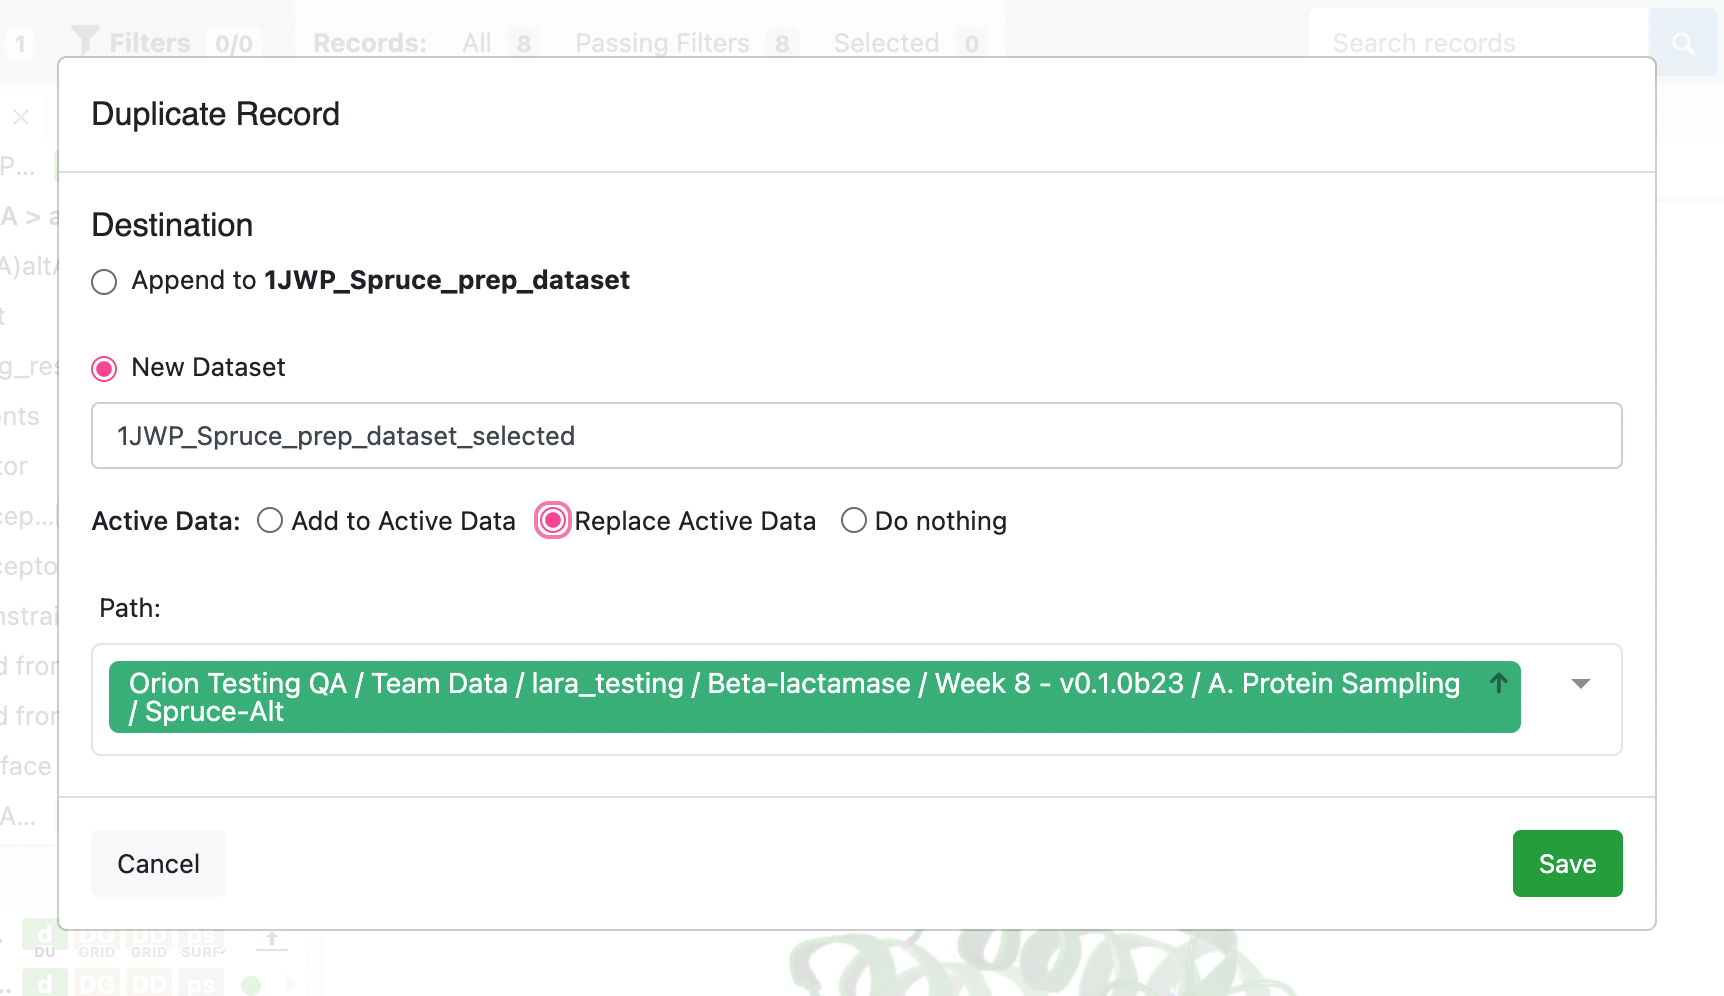
In the pop-up, select New Dataset and make a unique name for the dataset. If you want to review the resulting dataset, select the Replace Active Data option.
You may have noticed when reviewing the design unit components in the 3D page, there is a phosphate excipient in the prepared design unit. This is not something that we want to carry over to the simulation. Thus you will need to run the Subset Design Unit Floe following the instructions in this section of the tutorial.
Subset the Design Unit
It is a good idea to review the output design unit from the SPRUCE protein preparation before proceeding to the next phase. The SPRUCE protein preparation is not inherently intended to generate a protein that is ready to be solvated and simulated. It will likely contain desirable components such as the protein and solvent components. It will also contain undesirable components for a simulation, such as the packing_residues and excipient components. The Subset Design Unit Floe allows you to choose which components to keep.
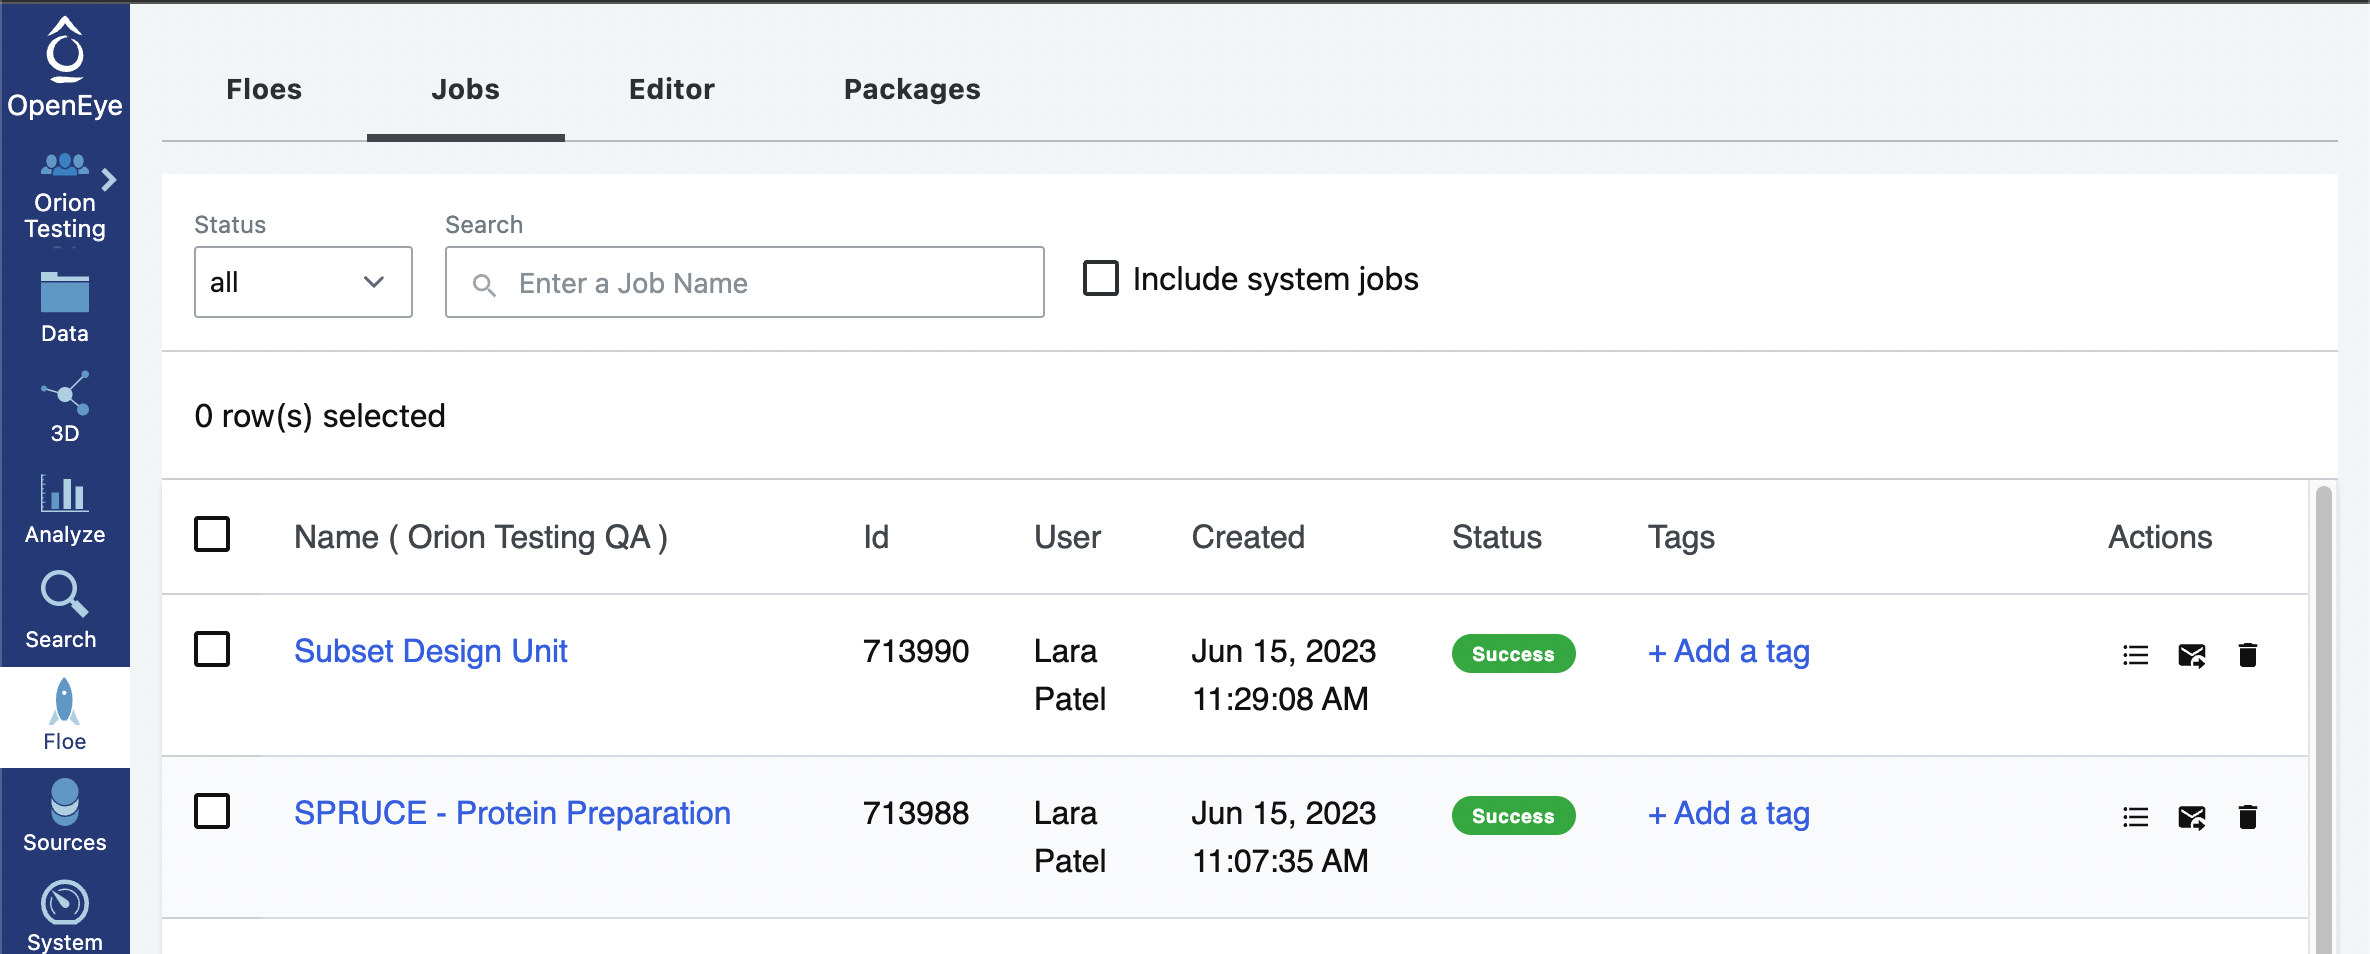
If you prepared the protein with Option 1, click on the Floe tab on the vertical navigation bar and click on the Jobs tab on the horizontal navigation bar. Click on the SPRUCE - Protein Preparation job.
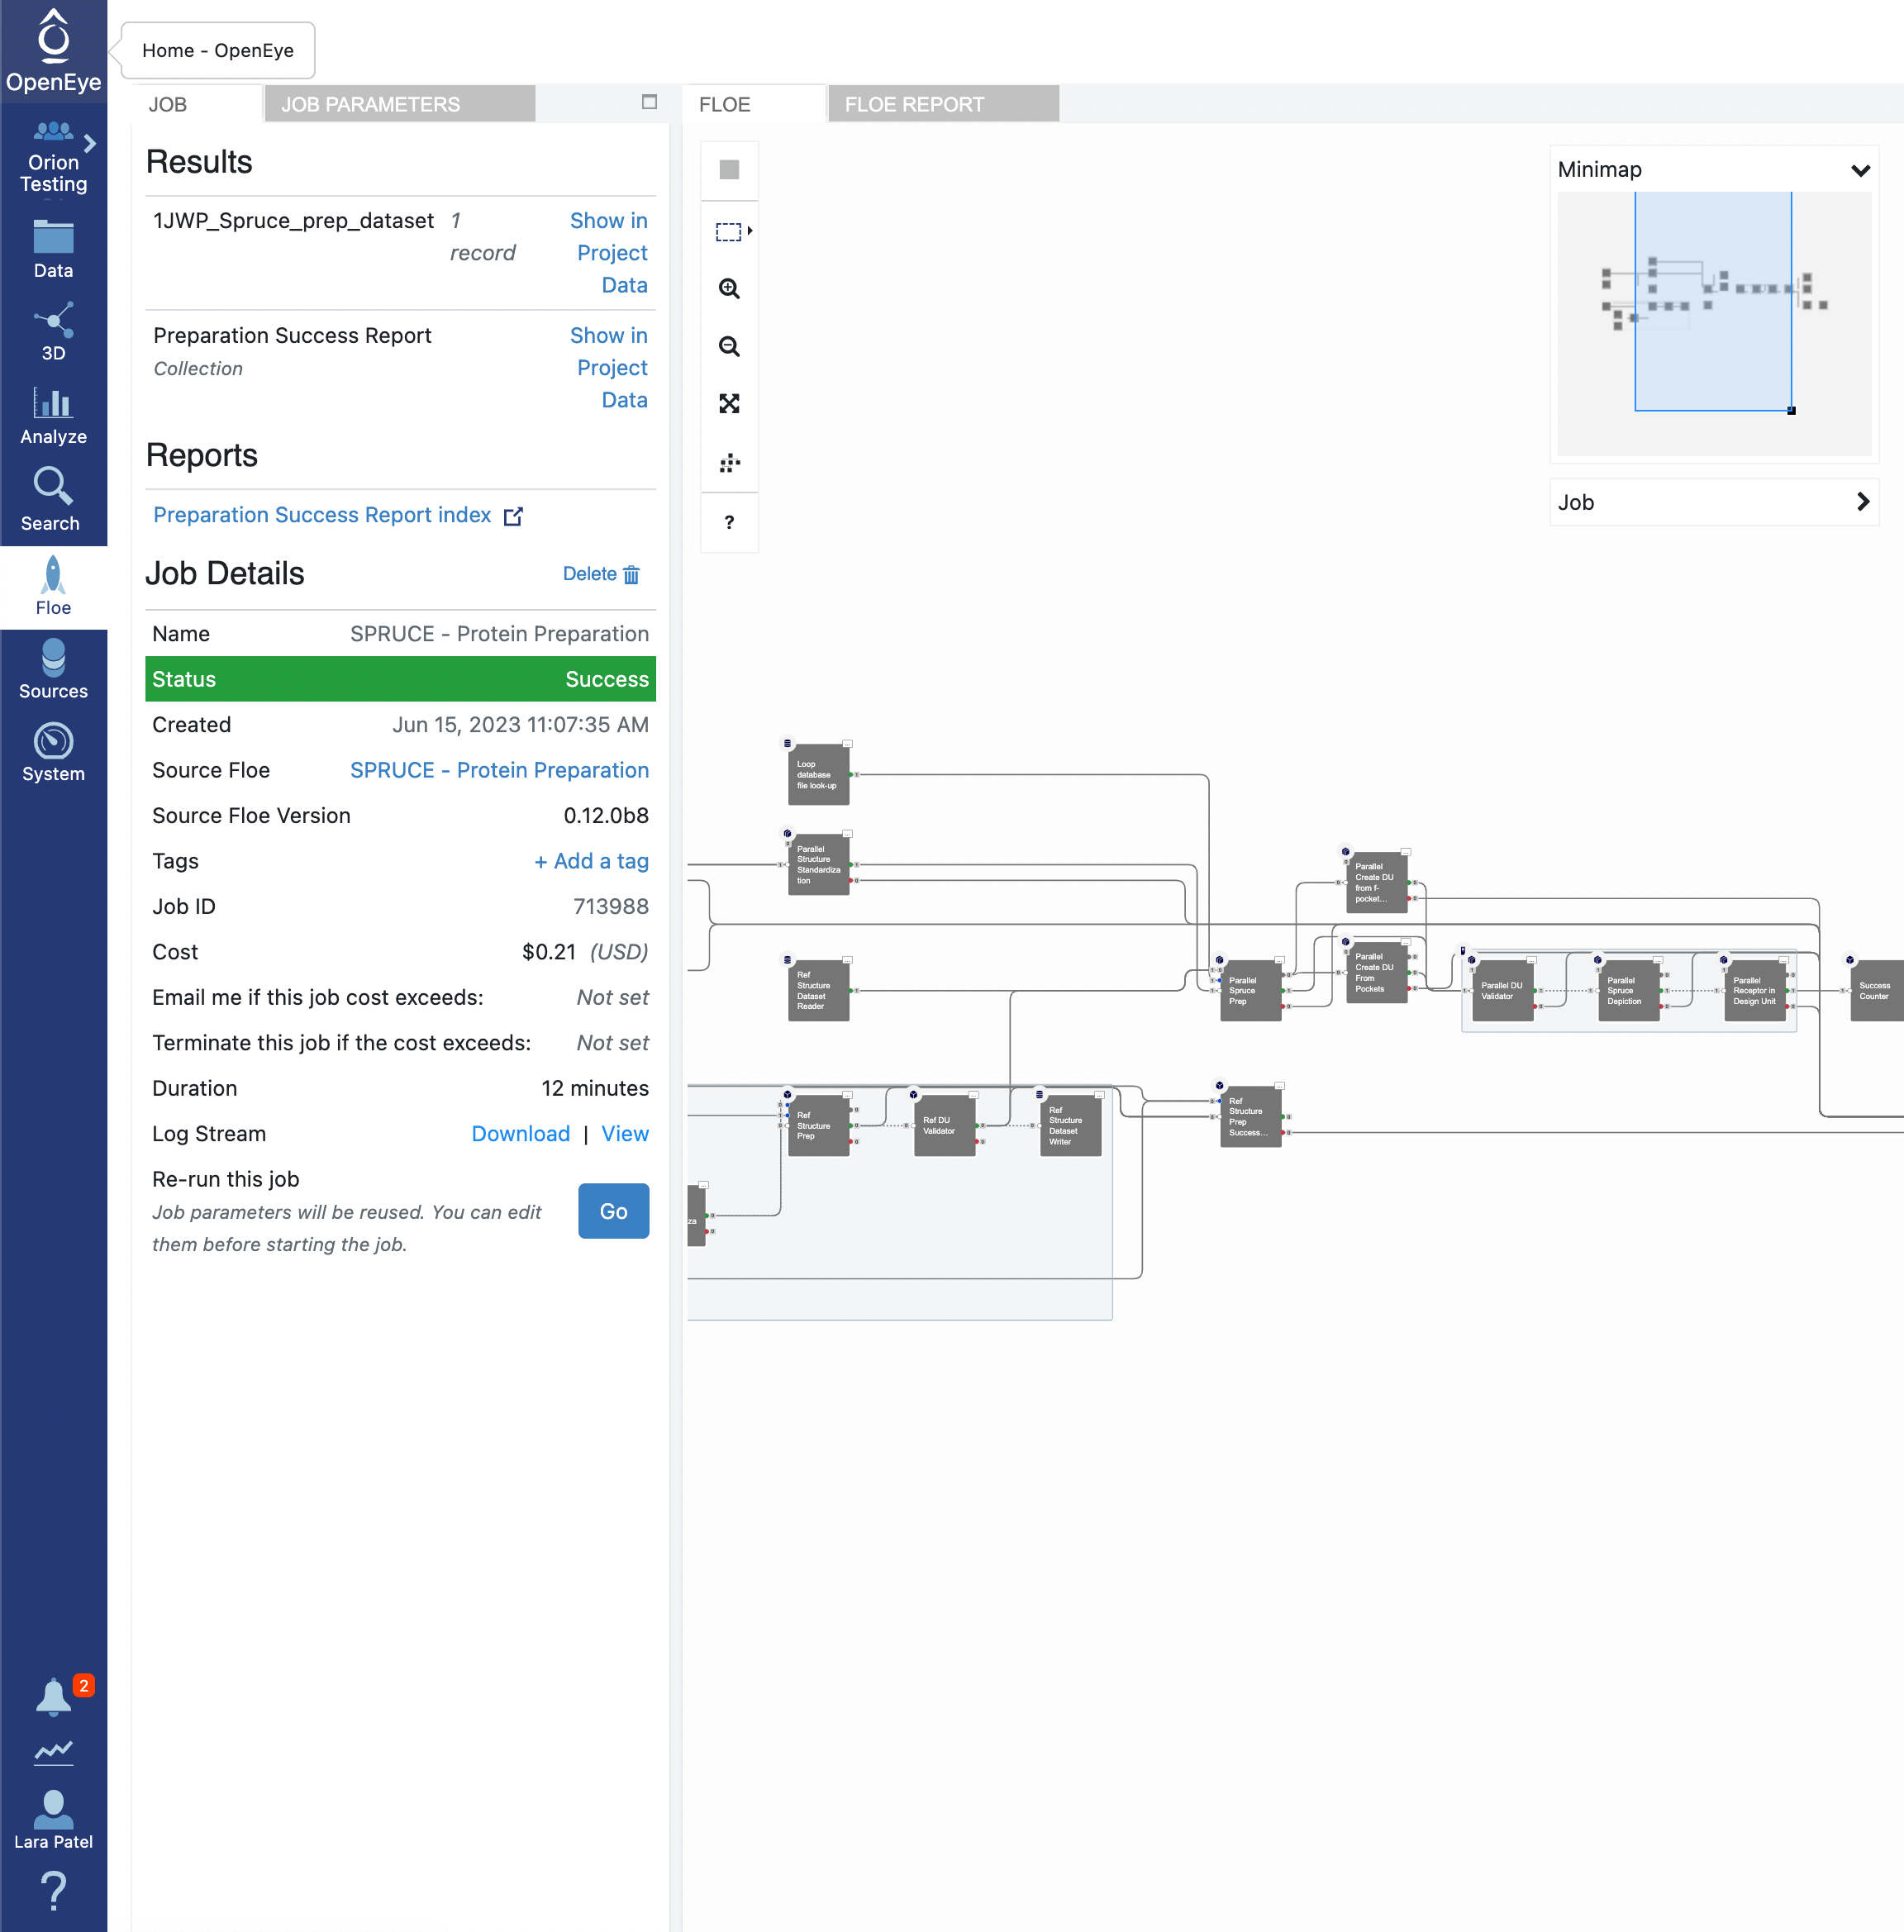
In the Results section, you will see the output dataset, Spruce_prep_dataset by default, listed with a Show in Project Data link beside it. Click on the link and this will redirect you to where that file is stored in your data.
If you prepared the protein with Option 2, you will have created an second dataset with a single record on it. Navigate to that dataset.
Click on the circle with a plus sign in it to add the relevant dataset (Option 1 or Option 2) to your active datasets.
Click on the 3D tab on the vertical navigation bar and make sure that the 1JWP dataset is the only one visible. You can expand the design unit details by clicking on the > symbols beside the design unit title. You will notice that the design unit includes the packing residues, the solvent, and the excipients.
While the A1. Protein Sampling (for Cryptic Pockets): Solvate and Equilibrate Target Protein Floe will handle the solvent and packing residues appropriately, it will keep the excipient molecules. In this case, the excipient phosphate molecule is not something that we want to keep for the simulation. As such, click on the Floe tab on the vertical navigation bar, click on the Floes tab on the horizontal navigation bar, and search for the Subset Design Unit Floe. Click on the blue LAUNCH FLOE button.
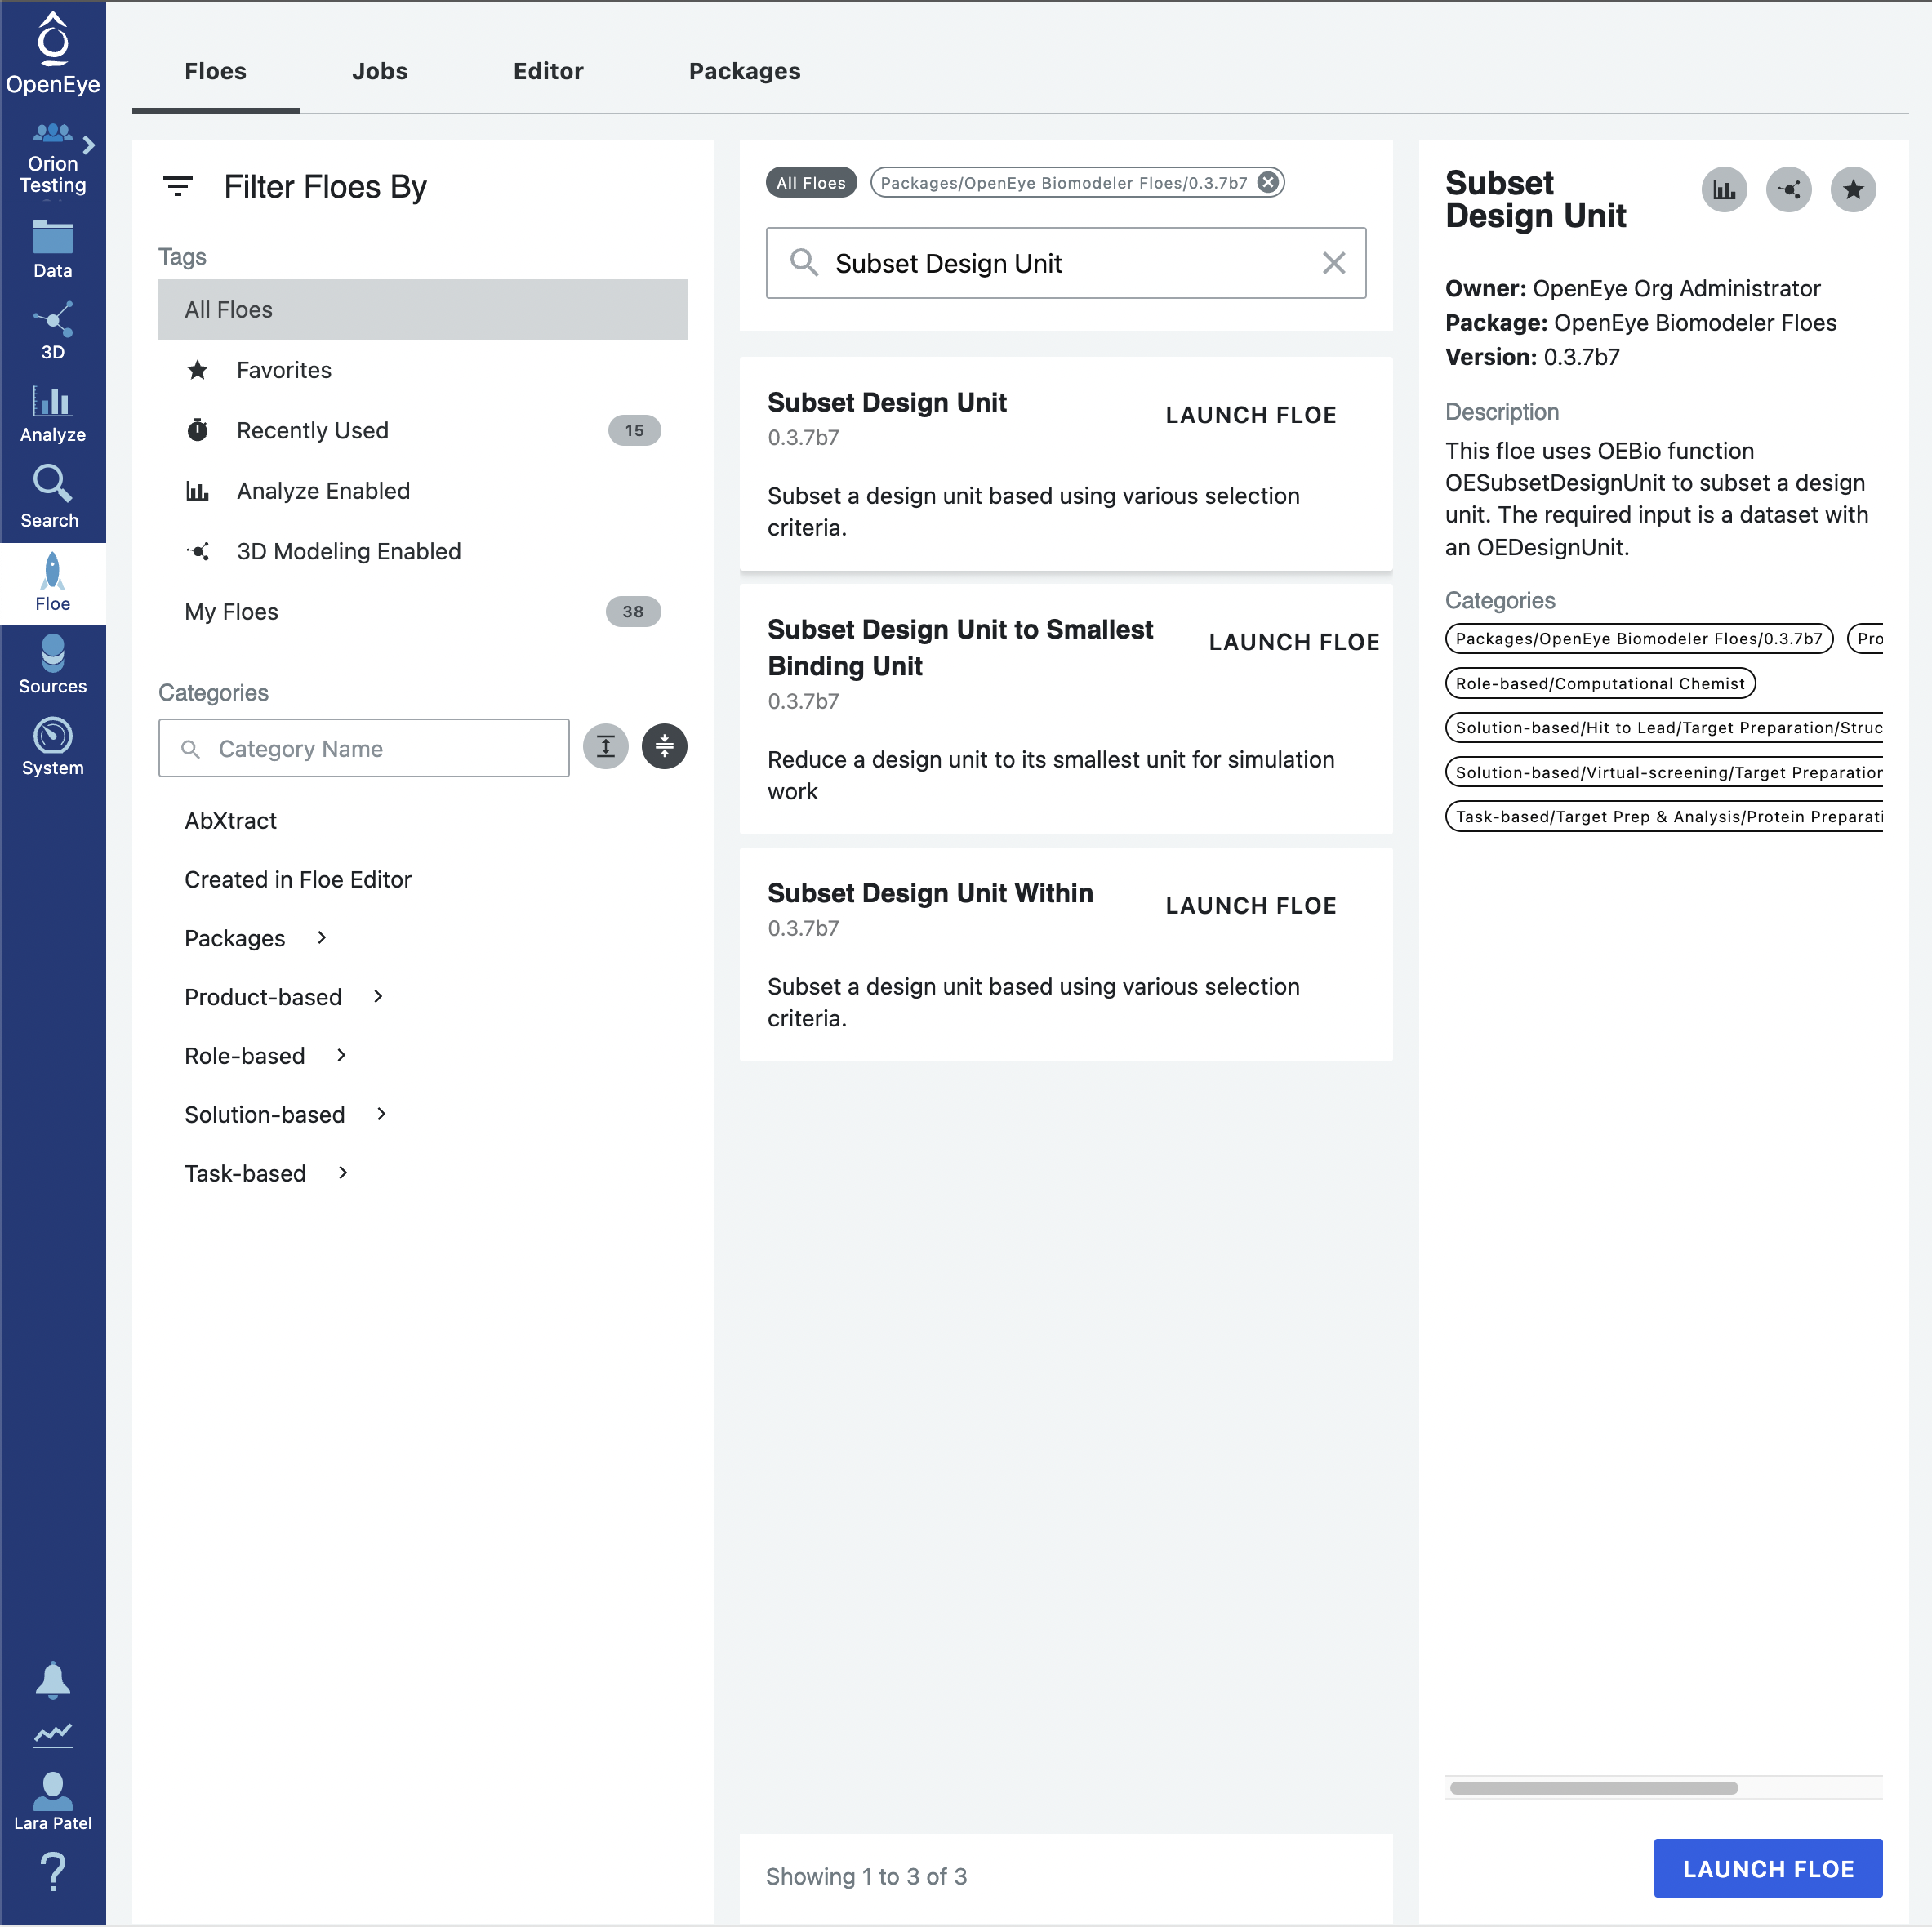
In the window that pops up, select the desired output path, customize the output dataset names as desired (we prepended 1JWP to the default output dataset names), and select the design unit components to keep. In this case we have chosen to use the default output design unit components but you could choose a different set of design unit components to keep. Note that the default components do not include the ‘excipient’ component, and so the output design unit will not be included the phosphate excipient.
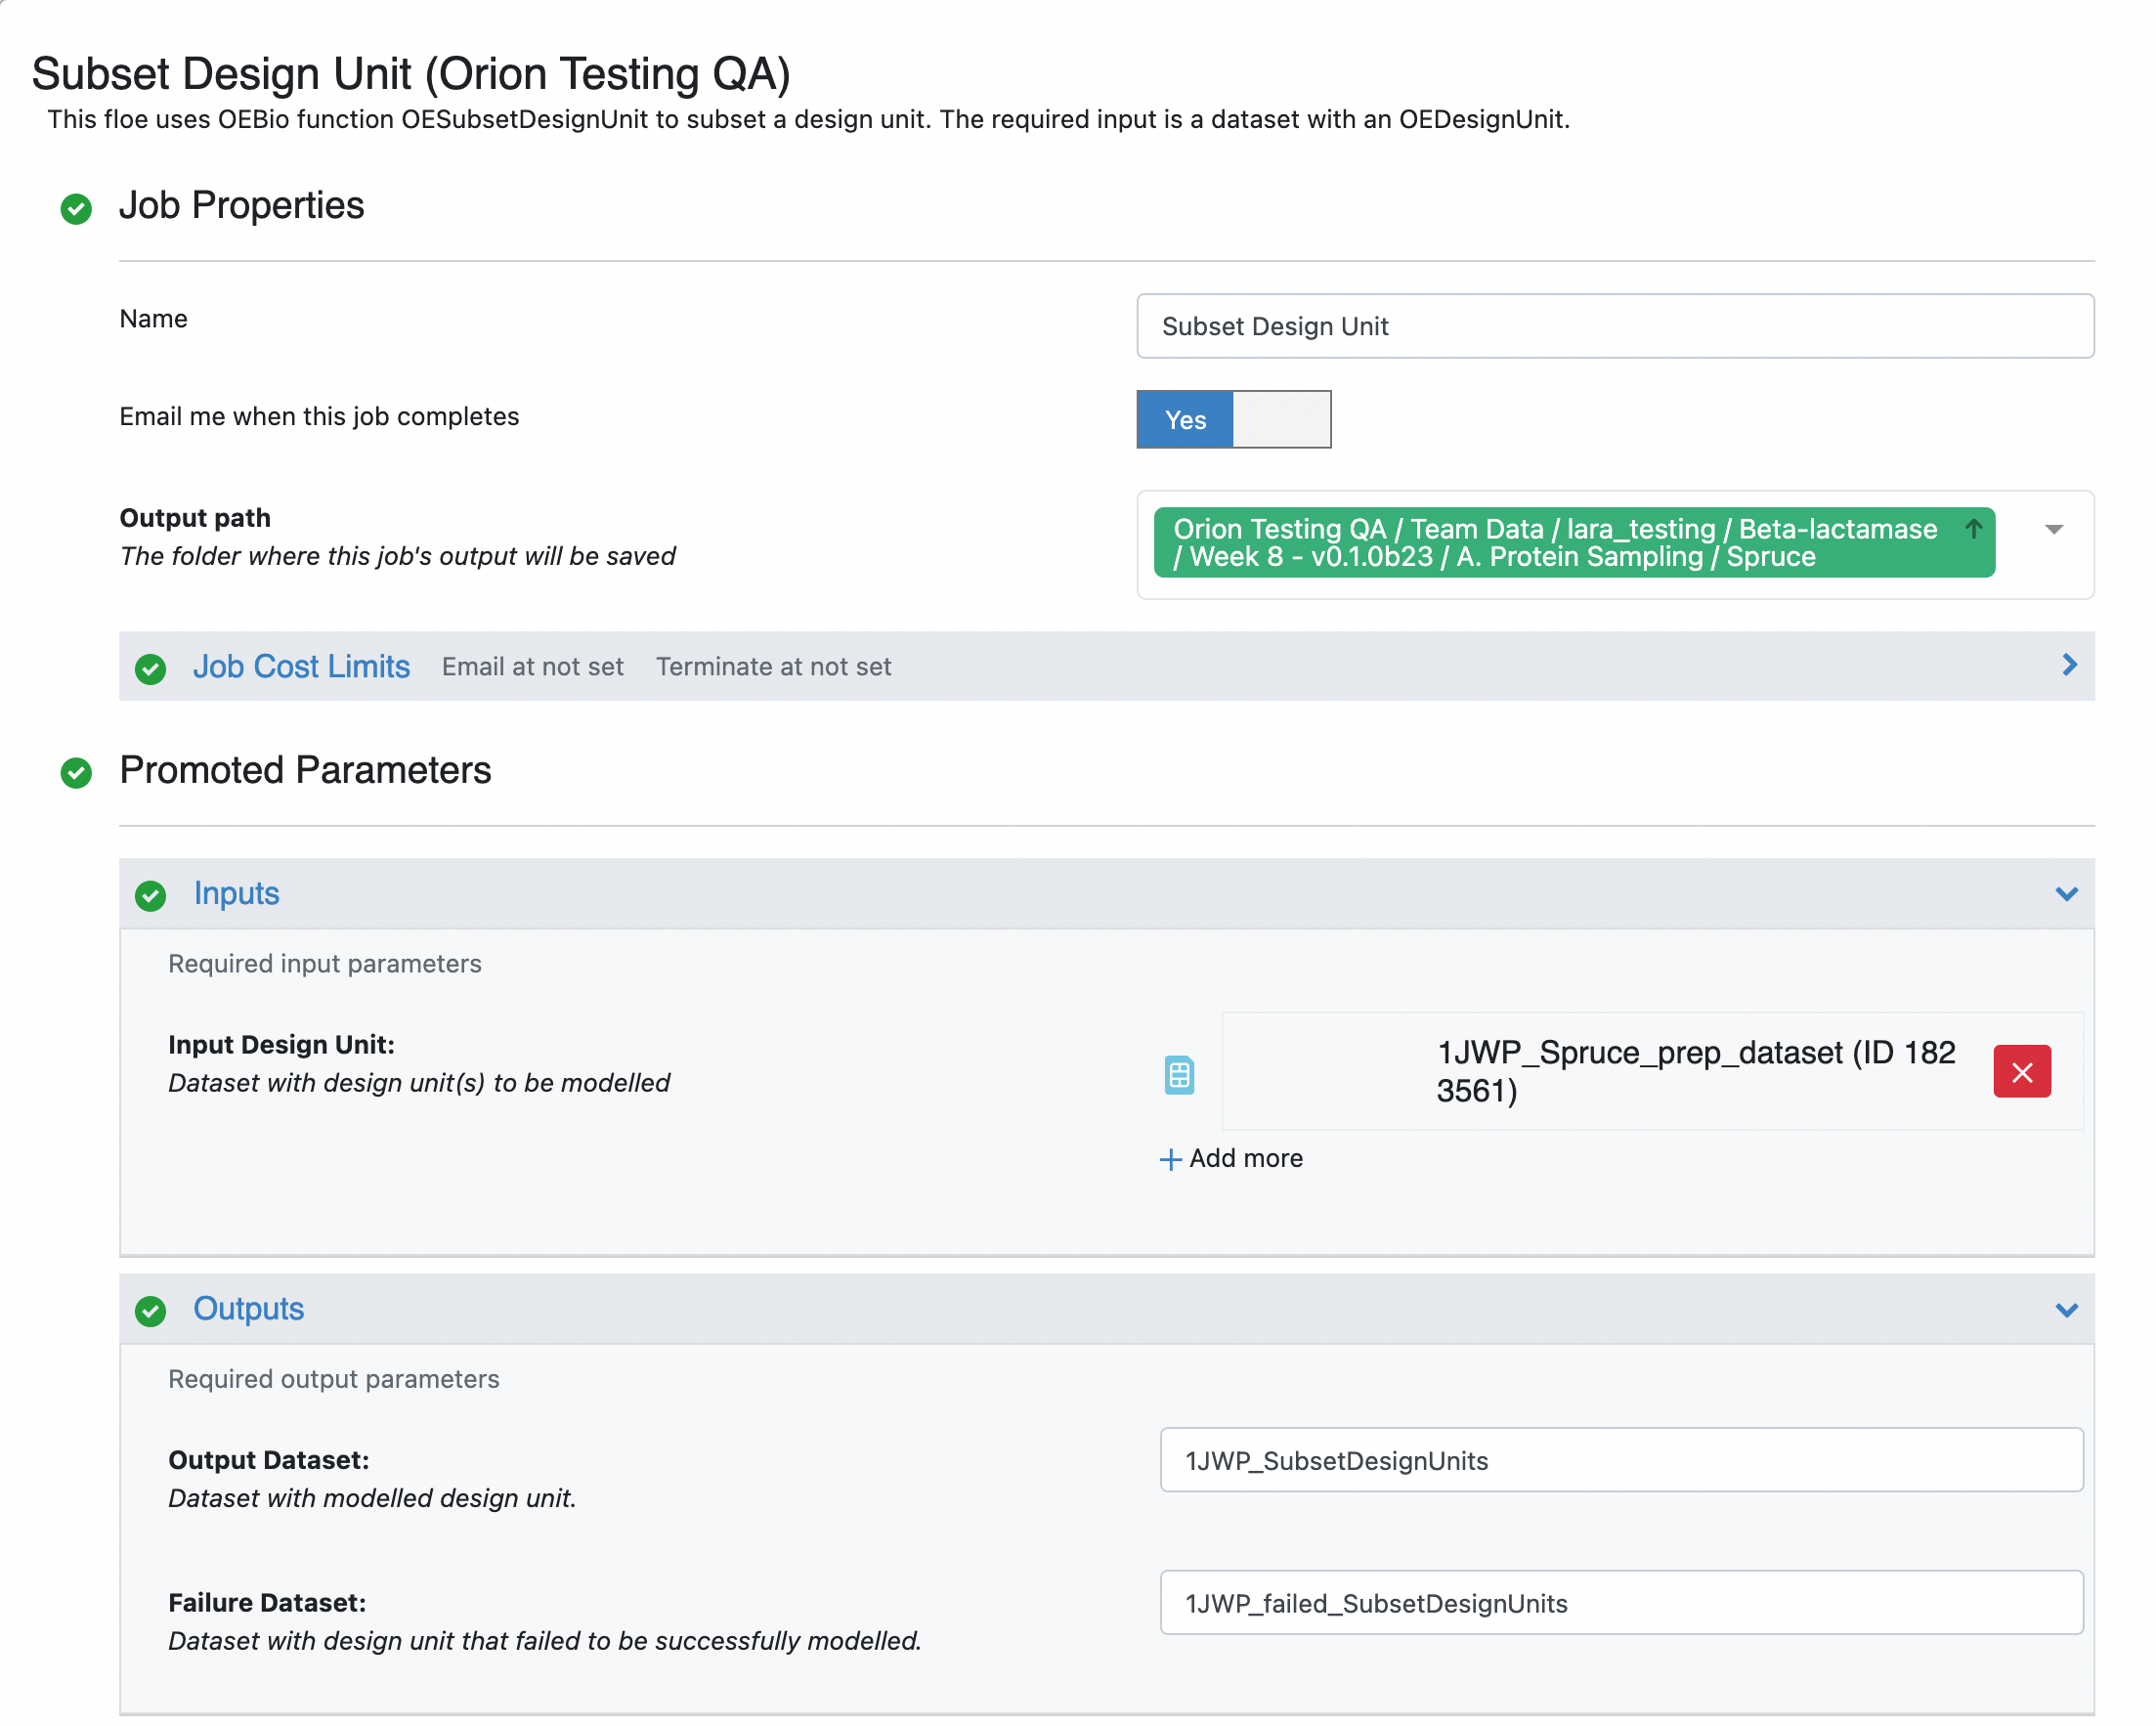
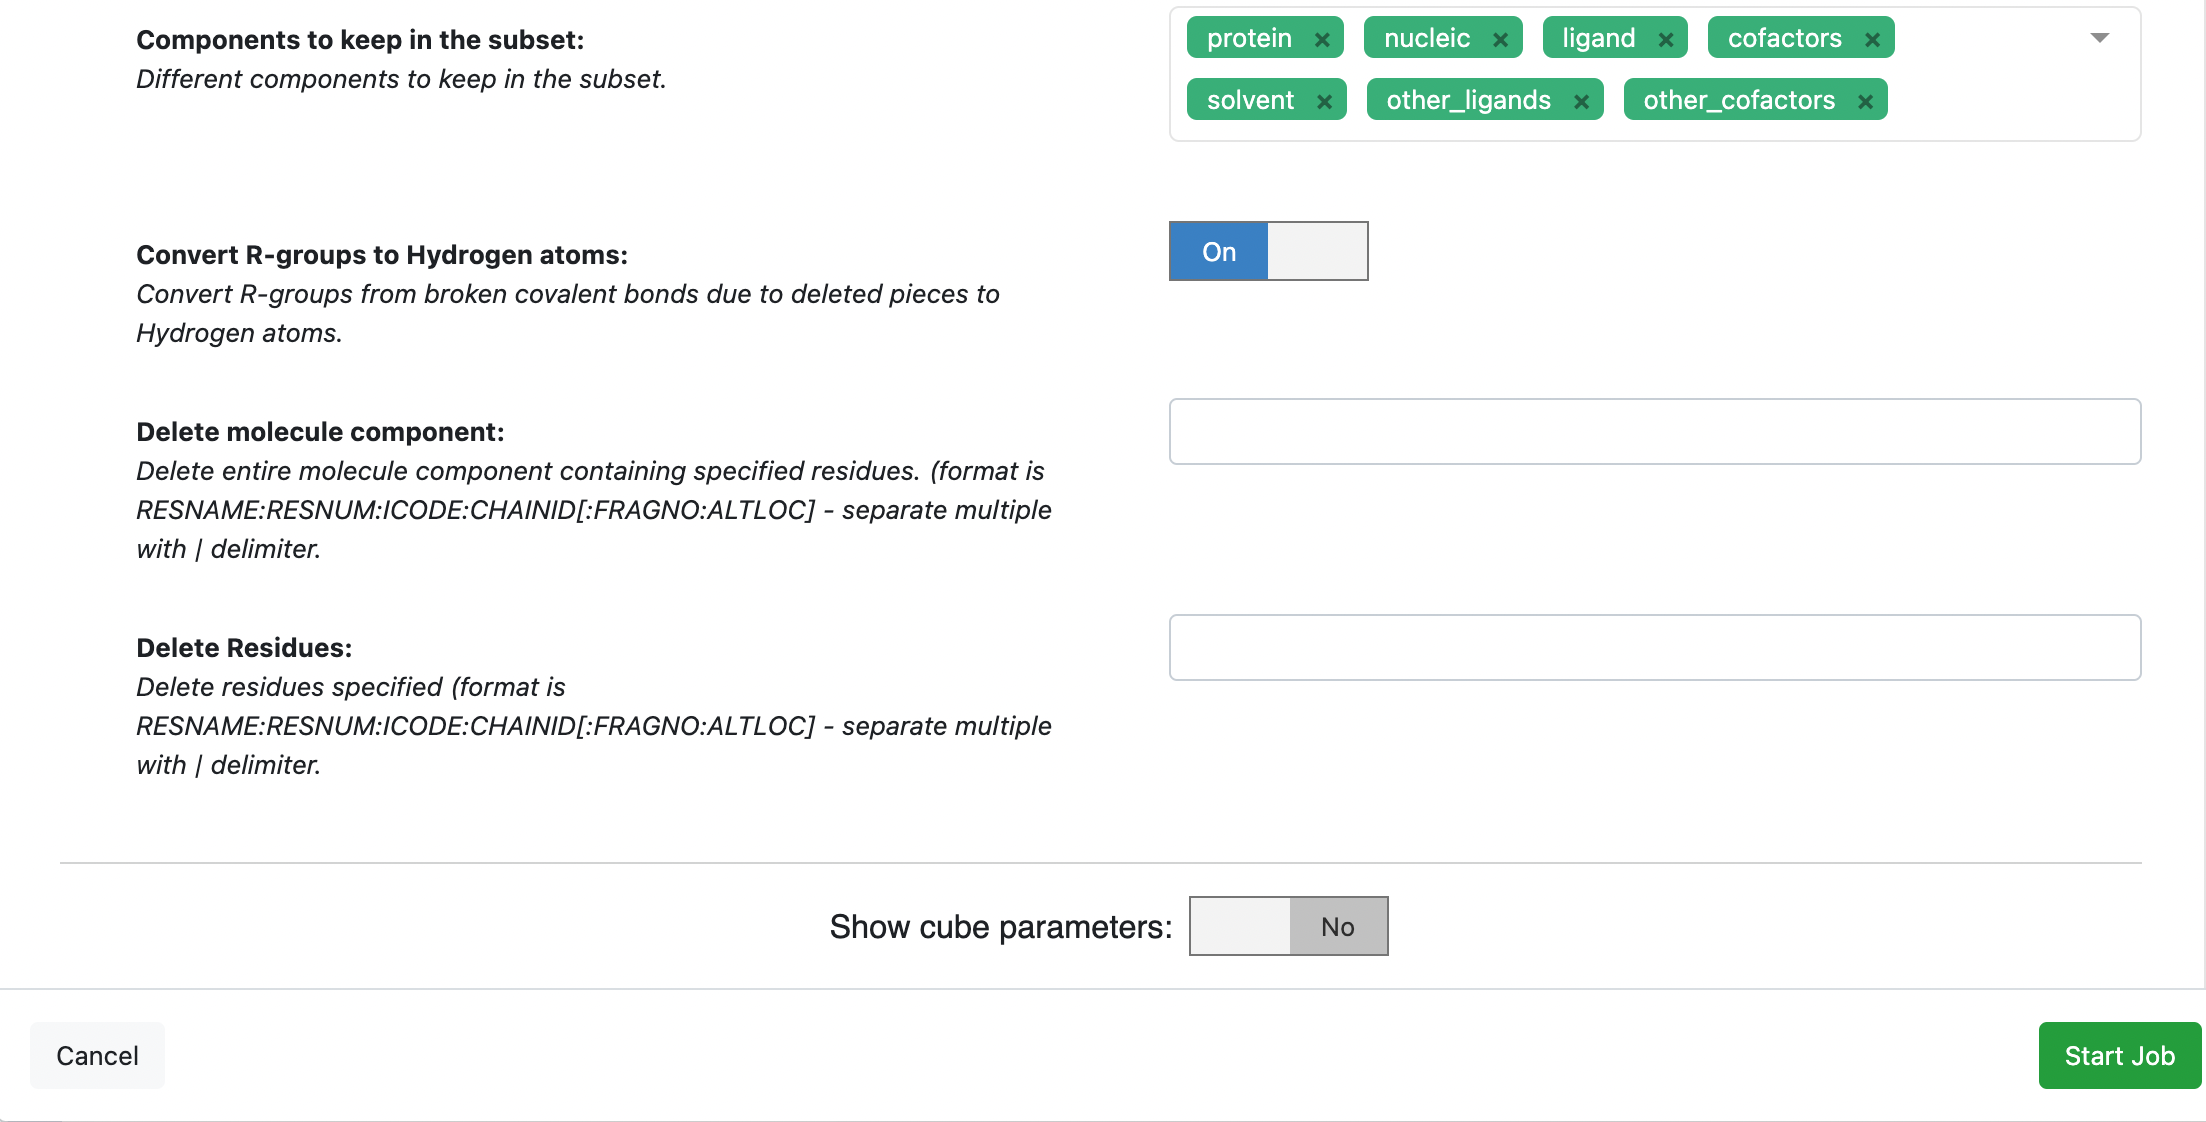
Click on the green Start Job button. This floe should take approximately 5 minutes to complete. Once this floe is complete, you will be able to proceed to the next stage of the tutorials.