FastROCS Plus with Docking and Consensus Score of Top Molecules
In this tutorial the the Enamine REAL collection will be search with FastROCS for molecules similar to a ligand crystallized with HSP90. The top scoring molecule from FastROCS will then be re-scored using ROCS and Docking into the HSP90 receptor and the generated consensus hit list will be examined. Running all the Floe in this tutorial will cost approximately $30 in Orion compute charges (the cost will vary somewhat depending on current AWS pricing).
This tutorial uses the following Floe:
SPRUCE - Protein Preparation from PDB Code from the OpenEye classic floes package.
Create a Tutorial Project and Working Directory
Note
If you have already created a Tutorial project while doing another tutorial you can re-use the existing one and skip this step.
Log into Orion
Click the Home button at the top of the left menubar.
Click on the ‘Create New Project’ button and in the pop up dialog enter Tutorial for the name of the project and click ‘Save’.
Prepare Design Unit / Receptor
Note
If you have prepared this design until for another tutorial you can skip this step and re-used the design unit from the first tutorial.
This tutorial will use the HSP90 crystal structure 1uyg from the Protein Data Bank. To import this structure into Orion and prepare it for docking locate the floe SPRUCE - Protein Preparation from PDB Code Floe in the ‘Floes’ page as follows
Click on the ‘Floes’ button in the left menu bar
Click on the ‘Floes’ tab
In the Floes filter click ‘All Floes’
In the search bar enter Spruce
A list of three spruce Floes will now be visible to the right. Click on the SPRUCE - Protein Preparation from PDB Code and a Job Form will pop up. Specify the following parameter settings in the Job Form.
Job Properties
Output Path : Tutorials/My Data/Input Data
You will need to create the Input Data subfolder unless you have already created it in another tutorial (this can be done within the selection menu).
Promoted Parameters
Outputs
Dataset : hsp90_design_unit
PDB Codes(s) to Download : 1uyg
Click the ‘Start Job’ button to launch the Floe. Wait for the Floe status to be complete before moving on to the next step in the tutorial (this may take ~10min). The cost will be less than $1.
View Prepared Design Unit / Receptor
Once the SPRUCE - Protein Preparation from PDB Code job finishes make the resulting dataset active as follows:
Go to the Project Data page by clicking on the blue ‘Data’ button on the left menubar.
Select ‘My Data’ under ‘Project Data’ from the list of options to the left of the page.
Select the folder ‘Input Data’ in the main view
In the ‘Show’ menu in the top center of the screen check ‘Datasets’ if it is not already checked.
Check to make sure you have no datasets set as active by clicking on ‘Active Datasets’ in the top right of the window. If you do click ‘Clear All’ to clear them.
Make the hsp90_design_unit active by clicking on the circle with the plus symbol in the Active column next to the hsp90_design_unit name.
Now switch to the 3D Viewer by clicking on the 3D button in the left menu bar. Only the crystallographic ligand from the pdb structure will initially be visible. Do the following to make the receptor information in the design unit visible in the 3D view.
In the ‘All Data’ window expand the tree under ‘1UGY(A) > PU(A-1224)’ by clicking on the chevron immediately to the right of the name.
Expand the tree under ‘1UGY(A) > PU(A-1224)’ by clicking on the chevron immediately to the right of the name. Note: the ‘1UGY(A) > PU(A-1224)’ name appears twice, once by default and once again after completing step 1.
Expanded tree under ‘Receptor’ by clicking on the chevron immediately to the right.
Click the check button to the left of “Receptor Outer Contour” to make the contour visible in the 3D window.
The protein structure, crystallographic ligand and a blue contour are now visible. The blue contour (generally referred to in OpenEye documentation as ‘The Outer Contour’) encloses the region of space that all docked molecule heavy atoms will fit within.
Run the FastROCS Plus Floe
Locate the FastROCS Plus floe as follows.
Click on the ‘Floes’ button in the left menu bar
Click on the ‘Floes’ tab
Click ‘All Floes’ in the left pane
In the search bar at the top of the right pane enter FastROCS Plus
The FastROCS Plus floe will be visible to the right. Click on the first FastROCS Plus floe to to bring up the Job Form and set the following parameters
Jobs Properties
Output Folder : Tutorial/My Data/FastROCS HSP90 Consensus
Promoted Parameters
Inputs
Input Query Dataset(s) : Tutorial/My Data/Input Data/FastROCS HSP90 Consensus
This is the dataset with the protein we prepared at the beginning of this tutorial. Select it as follows.
Click the ‘Choose Input’ button for Design Unit Or Receptor Dataset(s) to open the Select Dataset modal.
Click ‘My Data’ under Project Data on the menu to the left.
Click the ‘Input Data’ folder.
Select the hsp90_design_unit dataset
Click ‘Use dataset as Input’
Note
This floe automatically uses the bound ligand when a design unit with a ligand is passed to this parameter. In normal work on might alternatively pass one or more known active molecules to this parameter.
FastROCS Input Collection : Select the following two collection
Organization Data/OpenEye Data/FastROCS Collections/FastROCS Enamine REAL 2020q3-4 Simple 1.20B OEv1.0 - external
Organization Data/OpenEye Data/FastROCS Collections/FastROCS Enamine REAL 2020q3-4 Complex 2.43B OEv1.0 - external
Design Unit(S) (Optional) : hsp90_design_unit
This is the dataset with the protein we prepared at the beginning of this tutorial. Select it as follows.
Click the ‘Choose Input’ button for Design Unit Or Receptor Dataset(s) to open the Select Dataset modal.
Click ‘My Data’ under Project Data on the menu to the left.
Click the ‘Input Data’ folder.
Select the hsp90_design_unit dataset
Click ‘Use dataset as Input’
Now click the ‘Start Job’ button at the to start the FastROCS Plus job. The job will take roughly 30min to run and incur an Orion compute charge of about $30. Once the floe has finished move on to the next step of the tutorial below.
Note
This floe will produce the following seven hit lists, although we will only be using three in this tutorial.
FastROCS Hit List : Output dataset that will contain the top hits directly from FastROCS.
ROCS Hit List : Output hit list dataset from ROCS re-scoring of the top FastROCS hits
Dock Hit List : Output hit list dataset from docking the top FastROCS hits
Consensus ROCS Hit List : Consensus output hit list ranked by ROCS Combo Tanimoto
Consensus Dock Hit List : Consensus output hit list ranked by docking score
FastROCS Novelty Hit List : Output dataset that will contain a subset of top hits from FastROCS that are highly diverse in 2D.
ROCS Novelty Hit List : Output hit list dataset that will contain a subset of top hits from ROCS re-scoring that are highly diverse in 2D.
View Consensus Result
Make the Consensus Dock, Dock and ROCS hit lists activate.
Click the ‘Data’ button in the blue menu bar to the left
Under ‘Project Data’ select ‘My Data’
Click on the ‘FastROCS HSP90 Consensus’ folder.
Clicking on ‘Active Datasets’ menu in the upper right. If any dataset are active click ‘Clear All’ in the menu.
Make the following datasets active by clicking on the greg circle with the plus symbol to the left of the name. The grey circle will turn green.
Consensus Dock Hit List
ROCS Hit List
Dock Hit List
Plot the Dock and ROCS Scores in the Analyse Page and Highlight the Consensus Result
Click the ‘Analyse’ button in the blue menu bar to the left
In the main plot window choose the docs and rocs overlay scores as follows
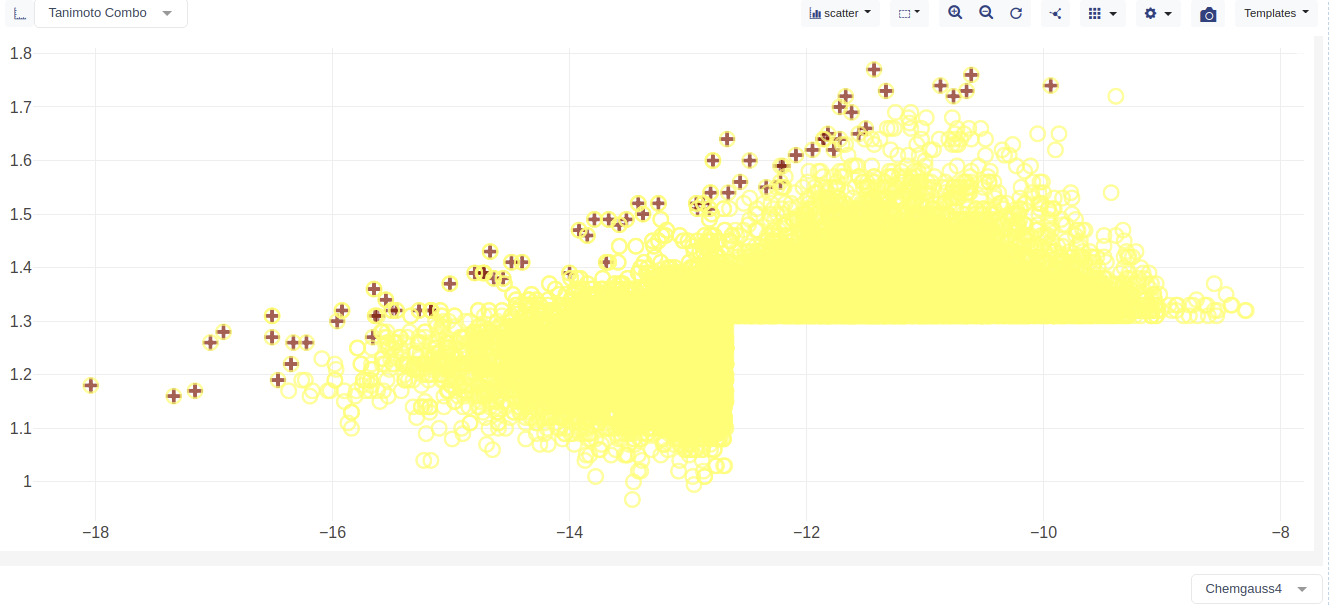
Column X : Chemgauss4
Column Y : Tanimoto Combo
Note
Chemgauss4 is the docking score. Tanimoto Combo is the ROCS overlay score.
Wait for the plot to load, ~2min.
Click the gear icon in the upper right of plot to open the plot options menu an set the following
Set the ‘Color Dimension’ in the ‘Color’ tab to Dataset Name
In the color tab set a dark color for ‘Consensus Dock Hit List’
In the color tab set a light color for ‘Dock Hit List’ and ‘ROCS Hit List’
Set the ‘Mark Dimension’ in the ‘Marker’ tab to Dataset Name
Set ‘Consensus Dock Hit List’ marker to +
Set the ‘Dock Hit List’ and ‘ROCS Hit List’ marker to be an open circle
The plot will now be showing the the plot of the hit lists molecules dock score (i.e., Chemgauss4) vs ROCS score (i.e., Tanimoto Combo). The consensus molecules are marked with a + symbol.
See also
Note
Some molecules appear in more than once hit list in this view.
View the Consensus Docked Results In the 3D View
Open the ‘Actives’ menu in the upper right and clear the ‘Dock Hit List’ and ‘ROCS Hit List’ datasets.
Click on the ‘Data’ button in the blue menu to the left
Navigate to the ‘FastROCS HSP90 Consensus’ folder.
Make the ‘Design Units’ dataset active.
Click on the ‘3D’ button in the blue menu to the left.
In the ‘Layout’ drop down menu in the upper right select ‘3D Viewer with Spreadsheet’
Click the ‘…’ a the bottom left of the window in the upper left of the interface and select ‘Large Molecule’
Click the green button to the right of ‘1YUG(A) > PU2(A-1224)’ in the ‘Large Molecule’ window to log the design unit to the 3D view.
Click the ‘Data Handling’ button to open the ‘Data Handling’ modal and do the following
Click the ‘All’ check box at the top of the ‘All’ column. This will uncheck all the boxes
Check ‘Docked Molecule’ in the All column
Check ‘Chemgauss4’ in the ‘All’ column
Check ‘Tanimoto Combo’ in the ‘All’ column.
Click ‘Apply’ to close the ‘Data Handling’ modal.
Wait for the ‘Data Handling’ changes to update, this may take a few minutes.
You can now view the consensus hit list molecules and see there associated scores in the spreadsheet, while examining the docked poses in the 3D window.