Installation
Installers and Licenses
Installers for our supported platforms can be found at the Product Downloads page.
VIDA Installer
Note that there is a separate VIDA installer for your platform. To add VIDA to the applications on your machine, use the VIDA installer with a procedure similar to the procedure used to install the other applications.
The installers check for the presence of an OpenEye license on the target computer, so be sure you have the license in the right place.
The following sections give more specific directions for your operating system.
The procedures documented in this chapter explain how to install the product code on your computer and how to set up the computer (for example, the path) to execute product commands. After following the installation instructions, see the chapters on the individual applications, for documentation of application commands and how to run them. For example, see the OMEGA introduction for information about OMEGA commands and arguments.
Linux
Note
Linux installation also requires libpciaccess to be available in order to open the desktop applications.
Linux distributions are provided as a gzipped tarball of the distribution
tree described below. Installation is performed by simply untarring the file
in the desired location. The top-level directory in the tarball is named
openeye. Distributions for different Linux variants can be installed
into the same location, allowing multiple Linux versions to be run from a
single shared directory.
Add bin Directory to Path
To ensure that the installed applications can be called from the command line,
be sure to add the full path of the openeye/bin subdirectory to the
PATH environment variable. For instance, if the distribution was
installed into /usr/local/openeye, the PATH environment variable
should contain: /usr/local/openeye/bin.
If you are not used to manipulating the path, this is the time to learn. See the
documentation available and online tips for your version of Linux. The usual
way to add /usr/local/openeye/bin, for the current terminal session, would be:
export PATH="/usr/local/openeye/bin:$PATH"
Under the top-level openeye directory are the following subdirectories:
- arch:
This directory contains the collection of platform specific subdirectories. Each subdirectory contains the actual installed executables and support libraries for the associated platform. In the platform specific subdirectory there will be a subdirectory for each application. Within that will be another subdirectory for each version of that application.
- bin:
This directory contains a startup script for each application that has been installed. This script determines, at run-time, what the current platform is and then calls the appropriate executable in the
arch. This script enables the easy co-existence of multiple platforms and versions of any OpenEye application in the same distribution tree.- data:
This directory contains all of the associated data and examples for the installed applications. There will be a subdirectory for each installed application and within that subdirectory there will be another subdirectory for each specific version of that application.
The startup script discussed in the section on the bin directory above will
have the same name as the installed executable with which it is associated.
When the script is called, it will attempt to determine the current platform
and run the appropriate executable if installed. If an appropriate executable
cannot be found, the script will report that information, as well as a list of
the currently installed platforms. The auto-detection can be overridden by
setting one of two environment variables:
OE_ARCHcan be used to specify a colon separated list of compatible distributions for the current platform such as:redhat-RHEL8-x64:redhat-RHEL7-x64or
Ubuntu-18.04-x64:Ubuntu-16.04-x64Specification of this environment variable overrides the auto-detection process, if it is present. If none of the compatible distributions listed are found, the script will fall back to the auto-detection process.
APPNAME_OE_ARCHcan be used to specify a colon separated list of compatible distributions for a specific application (as specified by changing the APPNAME text in the environment variable name) just likeOE_ARCHas detailed above.Specification of this environment variable overrides the
OE_ARCHenvironment variable as well as the auto-detection process. If none of the compatible distributions listed are found, the script will fall back to theOE_ARCHlist first and then to the auto-detection process.Specifying this variable provides a simple way to customize the behavior for individual applications on nonstandard platforms.
The startup script also supports a few commandline arguments including:
- -path
Specifying this argument will output the full path of the executable to be run. The executable will not be started if this argument is present.
- -print_arch
Specifying this argument will output the details of the current platform as detected by the script as well as which platform-version of the executable is being run. The executable will be started if this argument is present.
- -use_version
Specifying this argument followed by a specific version number allows the user to control which released version of the executable to run.
Windows
Windows distributions are provided as a standard MSI installer. Double click the installer and follow the instructions. For the OpenEye installation a data directory which contains example data for all of the application suites is installed by default. De-select it in the installer if you do not wish to install the data.
The OpenEye-applications folder will install into C:\Program Files by default but can be overridden.
If Microsoft MPI is not installed on the system you must install this separately in order for the applications to run using multiple processes. See section MPI for more information.
Under the OpenEye-applications directory (C:\Program Files\OpenEye-applications <version>) there are subdirectories for:
- bin:
This directory contains the application executables.
- data:
This directory contains all of the associated data and examples for the installed applications.
An OpenEye-applications group will be added to the
Start menu. It will contain a link to an OpenEye command shell
with PATH settings already defined to allow the user
to simply type the executable name at the prompt without concern for where the
executable is actually installed. A shortcut to the OpenEye command shell will also be placed onto the Desktop. Links to graphical apps and an OpenEye-applications Data folder
will also be installed to the Start menu and Desktop.
Note
The Windows installer will automatically remove the last version of OpenEye-applications from the computer, if it exists, before installing the latest version of the software. To install older released versions of OpenEye-applications, you must first uninstall the latest version using system settings\add or remove programs.
Enterprise Installation for Windows
It is possible to perform a “silent installation” of the applications by running the
installer with the /quiet flag from an administrator account.
It is also possible to run as a non-administrator, and to install to an alternate location from the default folder.
Example commands:
msiexec.exe /quiet /i OpenEye-applications-2019.May.1-win64-setup.msi When run from an administrator account this installs without displaying any progress or other istallation windows.
msiexec.exe /quiet /i OpenEye-applications-2019.May.1-win64-setup.msi ALLUSERS=2 MSIINSTALLPERUSER=1 INSTALL_ROOT=c:\mydir. Installs to c:\mydir instead of the default location and can be run from a non-administrator account.
No reboot is required after installation.
macOS
macOS distributions are provided as dmg disk images. For installation, double click the .dmg file in the Finder to open it. The installer will show icons for the applications and data, as shown in the figure below.
Drag each application to the
Applications folder. For convenience, multiple items to install can be selected
at once by drawing a box around them or by using command-click on each item.
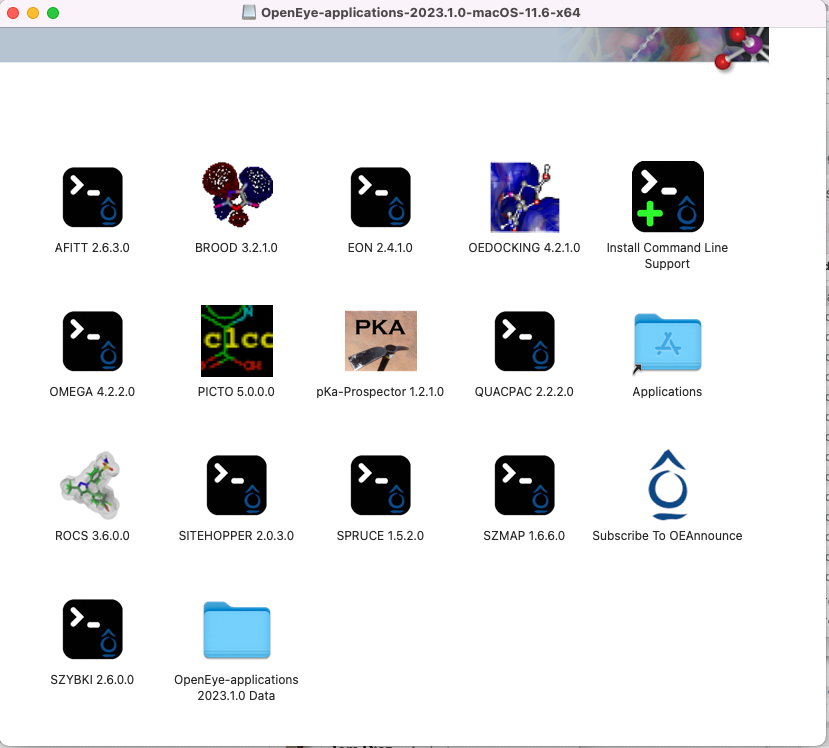
macOS disk image
A folder named OpenEye-applications<version#> Data, containing all the associated data for the applications, is included in the
disk image. It can be dragged to the Applications folder or other convenient location for installation.
Once the applications have been installed to the Applications folder, the application Install Command Line Support can be
saved to any location and run. This application adds the
command-line applications’ locations to the user’s PATH environment variable so they can be run from any command line.
Command-line applications can also be run from the Applications folder, in
which case they will open a terminal window with a properly configured
environment. The user may need to source their ~/.profile file after executing “Install Command Line Support” to update the PATH in existing terminals.
GPU-Enabled Applications
Supported Platforms
CUDA-enabled OpenEye software is only available on supported Linux platforms. For supported Linux platforms see above and/or the Platform Support Page
Supported GPUs
An NVIDIA Tesla, Quadro, or GeForce GPU with a compute capability of 3.5 or higher is required on your system. For a comprehensive table of which GPUs fall into which compute capability category please refer to the CUDA wikipedia page.
NVIDIA Drivers
Minimum NVIDIA Driver version: 450.x.
CUDA is not required to be installed.
We recommend driver 450.80.02 and we strongly advise manually downloading and installing the appropriate NVidia driver for your system as opposed to using a package manager.
To install, root privilege is required. Follow these steps:
Download the driver to the machine you are installing it on.
chmod +xthe driver package to make it executable.Ensure you have disabled X-server by killing any running sessions. Reboot may be required if X-server is still running after this step.
Warning
Disabling X-server requires different processes to be killed depending on your Linux distribution. See Nvidia installation guide for more details.
Warning
The NVidia kernel module can often conflict with the open source Nouveau display drivers depending on your specific Linux distribution. The NVidia documentation is a much more complete and up-to-date source for information on how to work around this issue. See Disabling Nouveau on the NVIDIA website.
Install the driver by
sudo ./NVIDIA-Linux-x86_64-450.80.02.runand follow the step-by-step installation instructions.For more details on driver installations see the CUDA Installation Guide
Note
The output of the nvidia-smi command is extremely useful when
debugging GPU issues. Please include the output from
nvidia-smi in any request to support@eyesopen.com.
Performance Tuning
To get the most performance out of an NVIDIA Graphics card, use the persistence daemon to switch persistence mode on across all cards on the system (root privilege required):
sudo nvidia-persistenced --user foo
This will automatically enable persistence mode after reboot.
For full instructions on persistence daemon see the Persistence daemon section of the NVIDIA docs.