Editing ROCS queries in vROCS
In earlier versions of ROCS it was difficult to edit a query using the various command line utilities. The input to ROCS was generally required to be either a whole molecule query or a grid or shape query, although it was possible to load one or more molecules into a 3D builder and then modify or merge them into a super molecule. Having the vROCS graphical editor for ROCS provides the ability to move from a simple molecule with automatic color atom assignment or a grid (with no color atoms at all) to a position where the user can decide how the query is built. The vROCS graphical editor will facilitate this process by:
Reducing the time required.
Reducing the risk of errors.
Increasing the flexibility of the editing process by allowing a greater range of editing tasks to be accomplished.
This will have a knock-on effect that more complex and/or selective queries can be employed in ROCS and, in some cases, it is possible that higher quality results could be obtained. Additionally, it will facilitate the use of queries that are not directly molecule shape-based e.g. multiple fragments or grid-based queries.
There is a danger associated with the ability to edit the query and that is over-editing i.e. editing a query until it does not work. For this reason the validation run and its associated statistical analysis tools were included in vROCS (see section Statistics metrics). By providing the validation the user has the tools necessary to decide whether a complex new query is really better than simply using e.g. the x-ray ligand. This caveat should constantly be uppermost in the user’s mind.
There are two methods for editing queries in vROCS. An automated wizard guides the user through one of a few predesigned paths for building a new query. Manual query building and editing is also available. Both functions are available from the Welcome interface.
Query Building Wizard
The query building wizard is designed to walk the user through building a query through one of the paths below:
SMILES
Ligand Model Builder
These are typically paths for which manual query building is less straightforward.
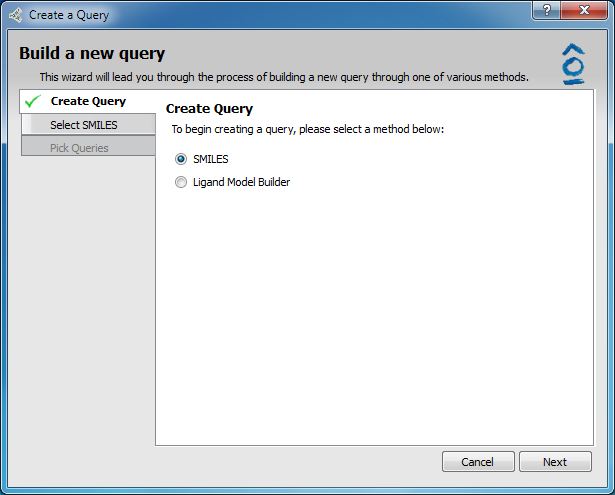
Query building wizard interface
There are two ways to access the Wizard. Either select the Create a Query With a Wizard button on the vROCS Welcome page or select File > New Query… from the menu at any time during a session.
SMILES
The SMILES option produces up to 5 queries from an input SMILES string, calculating a reasonable 3D structure and conformations.
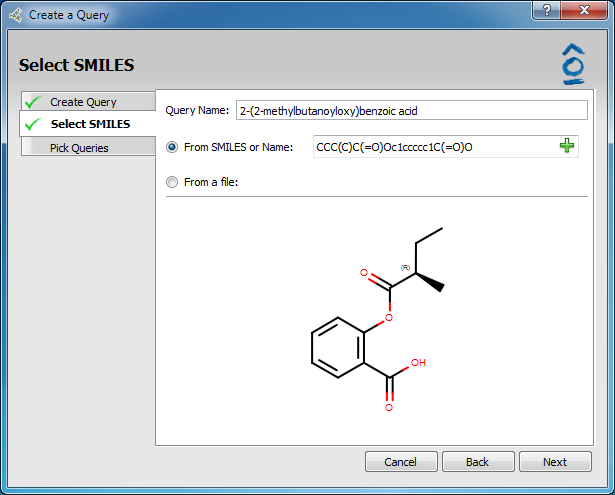
In the Create Query tab of the Query Wizard select the radio button SMILES and then click Next (as seen above).
The Select SMILES tab becomes active. This gives the option to type in a SMILES string or molecule name (systematic IUPAC or molecule name, i.e. aspirin). The molecule structure will be incrementally displayed as the SMILES string is entered.
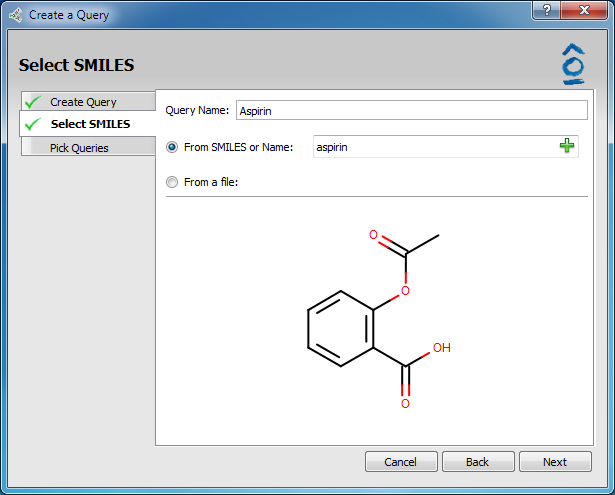
Select SMILES page
Clicking on the green “+” icon in the SMILES entry field pops up a Sketcher in which the molecule can be sketched or the SMILES string or molecule name can be entered in the input field. When sketching is complete, clicking OK will close the Sketcher and update the structure displayed in the Select SMILES tab.
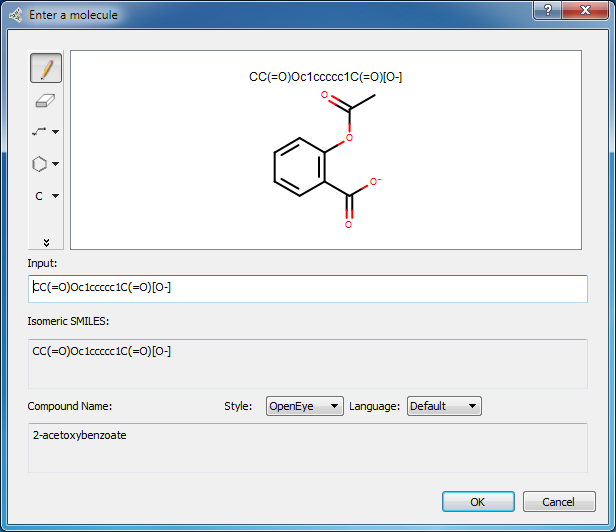
Picto sketcher
Alternatively, a file of one or more molecules can be loaded and a SMILES string is displayed for each molecule in the file. Scrolling through the list of molecules will change the structure displayed. The highlighted structure in the list is the one that will be selected for the next step.
Because the query will be run through OMEGA to generate conformers, and OMEGA requires stereochemistry to be defined, chiral molecules with undefined stereo centers will require an additional step to specify the proper configuration at each stereo center. Atoms and bonds with undefined stereochemistry will appear highlighted in red (see figure below). Clicking on the highlighted atoms will cycle through the possible configurations.
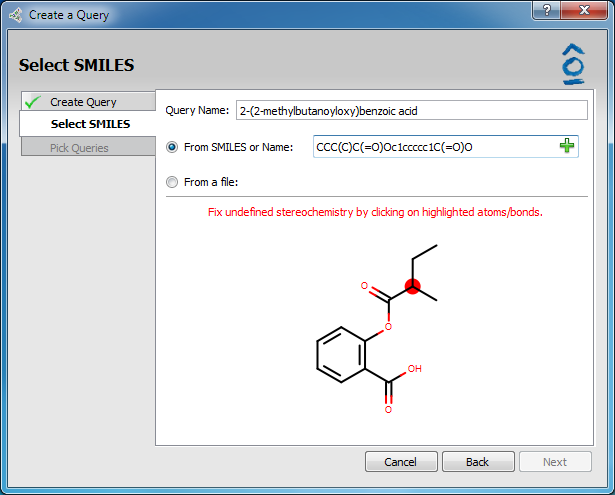
Molecule with Undefined Stereochemistry
Molecule with Stereochemistry Defined
Clicking Next activates the Pick Queries page. For the previously highlighted structure five (5) OMEGA lowest energy conformers are generated and listed. Conformer 1 is the lowest energy conformer. Scrolling through the list of conformer names using the up/down arrow keys or clicking on a specific conformer displays that structure in the 3D window above where it can be rotated or zoomed using the mouse. Multiple conformers can be chosen for import as ROCS queries into the main vROCS interface. The desired conformers are marked with a red check mark by double-clicking on their entries in the list.
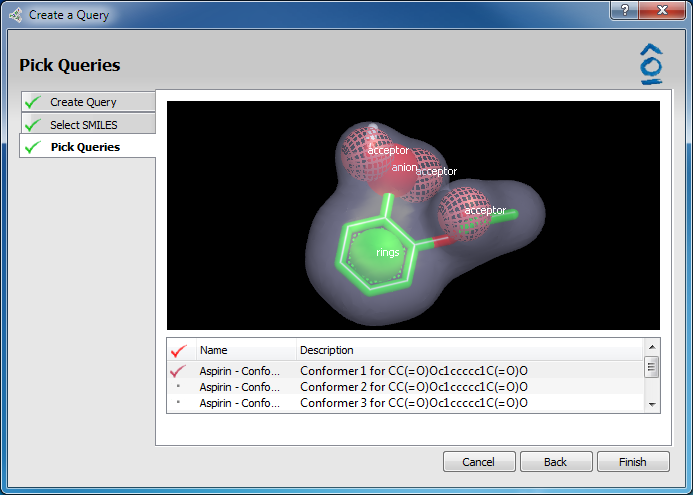
Pick queries page
Click Finish to close the Wizard and import the selected conformers into vROCS. They will be listed in the Query list for simple or validation runs and the lowest energy conformer will be displayed in the 3D window.
Ligand Model Builder
If there are several known active ligands for a given project it can be desirable in ROCS to use a hypothesis query which is an alignment of more than one of the active ligands. This avoids losing potentially important information from one ligand that may not be present in others. The ligand model builder takes a set of pre-aligned ligands in the same Cartesian coordinate frame and carries out a rigid alignment in the same frame of reference. It produces hypothesis models for 1,2…n molecules (where n is selected by the user as the maximum number of molecules per model). The top scoring model(s), based on TanimotoCombo score, are returned. These are the model(s) that best represent the set of ligands as a whole. Since this is a rigid alignment no OMEGA conformers are generated and it is therefore important to use a ‘reasonable’ structure for each compound that represents a putative binding mode e.g. a set of docked ligands or a set of x-ray crystal structures.
Consider the following example. A set of 19 trypsin protein crystal structures are sequence aligned and the ligands extracted to give a set of 19 Cartesian aligned ligands. The user is interested in building 2 models, each containing up to 3 molecules. The ligand model builder builds hypothesis alignment models containing 1, 2 and 3 of these 19 ligands. It scores all the models against the set of 19 compounds and returns the top scoring 2 models. These may contain 1, 2 or 3 of the ligands and a 3-ligand model does not necessarily contain any of the ligands used in a 1- or 2-ligand model.
From the Create Query dialog of the Wizard select the radio-button option for Ligand Model Builder and click Next. This will activate the Load Aligned Ligands page.

Load Aligned Ligands page
The user is required to browse and select a file containing the aligned ligands (single conformer only). The input file type can be any format with 3D coordinates but must contain molecules. Other potential ROCS inputs (e.g. shape grids) cannot be supported in this workflow. Both 3D and 2D preview windows allow scrolling through the individual members of the file. The 3D window is interactive for zooming or rotating with the mouse. Click the Next button to proceed to the Adjust Parameters page.
All the required parameters are set by default so it is optional to make any additions or changes to fields in the Adjust Parameters page.
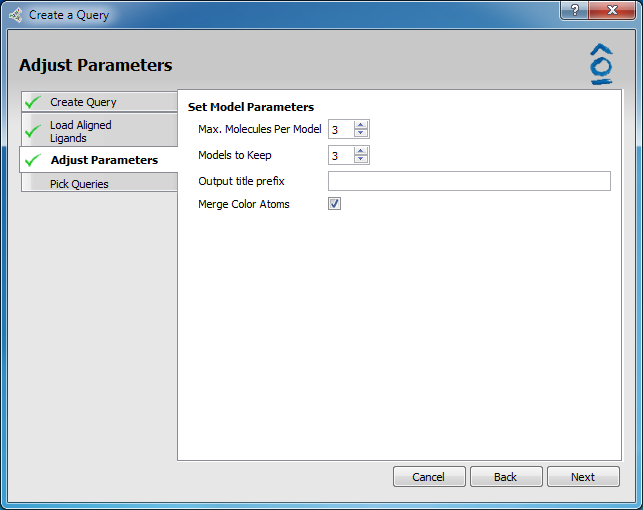
Adjust Parameters page
Option |
Description |
|---|---|
Max. molecules per model |
Models containing 1,2,…n molecules will be considered for an input value of n. |
Models to keep |
The number of best models to output, based on TanimotoCombo score. |
Output title prefix |
Optional naming prefix for the output models. |
Merge color atoms |
Optional merging of close color atoms of the same type in multi-molecule models. |
The following options are available:
Max. molecules per model: This is the value n described above. For n=4 models containing 1, 2, 3 & 4 molecules will be considered. The input value for n cannot exceed the number of ligands in the input file. As n is increased the number of models considered will increase at a rate of the sum of the binomial coefficients. It is the sum of the binomial coefficient elements of the nth row of Pascal’s triangle from 1 to n. (https://en.wikipedia.org/wiki/Pascal%27s_triangle.)
\(k = \sum_{i=1}^n\frac{h!}{(h-n)!n!}\)
k = total number of models considered;
h = no. of molecules in the pool;
n = max. molecules per model
Consider the trypsin example above where k=19. The binomial coefficients (for 1 to 19) are:
- \(19+171+969+3,876+11,628+27,132+50,388+75,582+92,378+\)
\(92,378+75,582+50,388+27,132+11,628+3,876+969+171+19+1\)
If only models containing 1 molecule are considered then 19 models will need to be evaluated. If models containing up to 3 molecules are considered then 1159 models will be built and evaluated:
\(19+171+969=1159\)
This represents 19 one-molecule models, 171 two-molecule models and 969 three-molecule models. However, if models containing all 19 molecules were to be considered then:
\(k = 2^{19} -1=524,287\)
k = total number of models considered
Thus, 524,287 models would be built and evaluated. Clearly this can become a cpu intensive and time consuming process so it is recommended to keep n low (<5) when the pool of molecules is large. This also avoids building overly complex models.
Models to keep: This is the number of top ranking models to output. By default this is set to 1 and therefore a single model will be produced. The output model is the one with the highest mean TanimotoCombo score across all the ligands. If this input value is set higher then more models will be output for visual evaluation and use as possible hypotheses. Increasing the number of models to keep has no effect on the run time; the same number of models are created and evaluated. It only changes the number of models retained in the output set.
Output title prefix: This optional field names the models produced. For a prefix ‘model’ the resulting models will be named ‘model 1’, ‘model 2’, etc. If no prefix is provided then the model name will be formulated by the names of the ligands which comprise the model. For example, ‘1GJ6_1QBO’ is a model made from two ligands named ‘1GJ6’ and ‘1QBO’ in the input file.
Merge color atoms: This is an optional field. If two color atoms are overlaid then they will automatically be merged. However, color atoms are often close but not perfectly overlaid, for example, the two donor atoms highlighted below. Checking the Merge color atoms box will attempt to produce a single color atom which describes both. This simplifies the resulting model. Color atoms can also be manually deleted or merged later, if desired, as described in Manual query building.
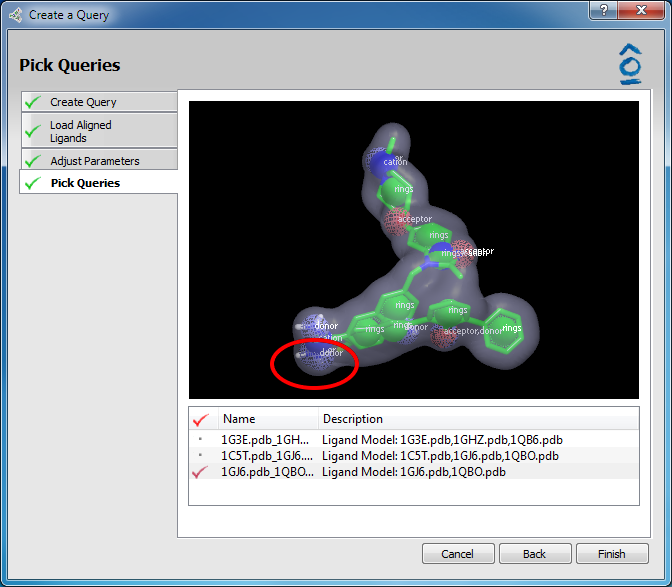
A two-ligand model produced by the model query builder
When the desired parameters are set in the Adjust Parameters dialog click Next to
begin the calculation. A progress tab will provide information on the progress
of the model building. Models are built using the color force field currently
selected in the user preferences (Edit > Preferences > vROCS,
see vROCS Preferences).
When the calculation and evaluation is complete the models best fitting the parameters, based upon TanimotoCombo score, will be displayed in the Pick Queries tab. A 3D preview window shows the model which can be rotated and zoomed. The model currently on display is highlighted in the list below the 3D display. The list gives each model’s name and a description made up of the names of the ligand(s) taken from the input ligand pool to build the model.
Clicking the Back button from the Pick Queries tab and changing any of the parameters will prompt with a warning that the previous results will be lost. To avoid losing potential queries it is advisable to first import any models of interest to the main vROCS interface before re-running the Wizard.
To import one or more models as queries to the main vROCS interface click to add a check mark in the column next to the model description. At least one check mark is required to activate the Finish button. The checked models will be imported into the Query list for a simple or validation ROCS run and each can be highlighted and viewed in the 3D window.
Queries built using the Ligand Model Builder can include many color features, some derived from each of the ligands used to build the query. This will have a couple of ramifications.
ROCS search speeds are typically slower with more color atoms
Unmatched color atoms give rise to scoring penalties and so scores using color might be lower than one might expect (e.g. TanimotoCombo score <1) compared to using a single ligand as a query. However, AUC and enrichment values will not be affected.
For these reasons it can frequently be useful to further edit the queries produced by the Ligand Model Builder and simplify them by removing some of the color features. Example candidates might be those that were not quite close enough to be merged by the Merge color atoms algorithm.
Manual Query Building
Manual query editing and building operations can be carried out on a new query (e.g. an imported ligand), a saved query file or the output from the Ligand Model Builder. To carry out the editing operations vROCS is required to be in the Edit Query mode.
Edit Query Mode: The Edit Query mode can be accessed in one of the
following ways. Either click on the Create or Edit a Query Manually
button in the Welcome screen or, at any time during an vROCS session,
click on the Edit Query icon at the top of the 3D window. While in the
editing mode the Edit Query button will be replaced by the Done Editing
button and an editing toolbar will
appear at the left of the 3D Window to select atoms, add color atoms,
delete atoms or color atoms and merge color atoms.
Editing a query
Icon |
Description |
|---|---|
Edit Query icon. Displayed in the 3D Visualization Window. Open the Edit Query panel and add the query editing icons. This icon is replaced by a Done Editing icon while in editing mode. |
|
Done Editing icon. This returns the user to the 3D visualization window and hides the editing icons once query editing is complete. This icon is only visible in editing mode. |
|
Selection mode. Click on a shape or color atom to select it. Selected atoms will be highlighted in orange. CTRL click to select multiple shape atoms or color atoms. Only all color atoms or all shape atoms can be selected using CTRL click. Right-click and drag a box to select a portion of the query including both shape and color atoms. |
|
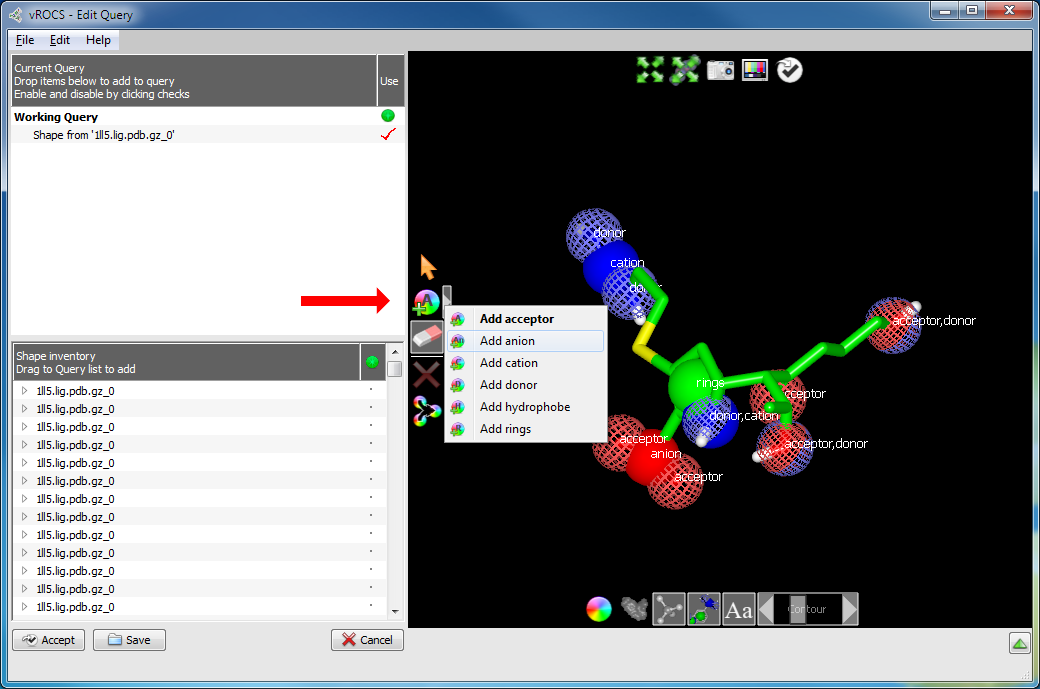
Add Color Atom mode. Click and select the desired color atom type from the pop-out menu. Choices for built-in color force fields are: 1) Acceptor (A), 2) Anion (An), 3) Cation (C), 4) Donor (D), 5) Hydrophobe (H) and 6) Rings (R). The letter on the icon indicates the currently active atom type. For other force field types, the list will be populated accordingly. |
|
Delete Atoms mode. Click on shape or color atoms to delete them from the query. Right-click and drag a box to delete all shape and color atoms currently visible within the box. |
|
Delete Selected Atoms action. Delete all currently selected atoms and/or color atoms. If there are no selected atoms, this button is disabled. |
|
Merge Color Atoms action. Merge multiple molecular fragments into a single query and merges color atoms of the same type to a single average representation. If color atoms are selected, those will be merged. If no color atoms are selected, all color atoms of the same type within 0.75 Angstroms of each other will be merged. |
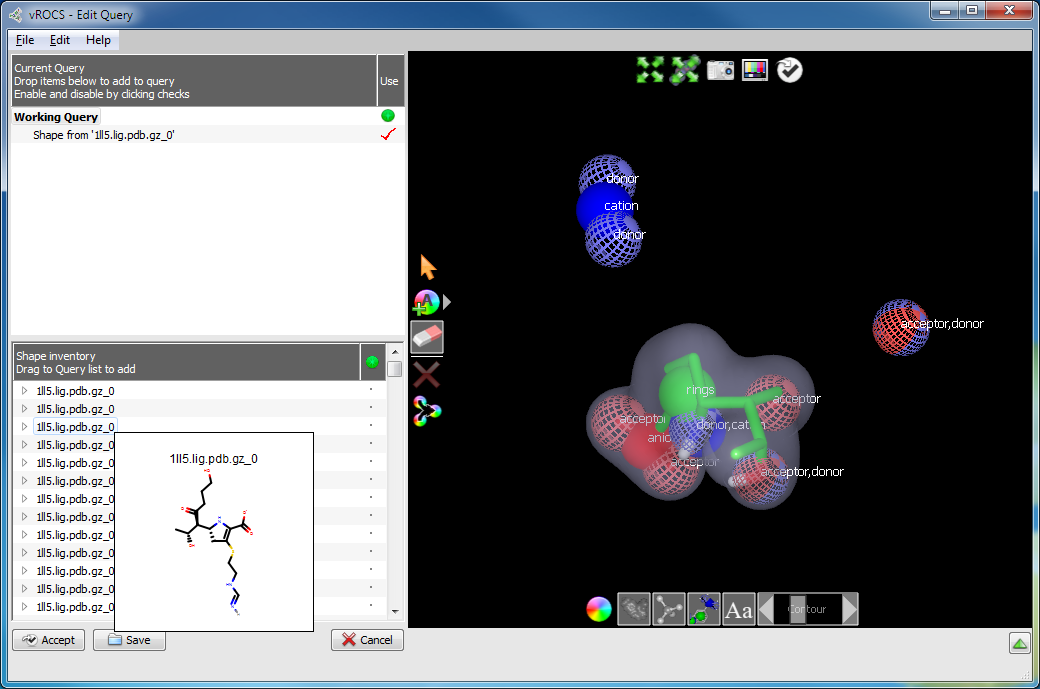
An Edit Query panel will display on the left hand side of the screen. This panel contains two areas. At the bottom is a Shape Inventory area. This lists all the open shape files that could be used in the query. These can be opened ligand or grid files, hits from an earlier ROCS run or other active queries. Items can be displayed in the 3D window by clicking their name. Molecules will be displayed as atom-colored sticks. At this stage they have no associated ROCS shape or color elements. Multiple items can be displayed together for comparison by clicking on the green visibility icon to the right of the item name on or off. Hovering over an item’s name will display a 2D depiction of the structure, if it is a molecule file.
Edit Query panel
At the top of the Edit Query panel is the Current Query area where components (e.g. atom components, color components, shape components) of the current working query are listed and can be selected or deselected. A selected item has a red check mark next to its name and will be used in the current query. Queries derived from molecules are displayed in the 3D Window as green colored sticks with atom-type colored heteroatoms. Color atoms are shown as colored spheres with labels. Grid shapes are shown as a gray, transparent surface (see Editing a query).
Any item can be moved from the Shape Inventory to the Current Query by dragging it from the bottom panel to the top panel or by right-clicking its name and selecting Add to Query. The other right-click options available in the Shape Inventory are to Delete the current item from the list or to Rename the item. A query can be made up of multiple query elements. To remove any element from the working query click on the red check mark to undisplay it or right-click on its name and select the option to Disable in Query. Other right-click options for the Current Query elements are Delete and Rename.
At any point the current working query can be saved by clicking on the
Accept button below the Shape Inventory or by File > Save Query... These are
both save as… actions and will always prompt for a filename and directory
for the file to be saved. Note that the color force field parameters used
to apply color atoms to a query are saved with the query and cannot be
changed on re-opening a saved query. The color force field is set in the
Edit > Preferences dialog (see vROCS Preferences) and can only be changed before any
molecules or shapes are loaded into vROCS. When editing is complete either
click on the Done Editing icon at the top of the 3D Window or the Use in
ROCS button below the Shape Inventory. Both will return to the display from
which the editing mode was accessed (e.g. Welcome screen or Run set-up dialog).
The manual query editing tasks available via the vROCS interface are:
Merge two or more molecules/grids.
Delete color atom(s).
Delete shape atom(s).
Add color atom(s) from one or more selected atom(s).
Alter shape atom or color atom weighting.
Merge color atom(s).
Load grid.
Add color atom(s) to grids.
Each is described in more detail below.
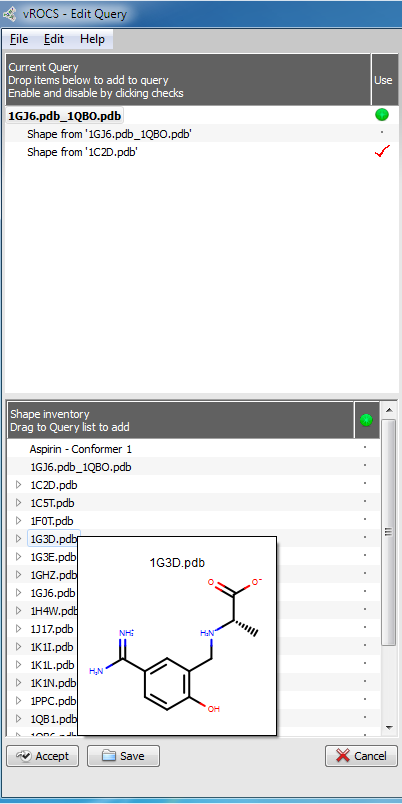
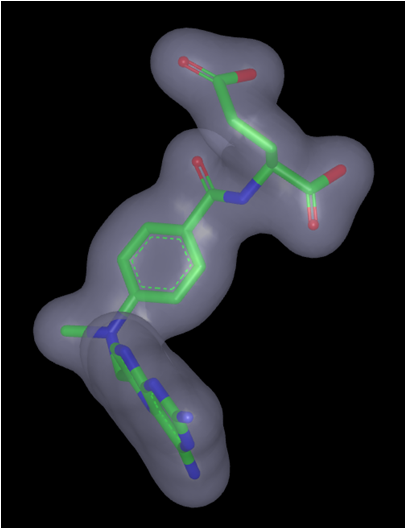
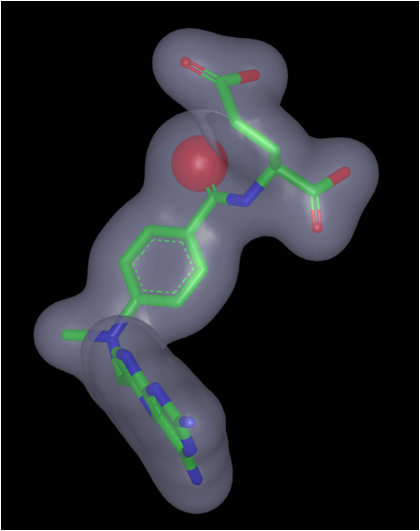
Merge two or more molecules/grids: A query can be made up of molecules and/or grids from multiple sources/files. For example, two molecular fragments that describe ligand-protein interactions at different positions in the binding pocket, as shown below.
Query built from two fragments
Open the files into the Shape Inventory using File > Open in the Edit Query
mode and then drag them to the Current Query area of the Edit Query Panel.
Each of these molecules/grids will be added to the current working query.
They should have a similar 3D coordinate frame so all portions of the query
can be viewed in the 3D window at the same time. Saving the current query
will save all constituent parts of the query together unless the red check
mark indicating Use in Current Query is checked off. The combined query
can be further edited using the options below.
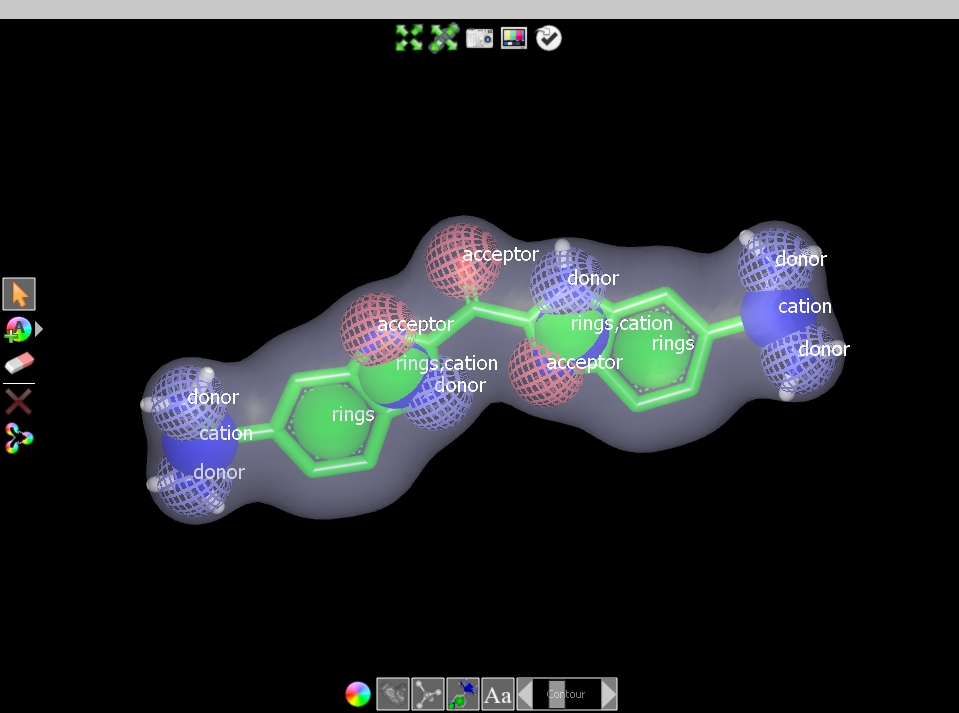
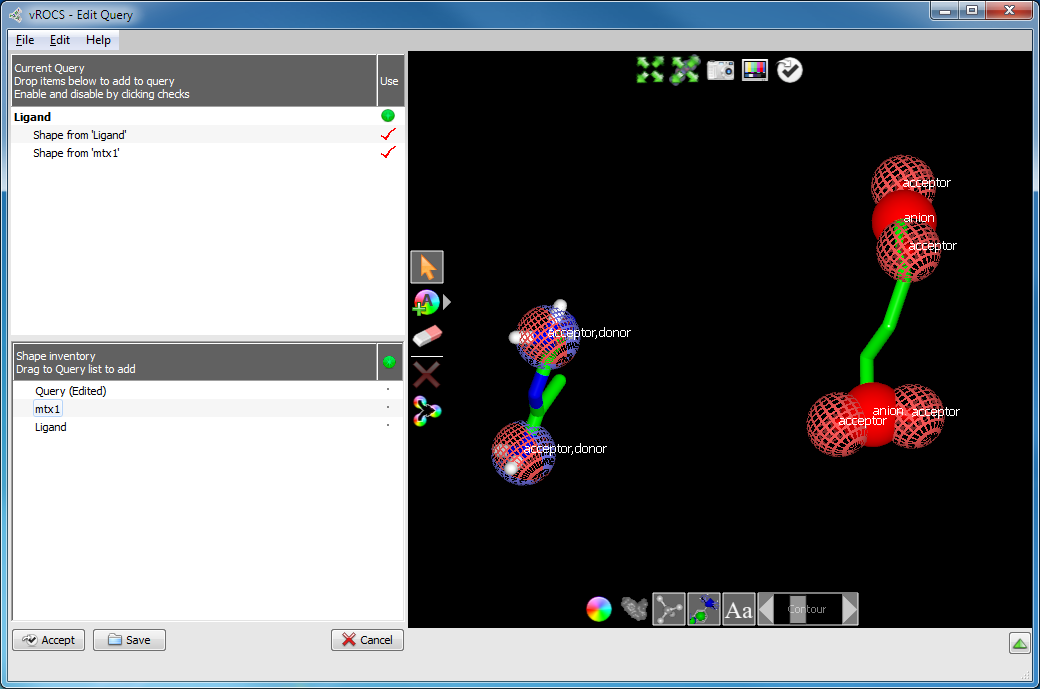
Delete color atom(s): A ligand-based query automatically has color atoms
assigned by vROCS. They are assigned using the currently selected color
force field, as applied in the checkcff (command line) utility. The default
color force field for vROCS is ImplicitMillsDean (see section Color Force
Field) but this can be changed using the Edit > Preferences
dialog (see vROCS Preferences for more details).
Color atoms can also be manually placed on atoms or grids. It can be desirable
to delete a color atom. For example, a hydroxyl oxygen atom would be assigned
as both an H-bond donor and an H-bond acceptor by vROCS as highlighted
in Deleting a color atom. However,
knowledge of your active compounds and/or receptor cavity may lead you to
believe that an acceptor is required at that position. The donor color atom
can be deleted.
Deleting a color atom
Click on the eraser icon highlighted in
Deleting a color atom, above, to activate
the Delete Atoms mode. A gray background to the button shows it
has been selected. A single left click on the color atom (or atoms)
that you wish to delete will remove that feature from the query.
In the case of the combined donor/acceptor example clicking on the
blue quadrants of the color atom will remove the donor feature and
clicking on the red quadrants will remove the acceptor.
Multiple color atoms can be deleted using sequential clicks.
At any point the Edit > Undo menu item can be used to replace a
color atom (or shape atom) that is accidentally deleted. Since
the Delete Atoms mode operates on both color and shape atoms
it is often useful to hide (undisplay) the shape atoms and
surface contour using the buttons at the bottom of the Edit Query 3D window.
To delete multiple adjacent color atoms right click and drag to draw a rectangular box around the features to be deleted with the Delete Atoms button highlighted. In this case it is desirable to display only the color atoms (hide the shape atoms and contour). This prevents other parts of the query from being deleted. The delete function only operates on the part of the query that is visible.
An alternative method is to click on the lightning bolt icon to activate the
Selection mode and select the color atom(s) to be deleted.
The grid contour may have to be hidden before the color atom(s) can be selected.
With the Selection mode active (icon highlighted gray) select
the color atom by clicking on it. Once selected the color atom is highlighted in
orange. To select multiple color atoms CTRL-click on each or right-click and
draw a box around the group. Either click on the Delete Selected Atoms button
(red ‘X’) or right-click on the highlighted color atom and select the Delete option.
Using the Selection mode is useful when multiple color atoms are to be deleted.
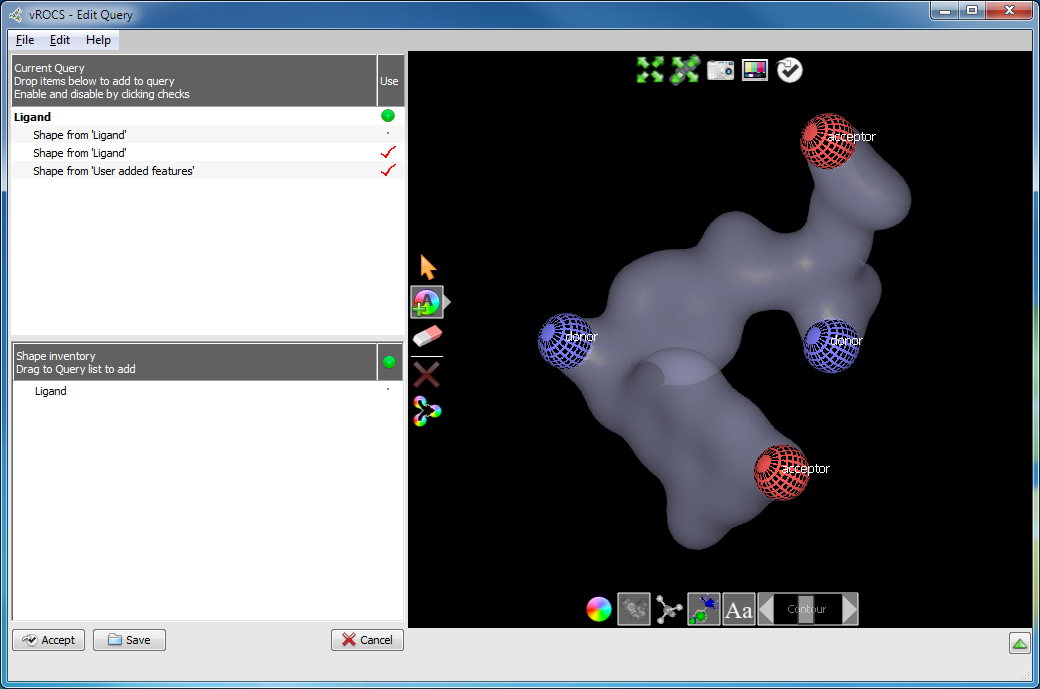
Delete shape atom(s): It can be useful to delete part of the query molecule (shape atoms) if, for example, you are starting from a large query molecule but are carrying out vHTS to identify small ligands that are a good shape fit to only part of that query. Alternatively, some parts of the known active molecule may be important for binding and another portion requires less stringent alignment so a query built only from those fragments would be useful.
Click on the Delete Atoms (eraser) button to make it the active mode. A gray
background to the button shows it has been selected. A single left
click on the shape atom (or atoms) that you wish to delete will remove
that feature from the query. Multiple shape atoms can be deleted using
sequential clicks. The portion of the shape contour associated with the
deleted shape atom(s) will also be deleted. To delete multiple adjacent
shape atoms right click and drag to draw a rectangular box around the
features to be deleted with the Delete Atoms mode button highlighted.
The Delete Atoms mode operates on both color and shape atoms and
will delete a color atom preferentially over a shape atom. The
delete function only operates on the part of the query that is visible.
Therefore it is possible to delete shape atoms but leave behind color
atoms with no associated shape in the query (as seen below)
if the color atoms are hidden during the delete operation. The utility of queries
of this nature has not been evaluated at OpenEye. It is possible that
if a conformer is able to align with the color atom outside the shape
during a ROCS alignment it may score higher than another conformer
with an equally good alignment to the shape part of the query. In that case the conformer
would receive a higher ColorTanimoto score although the ShapeTanimoto
would be unchanged. However, this is probably only the case for color atoms
close to the shape and these color atoms will not help to drive the
optimization of the shape-based alignment. Therefore, for most queries
the user should manually delete the color atoms as well as the shape atoms.
Color atoms remain after the shape atoms (and contour) have been deleted
An alternative is to select the shape atom to be deleted using the Selection
tool (lightning bolt icon). The grid contour and color atoms may have to be hidden before the
shape atom can be selected. Once selected, the shape atom is highlighted in
orange. Either click on the Delete Selected Atoms button
(red ‘X’) or right-click on the highlighted
color atom and select the Delete option.
Add color atom(s) to atoms: Color atoms can be added to shape atoms in a query molecule using the Add Color Atoms tool. This button contains a pop-out menu for selection of any color atom type for the current color force field. In the two built-in color force fields, these are acceptor (A), anion (An), cation (C), donor (D), hydrophobe (H) or rings (R). Click on any color atom type to create atoms for that color type. The button change will change the letter on the icon, as indicated in the list above, to indicate the active color atom type. In the Edit Query mode position the color atom by clicking on any atom of the ligand. Since color atoms can also be added to grids and surfaces the surface contour should be hidden before adding the color atoms. This is achieved using the Toggle Surface Contour button at the bottom of the 3D window.
If a color atom is added in error then the File > Undo option will
remove it again. Alternatively, follow the instructions to Delete
Color Atoms above.
An example of a situation where this might be useful is if the query ligand is a basic amine but you believe the N-atom is protonated at physiological pH to better interact with the protein. Deleting the Donor color atom from the N followed by adding a Cation color atom would effect this change. The overall shape of the query would be unchanged.
The Add Color Atoms button and sub-menu
An alternative method is to select the shape atom where the color
atom is to be added using the Selection mode. The grid contour
may have to be hidden before the shape atom can be selected. Once
selected the shape atom is highlighted in orange. Right-click on
the highlighted atom. A pop-up menu provides the option to
Create color atom... with a drop-down for selection of color atom type.
Move a color atom: Immediately after adding a color atom, shift + click in
a new location to move the added color atom to the geometric center of its initial
position and the new location. This allows a color atom to be positioned within a ring.
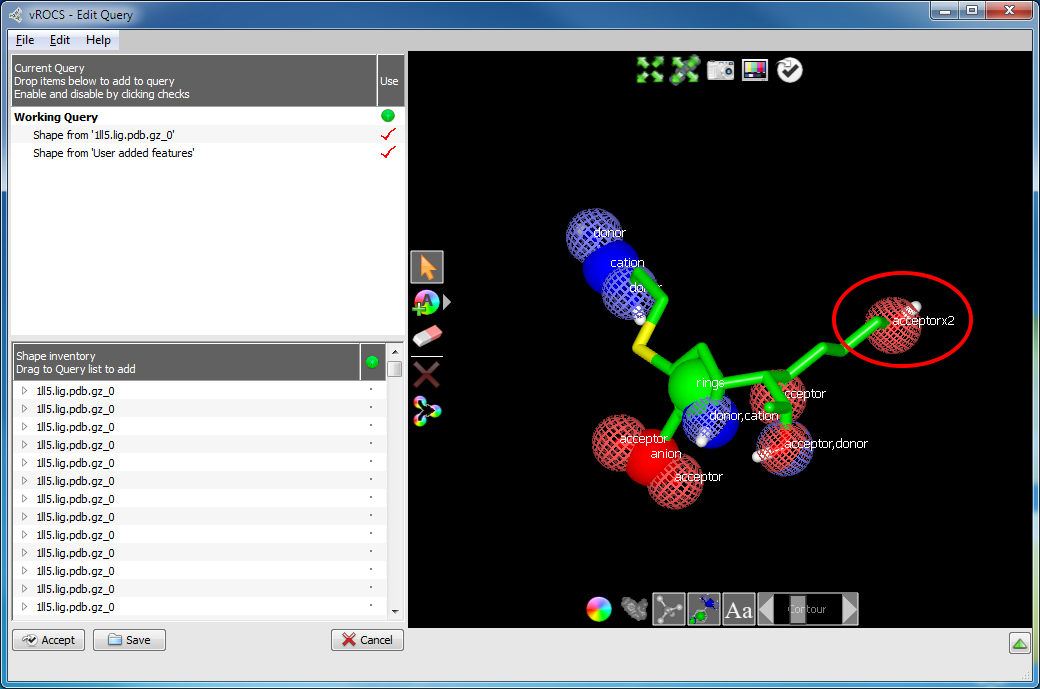
Alter shape atom or color atom weighting: Some molecular features or color interactions between a ligand and a protein are more important than others. This knowledge can be incorporated into the query to help drive the alignment and rank the hits. One way to weight only the important interactions is to delete those considered less important. However, this can cause loss of valuable information from the query. More preferred would be to increase the weighting of the important shape or color atoms while retaining the other features in the query.
Color atom weighting is achieved in a similar fashion to adding color atoms, described above. In the image below, the highlighted acceptor has been given a double weighting (acceptor x2) by adding a second acceptor feature to the hydroxyl. Select the Add Acceptor tool and click on the atom/color atom to be weighted. Similarly, use the Delete tool (eraser icon) to remove additional weighting from color atoms, exactly as previously described for deleting color atoms. The added color atoms will be listed as ‘Shape from “User Added Features”’ in the Current Query panel and can therefore also be deleted, hidden or selected for use in the current query (red check mark) in that panel. There is no limit to the increase in weighting that can be employed.
Weighting a color atom
Shape atoms can be weighted by selecting the desired shape atom with the Selection
tool so that it is highlighted in orange. Right-click on the highlighted atom and
from the pop-up menu select the option to Set shape atom strength... The strength can
be weighted from 1 (normal) to 5. This has the effect of placing up to 5 of those
atoms at that position in space. The atom will be displayed larger to indicate
its weighting and the shape contour will also be expanded, as seen for the carbonyl oxygen
below.
|
|
Methotrexate query with all shape atom weightings set to 1 (default) |
Methotrexate query with the carbonyl shape atom weighting set to 5 |
Merge color atoms: There are two cases where it may be useful to merge multiple color atoms together into a single color atom. The first occurs when a query is composed from multiple aligned molecules, resulting in color atoms of the same type lying very close to one another in space. The second case occurs when a molecule gives rise to multiple color atoms where a single color atom might better represent what the user would like to match. For example, a carboxylate group will by default be represented by two acceptor color atoms, but in some cases a single acceptor color atom, located midway between the two oxygen atoms, might be preferable. Likewise, a bicyclic ring system could be represented by a single ring color atom instead of the default two. Color atoms of the same type may be merged into a single color atom, located at the geometric centroid of the original color atoms, using the Merge Color Atoms tool.
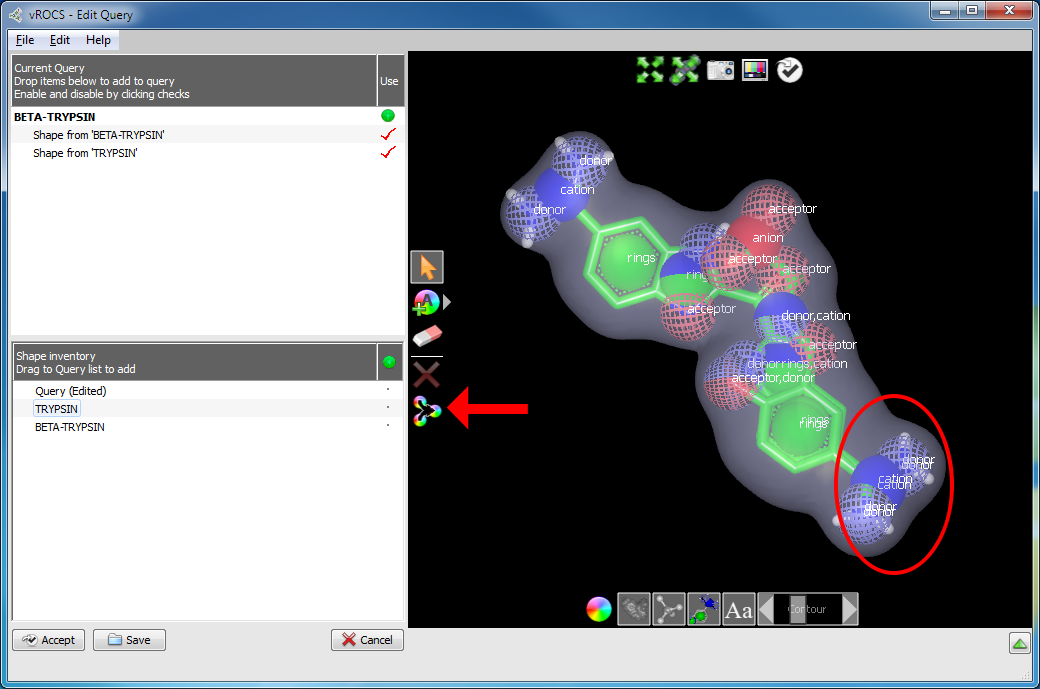
Merging color atoms
Aligned ligands from 1C2D.pdb and 1G3D.pdb in a single query. The highlighted area
illustrates where color atom merging is useful. The arrow indicates the
Merge Color Atoms button
In the Merging color atoms figure, the ligands from 1C2D.pdb and 1G3D.pdb above both possess a terminal benzamidine group, located at nearly identical positions.
Selecting the Merge Color Atoms tool when no color atoms are selected, will merge similar color atoms within 0.75 Angstroms of each other. (See the figure Merged ligands and color atoms.) To merge specific color atoms together, simply select two or more color atoms of the same type, and then use the Merge Color Atoms tool.
Note that if the current query is composed from multiple molecules, it will be collapsed into a single super molecule when color atoms are merged. This means that each individual ligand can no longer be separately selected, hidden, or deleted from the current query.
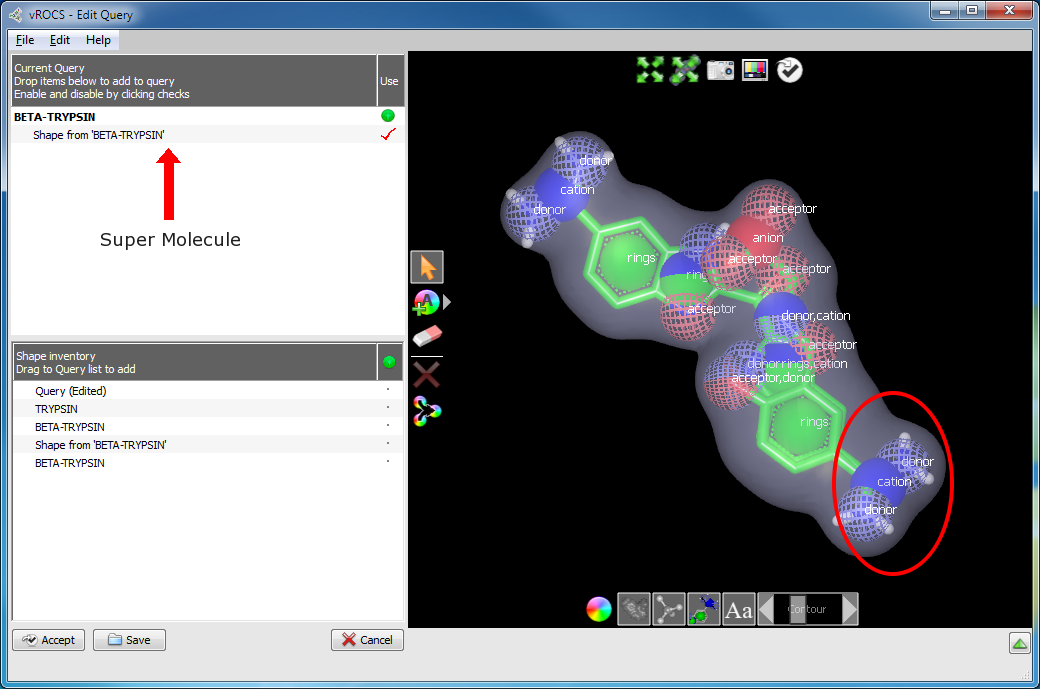
Merged ligands and color atoms
Aligned ligands from 1C2D.pdb and 1G3D.pdb in a single query (“super molecule”). The highlighted area illustrates where color atom merging simplified the query.
Load grid: The majority of ROCS queries tend to be ligand-based.
However, queries from other sources can also be useful, particularly if
no active ligand is known. This is discussed in ROCS Shape
Query Sources. Grids are loaded into the vROCS
interface in the same way as ligands, the major difference being
that no color features are automatically added to a grid. In the
Edit Query mode Use File > Open and browse to the desired grid
file. The grid will be loaded into the Shape Inventory area of
the Build Query panel from where it can be dragged up to the
Current Query.
Add color atom(s) to grids: When a grid is first loaded into vROCS it has no associated color atoms because the color atoms can only be automatically assigned to a ligand. However, adding color atoms to grid-based queries can enhance ROCS search selectivity, just as for ligand-based queries.
Color atoms can be added to grid shapes in the same manner as adding color atoms to ligands. Select the desired Add Color Atom tool (acceptor, donor, etc.) and click on the grid contour surface to place a color atom at that position on the contour surface. Clicking subsequent times on the color atom will increase the weighting for that color atom. Color atoms that one might expect to place on/near a grid surface are those that would make strong protein-ligand interactions, e.g. H-bonding.
Grid surface color features
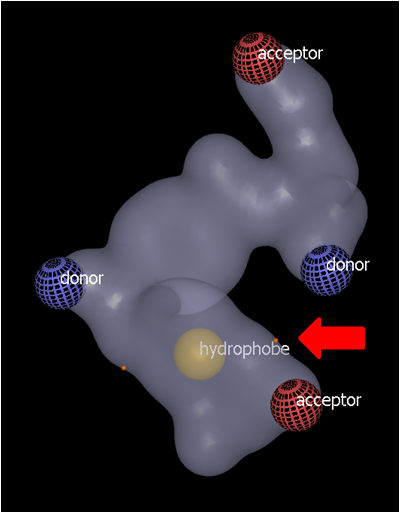
Hydrophobic and ring color atom types would normally be buried within the shape contour. These can be placed by initially clicking on the grid surface (see Grid surface color features above) and then CTRL-click elsewhere on the surface to move the color feature to the mid-point between the two surface points (see below). Additional surface points can be used to position the color atom at the desired position.

|
|
Click on the grid surface to place an initial hydrophobe feature, indicated by the yellow sphere |
CTRL-click (red arrow) to bury the feature mid-way between the two surface points (indicated by orange dots) |
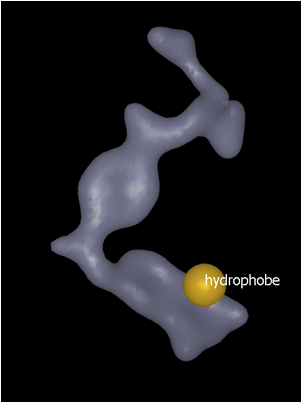
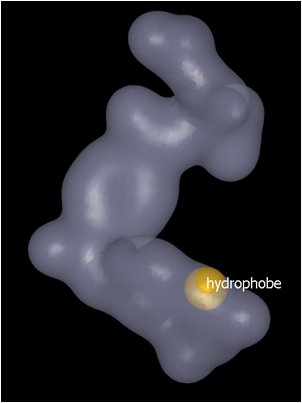
An alternative method of placing color atoms within the grid is to use the Contour level slider. The default contour level is set at 1. Increasing the contour level (up to a maximum of 3) has the effect of displaying a smaller surface shape. Place the color feature on the new contour surface (Hydrophobe feature placed on contour surface…) using the Add color atoms tool described above and then use the slider to change contour level back up to 1.0 (Contour level returned to 1.0…).
|
|
Hydrophobe feature placed on contour surface at contour level 3.0 |
Contour level returned to 1.0 results in a partially buried color atom |