Extensions
VIDA provides an Extension facility to allow users to modify and extend the user interface and general functionality of the program using Python scripting. VIDA extensions can expose functionality of all the OpenEye Toolkits (with appropriate licenses) or third party applications, and can also be used to customize VIDA’s user experience. They provide a convenient way to carry out regular tasks, streamline corporate workflows, and connect VIDA to other systems. A simple example might be the ability to search a corporate database by corporate compound ID and load that molecule into VIDA.
An individual extension is implemented as a Python module which, once installed, is imported into VIDA at startup. Extensions can be added, removed, updated, and/or disabled from the Extension Manager.
Example Extensions
A number of example extensions are available in the VIDA distribution for use as-is or as starting points for writing custom extensions (Python source code for these is included). The provided extensions are:
Alternate Location Browser: Browse through alternate conformations of a protein (as defined in a PDB file) and take snapshots of selected configurations. (Additional license required: none)
Binding Site Align: Align proteins based on binding site residues. (Additional license required: none)
Bump Checker: Displays intermolecular bump interactions. (Additional license required: none)
Center on Ligand: Automatically locates and centers the view on a ligand in a protein-ligand complex. (Additional license required: none)
Color by Atom Properties: Colors atoms by atom-level properties. (Additional licenses required: none)
Color by SD Data: Colors molecules by SD data values. (Additional licenses required: none)
Docking: Performs docking of ligands against pre-prepared receptors. (Additional license required: **OEDocking TK*)*
FastROCS Client: Submits a search to a FastROCS server, and loads the results into VIDA. (Additional license required: none. Also requires access to a FastROCS server.)
Fit: Performs shape-based alignments. (Additional licenses required: **Shape TK*, Omega TK)*
Interaction Map: Displays pattern-based intermolecular interactions. (Additional licenses required: none)
Ligand Minimizer: Perform minimizations in an active site. (Additional licenses required: **Szybki TK*)*
Molecule Alignment: Perform molecular alignments based on shape & color, sequence or RMSD. (Additional licenses required: none. Optional: **Shape TK*)*
OMEGA: Generate molecule conformations using the OMEGA software. (Additional licenses required: **Omega TK*)*
Void Volumes: Create void volumes around a ligand in a protein-ligand complex. (Additional licenses required: **Spicoli TK*)*
3D Molecule Filter: Filters lists of aligned molecules, e.g., ROCS results, based on positions of features in 3D. (Additional licenses required: none)
Although these extensions are distributed with VIDA, you will need to install them with the Extension Manager before using them.
Extension Manager
The Extension Manager is accessed under Edit > Extensions, and provides a way to add, activate, and remove extensions. Its use is illustrated here for the example extensions that ship with VIDA.
Add Extensions
To “subscribe” to the set of example extensions, open the Extension Manager, and click on the Manage Subscriptions… button to open the Manage Subscriptions dialog, then click the folder icon to browse to the directory where the example extensions are located. This will be under the OpenEye installation directory, in the subdirectory examples/vida/[version]/extensions.
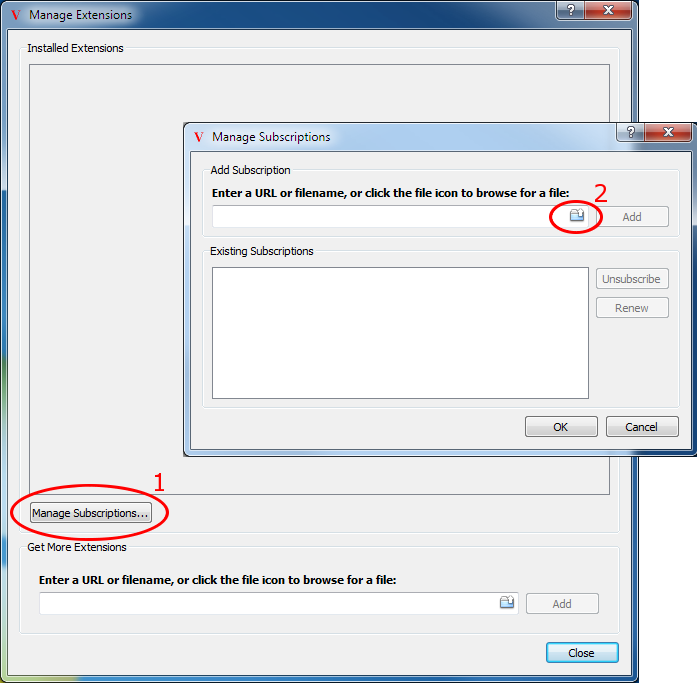
Basic steps to add extensions
There is a file in this directory named examples.pyxs. This type of file is called a subscription, and simply contains a list of URLs pointing to available extensions. Select this file, then click the Open button to install all of the subscription’s extensions. The list of extensions in the subscription will be shown in the Manage Subscriptions dialog. You can disable individual extensions using the checkboxes that appear beside each extension name.
Once a subscription has been added, an entry for each available extension will be displayed. Every extension has a name and a version (to enable updates), as well as a brief description and a list of any other required OpenEye toolkits for the extension to run. Additionally, each extension appears with four buttons: Info, Refresh, Delete, and Enable.
All of the example extensions, once added, will appear in the Extensions menu in VIDA’s main window, although custom extensions can be made to show up in other menus, as buttons in toolbars, or as other user interface elements.
Installed Extensions
The Installed Extensions list can be seen in Figure: Installed Extensions. It provides the user with the ability to view which extensions are installed as well as to update, uninstall, or disable the extension.
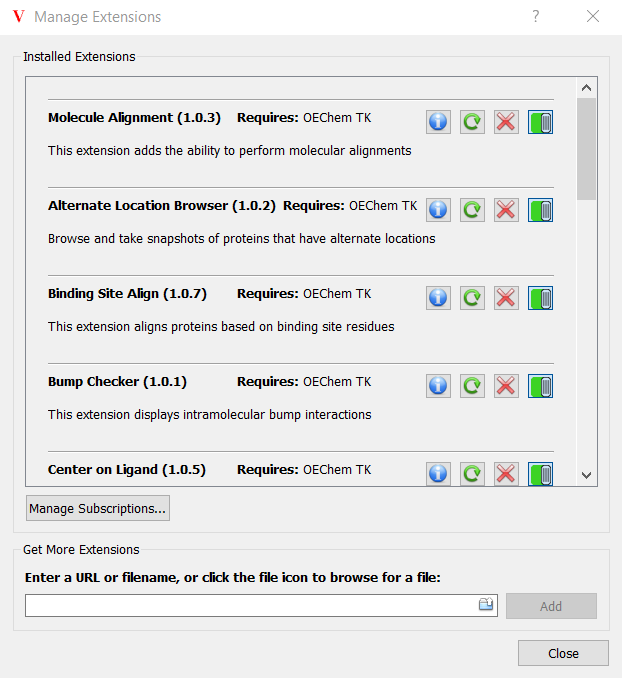
Installed Extensions
Clicking on the About button for an extension will display more detailed information about the extension than is seen in this section. Clicking on the Update button will cause VIDA to check for an updated version of the extension and if found, install it. Clicking on the Delete button will cause the extension to be uninstalled when VIDA exits. Clicking on the Disable button will prevent this extension from being imported the next time VIDA is run. A disabled extension will still be listed in the Installed Extensions section and can be reenabled by clicking on the Enable button.
Updating Extensions
VIDA checks for extension updates at startup and will install the updates directly if found. Extensions can also be manually updated using the Update buttons in the Installed Extensions list.
Managing Subscriptions
The Manage Subscriptions… button opens a dialog with a list of your current subscriptions. In this dialog you can add or remove a subscription. Removing a subscription will uninstall all of its extensions. You can also renew a subscription, which will update all of its extensions at once. In the Existing Subscriptions list, you can enable or disable individual extensions using the checkboxes next to the extension names.
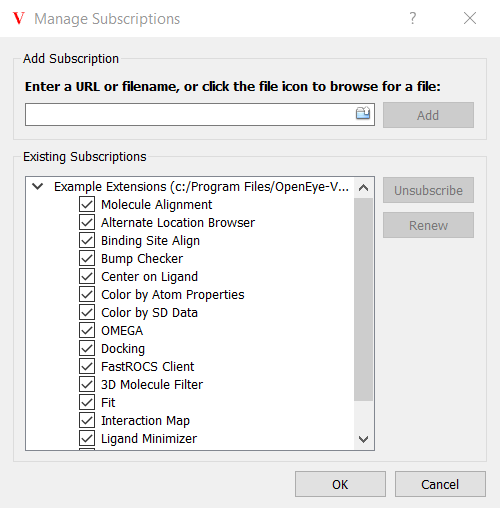
The Manage Subscriptions Dialog
Creating Extensions
Creating an extension for VIDA is very easy. At its simplest level, a
VIDA extension is simply a directory containing an __init__.py file
and any associated data files or additional scripts. Once this directory is
installed, the Python interpreter will import this extension every time the
application starts. The process of importing the extension will cause all the
code in the __init__.py file to be run.
The OEVidaExtension Base Class
Using the OEVidaExtension base class can simplify the creation of an extension script. When an extension is derived from OEVidaExtension, the following are automatically handled for you:
Importing of the PySide2 and other modules
Adding the extension to the Extensions menu
Loading of a Qt .ui file and creating a docked window from it
Providing Python access to the individual widgets in a Qt .ui file
Calling a one-time initialization function within the extension script
The basic steps for creating an extension using OEVidaExtension are:
If your extension needs a user interface, create a .ui file using Qt Designer. Give it the same first name as your extension.
Create a .pyx file (see below) containing information about the extension. The “title” record in this file is the part OEVidaExtension cares about. This step is optional during development of an extensions, but must be done before the extension is installed or deployed.
Create a Python script with a class derived from OEVidaExtension
Give your class an InitializeUI() method, where initialization of the user interface takes place
Create an object from your class. You’re done!
The following script illustrates basic use of the OEVidaExtension class:
Details for Using the OEVidaExtension Class
The constructor for OEVidaExtension accepts the following arguments:
extensionPath (Required): This should be the
__file__special variable, and is used to find the .pyx and .ui files.menuName (Optional): Specifies what menu the extension should appear in. If omitted, this defaults to ‘Extension’. If you want to specify a submenu, e.g., ‘Extensions > Proteins’, use the form ‘/Extensions/Proteins’. Note the leading forward slash character.
windowSubmenu (Optional): This specifies an optional name of a submenu in the Window menu, where this extension’s window can be toggled on and off. The default value is ‘/Extensions’, which puts an entry in an Extensions submenu of the Window menu.
command (Optional): Specifies a Python command to be issued when this extension is invoked from the menu. If left blank, selecting the extension from the menu will make its window visible.
uiFile (Optional): If the .ui file’s name does not match the extension’s name, it can be specified here.
title (Optional): Specifies a title to be used in the menus and on the title bar of the extension’s window. Used only if a title cannot be found in a .pyx file. This can be useful while developing an extension, if a .pyx file has not yet been created.
The constructor will create two member variables that may be useful:
self.ui: This is an object whose members represent the named widgets within the extension’s .ui file. For example, if a QPushButton named “myPushButton” is defined in the .ui file, you can refer to it using
self.ui.myPushButtonwithin the script.self.dockWidget: This is a QDockWidget containing the extension window. If your script needs to hide, show, or otherwise access the extension’s window, it can do so using this variable.
A class derived from OEVidaExtension must implement a method called InitializeUI(), which performs one-time initialization of the class. This method is also responsible for connecting the Qt widgets in the user interface to the methods in your class.
Some extensions won’t need a .ui file (for example, a menu item that
performs an action directly). In such a case, be sure to provide a
command argument to the constructor, since the default menu action
is to display the extension’s (in this case nonexistent) window.
Extension Preferences
The OEVidaExtension class provides several methods for managing preferences for extensions. This allows extensions to remember values from one VIDA session to the next. These preferences are stored as key-value pairs, and are preserved in state (.oes) files so that extensions can be set to a particular starting point when a state file is loaded. Preferences can be private to an individual extension, or can be “shared” among all extensions. The methods for managing preferences are:
SetPref(self, key, value, shared = False)– Sets the named preference to the specified value. In this and other methods, the shared parameter specifies whether this preference is to be shared by all extensions. If shared is true, other extensions will be notified when its value has changed, via the SharedPrefChanged method (see below).GetPref(self, key, defaultValue, shared = None)– Returns the value of a preference. If no such preference exists yet, defaultValue is returned. If shared is True, a shared preference value is returned. If shared is False, a private preference value is returned. When shared is None, the private value is returned if it exists; otherwise the shared value is returned.RemovePref(self, key, shared = False)– Removes a preference.ClearPrefs(self, shared = False)– Removes all preferences for an extension.SharedPrefChanged(self, key, value)– Called when a shared preference has changed. The default implementation of this function does nothing. You can reimplement it in a class derived from OEVidaExtension if you want your extension to do something when shared preferences change.
Notification Methods
The OEVidaExtension class provides two methods to allow extensions to be notified when VIDA is finished starting and when it is about to close. The default implementations of these methods do nothing, but you can reimplement them in derived classes to perform actions on startup and shutdown. These methods are:
StateReset(self)– Called when the state of VIDA has been reset. This happens at program startup, when a state (.oes) file has been loaded, or when all objects have been cleared using theDeleteAll()function.AppShutdown(self)– Called when VIDA is about to exit, but before preferences have been saved. Reimplement this method if your extension needs to save some preferences or perform other tasks before closing down.
Distributing Extensions
Extensions are distributed as directory archives (e.g. tar or zip files) coupled with a meta-file containing detailed information about the extension. The meta-file is a simple plain text file named with a .pyx file extension. This file is intended to provide all the associated details about the extension in an easily accessible way. The data contained in the file includes:
Author
Title
Description
Version
Name of the directory to be extracted
Required version of VIDA
Any required OpenEye toolkits
File’s own URL (so the file always knows where it came from)
URL of the directory archive containing the extension. Note that this URL can be a “short” filename, which implies that the archive can be found in the same directory as the .pyx file.
An optional specification of the order in which the extension should be loaded
When distributing multiple independent extensions it may be useful to organize them together into groups called Extension Sources or subscriptions. VIDA may subscribe to an Extension Source to get a list of available extensions for installation. The Extension Source itself (as described in Add Extensions) is a simple plain text file named with a .pyxs file extension which contains a title followed by a list of URLs to a collection of extension meta-files. These URLs can be simple file names, in which case VIDA will assume these reside in the same location as the .pyxs file.
Automatic Subscriptions
Users can be automatically subscribed to an extension source through the environment variable VIDA_EXTENSIONS_URL. When this environment variable is set to the URL of a .pyxs file, VIDA will install the full set of contained extensions without requiring any user intervention. To automatically subscribe to multiple extension sources, set the VIDA_EXTENSIONS_URL variable to a comma-separated list of URLs.