Examples
VIDA ships with a large collection of example data as well as example scripts. The examples are contained in the “examples” directory in the VIDA installation. This directory can be directly accessed from within VIDA by selecting the “Open Examples Directory” option in the “Help” menu.
A fast way to get started exploring the example data and scripts is to open
the add_menu_updating.vpy script (see Opening Files) which will add
an “Examples” menu to the main menu bar. This new menu will contain an entry
for each example data file and script provided. Selecting any one of these
options will open the associated file in the current instance of VIDA.
Data
VIDA ships with a directory of example data for the user to experiment with in the event that other input files are not immediately available. Included in this directory are:
cox2_good.sdf.gz- This is a large set of Cox-2 inhibitors which contains associated molecular data which makes this an excellent example file for use in the spreadsheet.MMFF94.mol2.gz- This is another large set of small molecules but it contains a significantly greater amount of diversity among the molecules than the previous file. This file is an excellent example file for browsing through a large data set as well as for exploring the many different ways that shape and chemistry may be visualized with VIDA.1ll5.grd- This is a grid file containing electron density data corresponding to crystallography data of the ligand structure found in the following file. It provides an excellent example of VIDA’s grid visualization capabilities and also works well to provide a context for the associated ligand file.1ll5.lig.pdb.gz- This small molecule is a beta-lactamase inhibitor positioned in its crystallographically determined binding location. This file combined with the actual beta-lactamase protein found in the following file provide an excellent example of how VIDA can be used to visualize small molecule-protein interactions. When visualizing this molecule, be sure to observe the three excellent hydrogen bonds it makes with the protein.1ll5.nolig.pdb.gz- This file contains the crystallographically determined structure of a beta-lactamase protein. Its bound inhibitor can be found in the previous file. This file is an excellent example of the many ways that proteins can be visualized in VIDA. Be sure to observe its many internal hydrogen bonds, particularly in the active site.1ll5.omega.oeb.gz- This file contains a large number of conformations of the beta-lactamase ligand (1ll5.lig.pdb.gz) generated with OpenEye’s conformer generation program OMEGA. This file is an excellent example of VIDA’s ability to handle multi-conformer molecules as well as its ability to view OMEGA output. It is important to note that this file is not in the same coordinate space as the three previous files and as such should not be expected to appear in the same location on screen with the above files.
Scripts
VIDA ships with a large directory of example scripts to both highlight the many different aspects of VIDA’s scripting capability and to help guide the user to begin developing their own scripts. Each one of the example scripts provided will be discussed in detail in the following sections. Note that not all of the example scripts will actually do anything interesting when you load them directly into VIDA. Many of them illustrate the creation of useful functions, but may not actually call these functions.
The location of the example scripts is platform-specific, but can be found from within VIDA by selecting the “Open Examples Directory” option in the “Help” menu.
add_toolbar_toggle.vpy
This example shows how to add a simple toggle button to the main application toolbar. A toggle button is different from a standard push button in that it has two potential states and can display a different icon and execute different Python commands based on the current state.
onIcon     = "mol_32"
offIcon    = "depict_32"
onCommand  = "AppMainWindowSet('2D Viewer');WindowVisibleSet('3D Viewer', False)"
offCommand = "AppMainWindowSet('3D Viewer');WindowVisibleSet('2D Viewer', False)"
tooltip    = "Toggles the main window between the 2D and 3D viewers"
update     = "AppMainWindowGet() == '2D Viewer'"
toolbar    = "Application"
name       = "ToolbarToggleMainWindowButton"

try:
    ToolbarRemove(toolbar, name)
except:
    pass

ToolbarAddToggleViaNamedIcons( onIcon, offIcon, onCommand, offCommand, tooltip, \
                               update, toolbar, name )
As seen in the example above, a toggle button also supports specification of an
update command which may be executed to determine the current state of the
button. The specified update code is normally executed when a call to
ToolbarUpdate or ToolbarItemUpdate is made.
def AppMainWindowSet( windowName, _oldAppMainWindowSet = AppMainWindowSet ):
  _oldAppMainWindowSet(windowName)
  ToolbarItemUpdate(name, toolbar)
To ensure that this particular toggle button is kept in sync with the state of
application, the AppMainWindowSet function is overridden to include a call
to ToolbarItemUpdate. This is particularly important as there are other
common pathways within VIDA which can have the same effect as toggling
this button (such as changing the main window through the Windows main menu).
calc_et.vpy
This example shows how to create a function using the OEChem and Zap Python toolkits from OpenEye to calculate the electrostatic Tanimoto between two molecules currently loaded in VIDA.
from openeye import oechem
from openeye import oezap

def CalculateET( idOrKey1, idOrKey2 ):
  tanimoto = 0.0

  try:
    PushIgnoreHint(True)
    WaitBegin()

    refmol = MoleculeGet(idOrKey1)
    oechem.OEMMFFAtomTypes(refmol)
    oechem.OEMMFF94PartialCharges(refmol)
    oechem.OEAssignBondiVdWRadii(refmol)

    fitmol = MoleculeGet(idOrKey2)
    oechem.OEMMFFAtomTypes(fitmol)
    oechem.OEMMFF94PartialCharges(fitmol)
    oechem.OEAssignBondiVdWRadii(fitmol)

    et = oezap.OEET()
    et.SetRefMol(refmol)
    tanimoto = et.Tanimoto(fitmol)

  finally:
    WaitEnd()
    PopIgnoreHint()

  return tanimoto
The CalculateET function retrieves copies of the specified molecules from
VIDA, prepares them for the calculation and then performs the actual
calculation. The resulting Tanimoto value is then returned by the function.
def CalculateETsForList( id ):
  ids = ListGetObjects(id)
  if len(ids) > 1:
    tanimoto = 0.0
    try:
      PushIgnoreHint(True)
      WaitBegin()

      refmol = MoleculeGet(ids[0])
      oechem.OEMMFFAtomTypes(refmol)
      oechem.OEMMFF94PartialCharges(refmol)
      oechem.OEAssignBondiVdWRadii(refmol)

      et = oezap.OEET()
      et.SetRefMol(refmol)

      count = 0
      total = len(ids)-1
      for id in ids[1:]:
        fitmol = MoleculeGet(id)
        oechem.OEMMFFAtomTypes(fitmol)
        oechem.OEMMFF94PartialCharges(fitmol)
        oechem.OEAssignBondiVdWRadii(fitmol)
        tanimoto = et.Tanimoto(fitmol)

        DataAdd(KeysGet(id)[0], "ET", str(tanimoto))

        ProgressbarUpdate(count, total)
        count = count + 1

    finally:
      ProgressbarUpdate(0, 0)
      WaitEnd()
      PopIgnoreHint()
The CalculateETForList function expects a VIDA list ID as a parameter.
The function will then assign the first molecule in the list to be the
reference structure against which the ET will be calculated for all the other
molecules in the list.
Instead of returning a list of ET values, the calculated ET is stored as a data
field in the application spreadsheet using the DataAdd function.
calculate_clashes.vpy
This example shows how to use the OEChem toolkit within VIDA to detect and then visualize intermolecular clashes.
from openeye import oechem

def CalculateClashes( proteinIDOrKey, ligandIDOrKey, cutoff ):
  protein = MoleculeGet(proteinIDOrKey)
  ligand  = MoleculeGet(ligandIDOrKey)

  if protein and ligand:
    try:
      PushIgnoreHint(True)
      WaitBegin()

      nbrs = oechem.OEGetNearestNbrs(protein, ligand, cutoff)
      for nbr in nbrs:
        id = MonitorDistanceCreate(nbr.GetBgn().GetKey(), nbr.GetEnd().GetKey())
        if id:
          mkey = KeysGet(id)[0]
          MonitorColorSet(mkey, OEColor(255, 0, 0))

    finally:
      PopIgnoreHint()
      WaitEnd()
The CalculateClashes function takes the IDs of two molecules and a cutoff
distance used to determine the intermolecular clashes. The clashes are
determined by calling the OEChem function OEGetNearestNbrs. Any clashes
that are found are then visualized as distance monitors (colored red) between
the clashing atoms.
cluster_browsing.vpy
This example is one of the most complicated examples included in this set as it incorporates many aspects of VIDA scripting into a single example. This example shows how one can create their own custom cluster browsing interface within VIDA using clustering information stored in the SD data of the relevant molecules.
The first part of the example attempts to locate an associated ‘.ui’ file which defines the layout of the widget used in this example. The ‘.ui’ file is expected to be located in the same directory as the script. If the ‘.ui’ file is not found, the script will throw an exception.
import os

path   = AppExampleDir()
uifile = os.path.join(os.path.join(path, "scripts"), "cluster_browsing.ui")
if not os.path.exists(uifile):
  raise IOError("Unable to locate user-interface specification: '%s'" % uifile)
A picture of the widget template defined by the ‘.ui’ file can be seen in the figure below. This widget was created using the Qt Designer application and will be loaded into an actual class using PySide2.
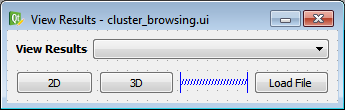
cluster_browsing Widget Template
The actual widget class is created below using PySide2. The class constructor performs the required initializations, loads the ui file, and sets up the necessary connections between the internal widgets and the classes methods.
from openeye           import vfappqt
from PySide2.QtCore    import *
from PySide2.QtWidgets import *
from PySide2           import QtUiTools

class ClusterBrowser(QWidget):

  def __init__(self):
    QWidget.__init__(self)
    self.setWindowTitle("View Results")

    # load the ui file and put it into a layout

    self.layout = QVBoxLayout()
    self.widget = QtUiTools.QUiLoader().load(uifile)
    self.layout.addWidget(self.widget)

    self.setContentsMargins(0, 0, 0, 0)
    self.setLayout(self.layout)

    # wrap the widget so we can get to the sub-widgets.
    # this uses the same names as set in Designer

    ui = self.ui = vfappqt.WrapPyQt(self.widget)

    # connect the buttons

    self.connect(ui.buttonLoad, SIGNAL("clicked()"), self.loadFile)
    self.connect(ui.comboGroups, SIGNAL("currentIndexChanged(int)"), self.changeGroup)
    self.connect(ui.button2D, SIGNAL("clicked()"), self.show2D)
    self.connect(ui.button3D, SIGNAL("clicked()"), self.show3D)

  def loadFile(self):
    cmd = "ViewClusterFile(PromptFilename('', 'Open', 'molecule', 'Open clustered results'))"
    exec(cmd)

  def changeGroup(self, index):
    data = str(self.ui.comboGroups.itemData(index).toString())
    exec(data)

  def show2D(self):
    AppMainWindowSet("2D Viewer")

  def show3D(self):
    AppMainWindowSet("3D Viewer")
Once the ClusterBrowser widget class has been defined, an actual instance
of that class needs to be created. In order to ensure that the
ClusterBrowser can be embedded into frame around the main window, a
QDockWidget is created to contain the ClusterBrowser and then added
to the right-hand side of the main window.
In addition, a menu item is added to the Tools menu which will prompt the
user to specify an input file and then will show the ClusterBrowser
widget.
widget = ClusterBrowser()
dock   = QDockWidget("Cluster Browser")
dock.setObjectName("Cluster Browser")
dock.setWidget(widget)
dock.layout().setContentsMargins(0,0,0,0)

for tw in QApplication.topLevelWidgets():
  if tw.inherits("QMainWindow"):
    tw.addDockWidget(Qt.RightDockWidgetArea, dock)
    break

dock.hide()

MenuAddButton("Tools", "Cluster View...",
			  "ViewClusterFile(PromptFilename('', 'Open', 'molecule', 'Open clustered results'))")
As described above, the molecules are expected to contain cluster information in their associated SD data. This data can be viewed and processed in the spreadsheet. To help organize this information, a custom sorting function is defined below.
def Sort(name):
  SpreadsheetHideColumn(name, "Depiction")
  if name=="Ideas":
    SpreadsheetSort(name, ["Idea"], [1,], False)
  else:
    SpreadsheetSort(name, ["VIDA ID"], [2,], False)
The ViewClustersID function defined below takes as a parameter the ID of a
list of molecules already loaded into VIDA which contain the appropriate
SD data. This function then creates a new filtered spreadsheet called “Ideas”
which only contains the cluster centroids (or “Ideas”). For each “Idea” there
is an associated “Idea Group” of other molecules. A new filtered spreadsheet
is also created for each individual “Idea Group”, although it is hidden from
the main spreadsheet tab by default.
This function also populates the drop-down menu in the ClusterBrowser
widget defined above with an entry for each of the “Idea Groups”.
maxGroups  = 0
ideas      = []
comboName  = ""

def ViewClustersID( id ):
  global comboName
  global ideas
  global maxGroups

  if not IsAList(id):
    return

  ids = ListGetObjects(id)
  if ids:
    static = True

    try:
      PushIgnoreHint(True)

      SpreadsheetFilter("Molecules",
      					"(COL('Idea')==0 or COL('Idea')) and COL('IdeaGroup')==COL('Idea')",
      					"Ideas", static)
      Sort("Ideas")
      SpreadsheetCurrentSet("Ideas")
      ct = SpreadsheetGetNumRows("Ideas")
      counts = [0]*(ct+1)
      ideas = [OEKey()]*(ct+1)
      for i in range(0, ct):
        try:
          group = int(SpreadsheetData("Ideas", i, "IdeaGroup"))
          ideas[group] = SpreadsheetGetKeyForRow("Ideas", i)
        except(Exception):
          pass

      for i in range(0, SpreadsheetGetNumRows("Molecules")):
        groupVal = SpreadsheetData("Molecules", i, "IdeaGroup")
        try:
          group = int(groupVal)
          counts[group] += 1
        except(Exception):
          pass

      AppStatusTextSet("Parsing Idea Groups", 0)

      maxGroups  = SpreadsheetGetNumRows("Ideas")
      groupNames = [ "None", "Ideas", ]
      groupCmds  = [ "ViewIdeaGroup(-2)", "ViewIdeaGroup(-1)", ]

      for i in range(0, maxGroups):
        if counts[i] > 0:
          groupNames.append("Idea Group %d (%d)" % (i, counts[i]))
          groupCmds.append("ViewIdeaGroup(%d)" % i)

      SpreadsheetCurrentSet("Ideas")
      ClearVisible()
      ClearActive()
      ClearSelection()

      Active(ideas[0])
      Visible(ideas[0], True)
      DrawMatrixSet(True)

      widget.ui.comboGroups.clear()
      for (name, cmd) in zip(groupNames, groupCmds):
        widget.ui.comboGroups.addItem(name, QVariant(cmd))
      dock.show()

    finally:
      PopIgnoreHint()
The ViewClusterFile function loads a specified molecule file and then
passes the ID of the newly created list to the ViewClustersID function
to setup the view. Before calling this function, the spreadsheet window is
hidden to prevent flickering as many spreadsheet operations take place in
the ViewClustersID function.
def ViewClusterFile( fname ):
  try:
    WaitBegin()

    ids = []
    if os.path.exists(fname):
      ids = Open(fname)
      if ids:
        WindowVisibleSet("Spreadsheet", False)
        ViewClustersID(ids[0]-1)
        WindowVisibleSet("Spreadsheet", True)

  finally:
    WaitEnd()
The ViewIdeaGroup function takes the index of an “Idea Group” as a
parameter. If the idea group exists, the associated spreadsheet will be shown.
In addition, the first 12 molecules in the “Idea Group” are displayed in tiled
mode in the main window (either 2D or 3D, depending on which option the user
has selected).
lastGroup = ""

def ViewIdeaGroup( group ):
  global lastGroup

  try:
    PushIgnoreHint(True)
    DrawMatrixSet(True)

    ClearActive()
    ClearVisible()
    ClearSelection()

    if lastGroup != "Ideas":
      SpreadsheetHideTab(lastGroup)


    if group >= -1:
      if group == -1:
        lastGroup = "Ideas"
        group     = 0
      else:
        grpQuery = "COL('IdeaGroup')==%d" % int(group)
        lastGroup  = "Grp %d" % int(group)
        SpreadsheetFilter("Molecules", grpQuery, lastGroup, True)
        Sort(lastGroup)
        SpreadsheetShowTab(lastGroup)

      SpreadsheetCurrentSet(lastGroup)
      ct = SpreadsheetGetNumRows(lastGroup)
      if (ct > 12):
        ct = 12

      Active(ideas[group])
      for i in range(0, ct):
        key = SpreadsheetGetKeyForRow(lastGroup, i)
        Visible(key, True)
    else:
      Active(ideas[0])

  finally:
    PopIgnoreHint()
docking_view.vpy
This example shows how to create a function which replicates the behavior of
the FRED View tool available under the Tools menu. The function takes a
protein ID, a ligand ID and an optional list of IDs corresponding to docking
results.
def DockingView():
  ligand = ActiveKey()
  marked = GetMarkedMolecules()
  protein = OEKey()
  if marked:
    protein = marked[0]

  if not protein.IsValid() or not ligand.IsValid():
    PromptMessage("""To create a docking view, set the desired protein to
    'marked' in the List Window, and make the ligand 'active' before calling
    this function.""")
    return

  showRibbons   = True
  showLabels    = True
  showHBonds    = True
  showSurface   = True
  residueWithin = 5.0
  surfaceWithin = 4.5
  surfColor     = "electrostatics"

  try:
    PushIgnoreHint(True);
    WaitBegin();

    ClearActive()
    ClearLocked()
    ClearVisible()

    DrawMatrixSet(False)
    BondHideHydrogenSet(True)

    Visible(protein, True)
    Visible(ligand, True)

    Lock(protein, True)
    Lock(ligand,  True)

    Select(ligand, True)
    AtomColorReferenceScoped(SelectedScope)

    SelectWithin(residueWithin, True)
    SelectInvert()

    AtomStyleSetScoped("hidden", SelectedScope)
    BondStyleSetScoped("hidden", SelectedScope)

    DrawRibbonsSet(protein, showRibbons)
    if showLabels:
      AtomLabelSet(protein, "%car")
    else:
      AtomLabelSet(protein, "")

    ClearSelection();
    if showSurface:
      surfID = SurfaceCreate("molecular", protein, True)
      if surfID:
        surfKey = KeysGet(surfID)[0]
        Select(surfKey, True)
        SurfaceColorByScoped(surfColor.lower(), "", SelectedScope)
        SurfaceTransparencySetScoped(128, SelectedScope)
        ClearSelection()
        SurfaceCropDistanceFrom(surfKey, ligand, surfaceWithin)

    if residueWithin > 3.0:
      residueWithin = residueWithin - 3.0
    ViewerFit([ligand, ], residueWithin)
    ViewerLookAt(ligand, protein)

    if showHBonds:
      ClearSelection()
      Select(protein, True)
      HBondAddTargetsScoped(SelectedScope)
      HBondShowExternalSet(True)
      HBondShowInternalSet(False)

    Visible(protein, True)

  finally:
    ClearSelection()
    WaitEnd()
    PopIgnoreHint()
As expected from the FRED View behavior, this function makes the
protein-ligand complex visible and centers the view on the ligand in the
active site. Furthermore, it adds a surface to the protein, colors and crops
the surface to a certain distance from the ligand, and hides residues a
certain distance from the ligand. The function also adds residue information
labels as well as turns on the display of hydrogen bonds.
fix_file_omega.vpy
This example incorporates widget creation using PySide2 and interaction with the OmegaTK toolkit. The example shows how OmegaTK can be used to generate new conformations for a molecule within VIDA and furthermore how the user can fix certain portions of the molecule during the conformer generation process.
The first part of the example shows how the widget is created using PySide2 from an associated ‘.ui’ file. The ‘.ui’ file is expected to be located in the same directory as the script. If the ‘.ui’ file is not found, the script will throw an exception. In addition, this part of the example also creates the OEOmega object which will be used later to generate the conformations.
import os
from PySide2.QtCore    import *
from PySide2.QtWidgets import *
from PySide2           import QtUiTools
from openeye           import vfappqt
from openeye           import oeomega

omegaWidget = QWidget()
path   = AppExampleDir()
uifile = os.path.join(os.path.join(path, "scripts"), "fix_file_omega.ui")
if os.path.exists(uifile):
  omegaWidget = QtUiTools.QUiLoader().load(uifile)
else:
  raise IOError("Unable to locate user-interface specification: '%s'" % uifile)

ui = vfappqt.WrapPyQt(omegaWidget)
omega = oeomega.OEOmega()
omega.SetRMSThreshold(0)

spinMaxConfs = ui.spinMaxConfs
spinMaxConfs.value = omega.GetMaxConfGen()

spinEWindow = ui.spinEWindow
spinEWindow.value  = omega.GetEnergyWindow()
A picture of the widget template defined by the ‘.ui’ file can be seen in the figure below.
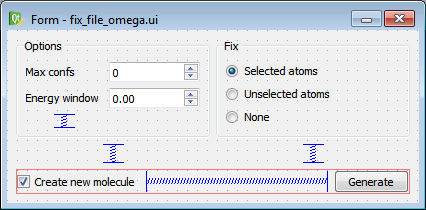
fix_file_omega Widget Template
The following example code details the actual function that will be called to generate the new conformations. It shows how configuration information is pulled from the widget as well as how the fixed portion of the molecule is determined and specified to the Omega object.
from openeye import oechem

def GenerateConfs( omega = omega ):
  try:

    AppStatusTextSet("Running omega...", 0)
    WaitBegin()
    try:

      id = ActiveID()
      if not id:
        WaitEnd()
        PromptMessage("A molecule must be focused in order to generate conformers")
        return

      mol = oechem.OEMol()
      MoleculeCheckOut(mol, id)

      omega.SetMaxConfGen(spinMaxConfs.value)
      omega.SetEnergyWindow(spinEWindow.value)

      radioS = ui.radioSelected
      radioU = ui.radioUnselected

      if radioS.isChecked() or radioU.isChecked():
        # assign a parts list, this will end up being 1 if an atom is
        # selected or 0 if not.

        parts = [0] * mol.GetMaxAtomIdx()

        # get all keys from the selected scope

        keys = {}
        for key in GetAtomsByScope(SelectedScope):
          keys[key.key] = True

        for atom in mol.GetAtoms():
          parts[atom.GetIdx()] = atom.GetKey().key in keys

        fixed = oechem.OEPartPredAtom( parts )
        if radioS.isChecked():
          fixed.SelectPart(1)
        else:
          fixed.SelectPart(0)

        fixedMol = oechem.OEMol()
        oechem.OESubsetMol(fixedMol, mol, fixed)

        # check the fixedMolecule to see if it has multiple components
        #  fix-file omega doesn't like this!

        count, components = oechem.OEDetermineComponents( fixedMol )
        if count > 1:
          PromptMessage("Your selection has more than one component, not generating conformations...")
          return

        fixedMol.SetTitle("Fixed Portion")
        omega(mol, fixed)

        # attach the fixed molecule to omega conformers so we know
        #  which portions were supposed to be fixed

        mol.SetData("Fixed Portion", fixedMol)

      else:
        omega(mol)

      if ui.checkNewMolecule.isChecked():
        id = MoleculeAdd(mol)
        Active(id)
        ViewerCenterSet(id)
      else:
        MoleculeCheckIn(mol, 0)

    except:
      import traceback, StringIO, sys

      err        = sys.stderr
      sys.stderr = StringIO.StringIO()
      traceback.print_exc()
      print( sys.stderr.getvalue() )
      sys.stderr = err

  finally:
    WaitEnd()
This final section of code connects up the function defined above to the appropriate button and then creates a menu item in a ‘Special’ menu to open the widget.
QObject.connect(ui.buttonGenerate, SIGNAL("clicked()"), GenerateConfs)

if not MenuExists('Special'):
  MenuAddSubmenu('MenuBar', 'Special')
MenuAddButton('Special', 'Omega', 'omegaWidget.show()')
load_and_split_pdb.vpy
This example shows how to load a file directly from the PDB and then split that file into its individual components. This first section details the function which fetches the molecules corresponding to the specified PDB codes and then loads them into VIDA.
import urllib.request

def LoadMoleculesFromPDB( ids ):
  if not ids:
    return

  loaded = []

  WaitBegin()
  try:
    files = []
    for id in ids.split(","):
      id  = id.strip()
      url = urllib.request.urlopen("https://files.rcsb.org/download/" + id + ".pdb.gz")
      if url:
        AppStatusTextSet("Fetching '" + id + "i", 0)
        data = url.read()
        if len(data) > 0:
          f = open(id + ".pdb.gz", "wb")
          f.write(data)
          f.close()
          files.append(id + ".pdb.gz")
        else:
          raise IOError( "PDB id (" + id + ") not found")

    if files:
      loaded = Open(files)

  finally:
    WaitEnd()

  return loaded
The following section details the LoadAndSplitPDBs function which
calls the LoadMoleculesFromPDB function defined above and then
iterates over the newly loaded molecules, splits them into their individual
components, and then removes the original complex.
def LoadAndSplitPDBs( ids ):
  PushIgnoreHint(True)
  WaitBegin()

  try:
    loaded = LoadMoleculesFromPDB( ids )
    for pdb in loaded:
      listid = pdb - 1
      MoleculeNewSubset(listid, pdb, True)
      Delete(pdb)

  finally:
    WaitEnd()
    PopIgnoreHint()
This final section shows how a new menu item is created to prompt the user for the desired PDB codes and then to call the above function. This section also shows how to replace the command associated with a menu item in the event that the menu item has already been created.
menu    = "Open Special"
name    = "From PDB (Split) ..."
command = "LoadAndSplitPDBs(PromptString('Enter PDB code(s)'))"

if MenuHasItem(menu, name):
  MenuButtonActionSet(menu, name, command)
else:
  MenuAddButton(menu, name, command)
molecule_alignment.vpy
This example shows how to create a moderately complex widget using PySide2 to perform molecule alignments using one of a variety of techniques including: shape & color, RMSD, or sequence.
The following block of code shows the function which performs the shape and color alignment of two specified molecules using the OEChem and OEShape toolkits.
from openeye import oechem
from openeye import oeshape

def DoShapeAlign( id1, id2 ):
  refmol = MoleculeGet(id1)
  fitmol = oechem.OEMol()
  MoleculeCheckOut(fitmol, id2)

  best = oeshape.OEBestOverlay()
  best.SetColorForceField(oeshape.OEColorFFType_ImplicitMillsDean)
  best.SetColorOptimize(True)
  if not best.SetRefMol(refmol):
    raise Exception("Unable to set refmol as a reference molecule")

  scoreiter = oeshape.OEBestOverlayScoreIter()
  oeshape.OESortOverlayScores(scoreiter, best.Overlay(fitmol), oeshape.OEHighestTanimotoCombo())
  score = scoreiter.Target()

  fitmol.SetActive(fitmol.GetConf(oechem.OEHasConfIdx(score.fitconfidx)))
  score.Transform(fitmol)

  oechem.OESetSDData(fitmol, "Tanimoto",      "%-.3f" % score.tanimoto)
  oechem.OESetSDData(fitmol, "ColorTanimoto", "%-.3f" % score.GetColorTanimoto())
  oechem.OESetSDData(fitmol, "TanimotoCombo", "%-.3f" % score.GetTanimotoCombo())

  MoleculeCheckIn(fitmol, 0)
  Visible(id2, True)
The following block of code shows the function which performs the RMSD alignment of two specified molecules using the OEChem toolkit. Note that before the alignment is done, the graphs of the two molecules are compared by the generation of canonical SMILES.
from openeye import oechem

def DoRMSDAlign( id1, id2 ):

  refmol = MoleculeGet(id1)
  fitmol = oechem.OEMol()
  MoleculeCheckOut(fitmol, id2)

  smiles1 = oechem.OECreateCanSmiString(refmol)
  smiles2 = oechem.OECreateCanSmiString(fitmol)
  if ( smiles1 != smiles2 ):
    PromptError("Connection table is not the same for refmol and fitmol molecule")
    return

  numconfs     = fitmol.GetMaxConfIdx()
  rmsds        = oechem.OEDoubleArray(numconfs)
  rotations    = oechem.OEDoubleArray(9 * numconfs)
  translations = oechem.OEDoubleArray(3 * numconfs)

  result = oechem.OERMSD(refmol, fitmol, rmsds, True, True, True, rotations, translations)
  if not result:
    PromptError("RMSD failed")

  rotations    = list(rotations)
  translations = list(translations)

  indices     = [ (rmsd, index) for index, rmsd in enumerate(rmsds) ]
  rmsd, index = min(indices)

  conformer   = fitmol.GetConf(oechem.OEHasConfIdx(index))
  rotation    = oechem.OEDoubleArray( rotations   [index*9:index*9 + 9] )
  translation = oechem.OEDoubleArray( translations[index*3:index*3 + 3] )

  oechem.OERotate(conformer, rotation)
  oechem.OETranslate(conformer, translation)
  MoleculeCheckIn(fitmol, 0)
  Visible(id2, True)
The following block of code shows the function which performs the sequence alignment of two specified proteins using the OEChem toolkit. Note that a check for residue information is performed on both molecules to ensure that a sequence alignment is even feasible.
After the alignment is performed in this function, the two molecules are both made visible, uniquely colored and displayed in ribbon style.
from openeye import oechem

def DoSequenceAlign( id1, id2 ):
  ref = MoleculeGet(id1)
  fit = oechem.OEMol()
  MoleculeCheckOut(fit, id2)

  for atom in ref.GetAtoms():
    idx = oechem.OEGetResidueIndex(atom)
    if idx >= oechem.OEResidueIndex_ALA and idx <= oechem.OEResidueIndex_VAL:
      break
  else:
    PromptError("Reference molecule has no amino acids")
    return

  for atom in fit.GetAtoms():
    idx = oechem.OEGetResidueIndex(atom)
    if idx >= oechem.OEResidueIndex_ALA and idx <= oechem.OEResidueIndex_VAL:
      break
  else:
    PromptError("Fit molecule has no amino acids")
    return

  sequenceAlignment = oechem.OEGetAlignment(ref, fit)
  rotation          = oechem.OEDoubleArray(9)
  translation       = oechem.OEDoubleArray(3)

  rms = oechem.OERMSD(ref, fit, sequenceAlignment, True, True, rotation, translation)
  oechem.OERotate(fit, rotation)
  oechem.OETranslate(fit, translation)

  try:
    PushIgnoreHint(True)
    MoleculeCheckIn(fit, 0)

    ClearVisible();
    Visible(id1, True)
    Visible(id2, True)
    ViewerCenterSetScoped(VisibleScope, True)
    ViewerFit()
    ColorUniqueScoped(VisibleScope)
    DrawRibbonsSetScoped(True, VisibleScope);
    MoleculeStyleSetScoped("hidden", VisibleScope)

  finally:
    PopIgnoreHint()
The following section shows how the main widget is hand-coded (as opposed to using a ‘.ui’ file from Qt Designer) using PySide2.
from PySide2.QtCore    import *
from PySide2.QtWidgets import *

dock   = QDockWidget("Molecule Alignment")
widget = QWidget()

refmol =  QPushButton('Reference', widget)
refmol.setToolTip('Select a reference molecule to align to')

fitmol = QPushButton('Molecule', widget)
fitmol.setToolTip('Select a molecule that will be aligned')

refmolName = QLabel('Reference ID:', widget)
fitmolName = QLabel('ID:', widget)

refmolID = QLabel('', widget)
fitmolID = QLabel('', widget)

technique = QComboBox(widget)
technique.addItem("shape+color")
technique.addItem("sequence")
technique.addItem("rmsd")

go         = QPushButton('Align', widget)
go.setToolTip('Align two molecules')
go.setEnabled(False)

gbox = QGridLayout(widget)
gbox.addWidget( refmolName, 0,   0 )
gbox.addWidget( fitmolName, 1,   0 )
gbox.addWidget( refmolID,   0,   1 )
gbox.addWidget( fitmolID,   1,   1 )
gbox.addWidget( refmol,     0,   2 )
gbox.addWidget( fitmol,     1,   2 )
gbox.addWidget( technique,  2,   1 )
gbox.addWidget( go,         2,   2 )

widget.setLayout(gbox)
dock.setWidget(widget)
This next section shows the definition of all the functions that provide the interface between the widget and the desired actions.
def CanAlign(refID = refmolID, fitID = fitmolID, btn = go):
  try:
    id1 = int(refID.text())
    id2 = int(fitmolID.text())
    btn.setEnabled(bool(id1 and id2))
  except:
    btn.setEnabled(False)

def GetFitMol(refID = refmolID, fitID = fitmolID, btn = go):
  try:
    id = PromptID(['M'])
    if id:
        fitID.setText(str(id))
  except:
    pass

  CanAlign(refID, fitID, btn)

def GetRefMol(refID = refmolID, fitID = fitmolID, btn = go):
  try:
    id = PromptID(['M'])
    if id:
        refID.setText(str(id))
  except:
    pass

  CanAlign(refID, fitID, btn)

def Align(refID = refmolID, fitID = fitmolID, method = technique):
  try:
    try:
      id1 = int(refID.text())
      id2 = int(fitID.text())
    except:
      return

    if id1 == 0 or id2 == 0:
      return

    if method.currentText == "shape+color":
      DoShapeAlign(id1, id2)
    elif method.currentText == "rmsd":
      DoRMSDAlign(id1, id2)
    elif method.currentText == "sequence":
      DoSequenceAlign(id1, id2)

  except:
    import traceback
    traceback.print_exc()
This final section shows how the widget buttons are connected up to the support functions defined in the section above.
QObject.connect(refmol, SIGNAL("clicked()"), GetRefMol)
QObject.connect(fitmol, SIGNAL("clicked()"), GetFitMol)
QObject.connect(go, SIGNAL("clicked()"), Align)
open_from_pdb.vpy
This example shows how to load one or molecule molecules directly from the PDB. The following section details the function which fetches the molecule(s) from the PDB corresponding to the specified PDB code(s) and then loads them into VIDA.
import urllib.request

def LoadMoleculesFromPDB( ids ):
  if not ids:
    return

  loaded = []

  WaitBegin()
  try:
    files = []
    for id in ids.split(","):
      id  = id.strip()
      url = urllib.request.urlopen("https://files.rcsb.org/download/" + id + ".pdb.gz")
      if url:
        AppStatusTextSet("Fetching '" + id + "i", 0)
        data = url.read()
        if len(data) > 0:
          f = open(id + ".pdb.gz", "wb")
          f.write(data)
          f.close()
          files.append(id + ".pdb.gz")
        else:
          raise IOError("PDB id (" + id + ") not found")

    if files:
      loaded = Open(files)

  finally:
    WaitEnd()

  return loaded
This final section shows how a new menu item is created to prompt the user for the desired PDB codes and then to call the above function. This section also shows how to replace the command associated with a menu item in the event that the menu item has already been created.
menu    = "Open Special"
name    = "From PDB..."
command = "LoadMoleculesFromPDB(PromptString('Enter PDB code(s)'))"

if MenuHasItem(menu, name):
  MenuButtonActionSet(menu, name, command)
else:
  MenuAddButton(menu, name, command)
override_open_1.vpy
This example shows how to override the Open function in VIDA to
customize the behavior when a file is opened. In this case, the original
function is cached so that it can be called later within the new function.
Once the file has been loaded, this function iterates over all the newly
loaded molecules looking for atoms with formal charges. If a formal charge
is found, a label corresponding to the charge is added to that atom.
_oldOpen = Open

def Open( *a, **kw ):
  PushIgnoreHint(True)
  try:
    ids   = _oldOpen(*a, **kw)
    total = len(ids)
    count = 0

    for id in ids:
      hasChg = False
      mol    = MoleculeGet(id)
      for atom in mol.GetAtoms():
        if atom.GetFormalCharge() != 0:
          hasChg = True
          break

      if hasChg:
        for key in KeysGet(id):
          AtomLabelSet(key, "%f")

      ProgressbarUpdate(count, total)
      count  = count + 1

  finally:
    ProgressbarUpdate(0, 0)
    PopIgnoreHint()

  return ids
override_open_2.vpy
This example shows how to override the Open function in VIDA to
customize the behavior when a file is opened. In this case, the original
function is cached so that it can be called later within the new function.
Once the file has been loaded, this function iterates over all the newly
loaded molecules looking for molecules that do not have a dimension of 3.
In cases where the dimension is not 3, 3D coordinates are generated for the
molecule using Omega.
from openeye import oechem
from openeye import oeomega

omega = oeomega.OEOmega()
omega.SetMaxConfs(1)

_oldOpen = Open

def Open( *a, **kw ):
  global omega

  WaitBegin()
  PushIgnoreHint(True)

  # Suppress any informational and warning messages generated
  # in the following block of code

  level = oechem.OEThrow.GetLevel()
  oechem.OEThrow.SetLevel(oechem.OEErrorLevel_Error)

  try:
    ids   = _oldOpen(*a, **kw)
    total = len(ids)
    count = 0

    for id in ids:
      mol = MoleculeGet(id)
      if mol and mol.GetDimension() != 3:
        mol = oechem.OEMol()
        MoleculeCheckOut(mol, id)
        omega(mol)
        MoleculeCheckIn(mol, 0)

      ProgressbarUpdate(count, total)
      count  = count + 1

  finally:
    oechem.OEThrow.SetLevel(level)

    ProgressbarUpdate(0, 0)
    PopIgnoreHint()
    WaitEnd()

  return ids
search_chemspider.vpy
This example shows how to search ChemSpider using the active molecule as a query. The active molecule is converted to a SMILES string which is inserted into the ChemSpider search URL.
from openeye import oechem

def SearchChemSpider( key ):
  if not key.IsValid():
    return

  mol = MoleculeGet(key)
  if mol:
    smiles = oechem.OECreateSmiString(mol)
    if smiles:
      AppOpenUrl("http://www.chemspider.com/Search.aspx?q=" + smiles)
The following section shows how the above function is bound to a button which is placed in the main application toolbar.
icon    = "find_32"
command = "SearchChemSpider(ActiveKey())"
tooltip = "Search ChemSpider for the active molecule"
toolbar = "Application"
name    = "ToolbarChemSpiderButton"

try:
    ToolbarRemove(toolbar, name)
except:
    pass

ToolbarAddViaNamedIcon( icon, command, tooltip, toolbar, name )
search_pubchem.vpy
This example shows how to search PubChem using the active molecule as a query. An IUPAC name is generated for the active molecule using the OpenEye Lexichem toolkit. The generated name (if valid) is then inserted into the PubChem search URL.
from openeye import oechem
from openeye import oeiupac

def SearchPubChem( key ):
  if not key.IsValid():
    return

  mol = MoleculeGet(key)
  if mol:
    name = oeiupac.OECreateIUPACName(mol)
    if name and not "blah" in name.lower():
      AppOpenUrl('http://www.ncbi.nlm.nih.gov/sites/entrez?db=pccompound&term="' + name + '"')
The following section shows how the above function is bound to a button which is placed in the main application toolbar.
icon    = "find_32"
command = "SearchPubChem(ActiveKey())"
tooltip = "Search PubChem for the active molecule"
toolbar = "Application"
name    = "ToolbarPubChemButton"

try:
    ToolbarRemove(toolbar, name)
except:
    pass

ToolbarAddViaNamedIcon( icon, command, tooltip, toolbar, name )
simple_pyside2.vpy
This example shows how to create a very simple widget with a functioning button using PySide2 and how to display it within VIDA.
from PySide2.QtCore    import *
from PySide2.QtWidgets import *

class SimpleWidget(QWidget):

  def __init__(self):
    QWidget.__init__(self)
    self.setWindowTitle("Example")

    self.button = QPushButton(self)
    self.button.setText("Push Me")
    self.layout = QVBoxLayout()
    self.layout.addWidget(self.button)
    self.setLayout(self.layout)
    self.resize(200, 50)

    self.connect(self.button, SIGNAL("clicked()"), self.ButtonPushed)

  def ButtonPushed(self):
    PromptMessage("Button Pushed")

widget = SimpleWidget()
widget.show()
void_volumes.vpy
This example shows how to create a function which generates and then loads into VIDA the calculated void volume between a protein and a ligand.
from openeye import oechem
from openeye import oegrid
from openeye import oespicoli

def CalcVoidVolumes( proteinIDOrKey, ligandIDOrKey ):
  protein = MoleculeGet(proteinIDOrKey)
  ligand  = MoleculeGet(ligandIDOrKey)

  id = 0
  if not protein or not ligand:
    return id

  try:
    PushIgnoreHint(True)
    WaitBegin()

    oechem.OEAssignBondiVdWRadii(protein)
    oechem.OEAssignBondiVdWRadii(ligand)

    grid = oegrid.OEScalarGrid()
    oespicoli.OEMakeVoidVolume(protein, ligand, grid, 0.5)

    surf = oespicoli.OESurface()
    oespicoli.OEMakeSurfaceFromGrid(surf, grid, 0.5)
    id = SurfaceAdd(surf)
    Visible(id, True)

  finally:
    WaitEnd()
    PopIgnoreHint()

  return id